If you have waist and hip measurements that put you into different sizes, you may need to grade between sizes. In this blog post, we show you how to grade between sizes on the Meriam Trousers and Creston Jeans.
Meet the Meriam Trousers: woven pants you’ll actually enjoy wearing. The Meriam has the classic details you love in a trouser: a zip fly with a hidden closure, front slash pockets, straight legs, and optional back welt pockets. But best of all, you’ll get a fabulously comfortable fit with a flex waistband that gently expands as you sit down, plus the option of a full bum adjustment piece, already done for you.
Want even more fitting and sewing instruction? In our newest workshop, Pants Making for Curves, curvy fitting expert Jenny Rushmore takes you through the process of sewing a pair of Meriam Trousers, from choosing your size and fabric all the way to the final hem. With step-by-step video lessons and loads of fitting and sewing tips throughout, you’ll create your perfectly tailored trousers with confidence. This class comes with a free copy of the Meriam Trousers pattern.

Grading between sizes on the Meriam Trousers
The Meriam Trousers are a little different to grade than regular trousers due to the innovative flex waistband, but this tutorial will lead you through the steps.
Start by determine what size waist and hip you need using this tutorial. It’ll also help you assess if you need any rise adjustments.
Then, print out the Meriam Trousers pattern with both sizes that you’re grading between. If you’re adjusting the rise, do that first before you move on to grading.
Prefer to learn by watching? Check out these grading excerpts from Pants Making for Curves! (Prefer to learn through illustrations? Then read on…)
How to grade from a smaller waist size to a larger hip size
For this example we will be grading from a 20 waist to a 24 hips.
Grading the Front Leg
To begin, we are going to tape all the pocket pieces together with the front leg so that we only need to make our changes once – they’ll be joined as if they were being sewn so the all pocket pieces will end up behind the front piece, and when it’s all laid flat it’ll look like the final garment. Use the pocket pieces associated with your WAIST size – in this case the size 20.
As we will be grading out from the waist to the hips we will need to add some extra paper along the outer edges of the pocket pieces. Tape a 1″ wide strip of paper to the side seam edge of lower pocket (5), pocket facing (6) and top pocket (7).
1. Temporarily tape the pocket facing (6) on top of the lower pocket (5) aligning notches.
2. The top pocket (7) will be taped behind the front (1). In order to tape it in the correct location, you will need to transfer the waistband size lines onto the back of the pattern piece. If you can not easily see through the pattern piece to do this, hold it up to a window. Mark for about 3″ in each direction from the top outer corner at the waistband size (size 20). Temporarily tape the top pocket (7) behind the front (1) aligning the pocket edge and top edge with your waistband size (size 20).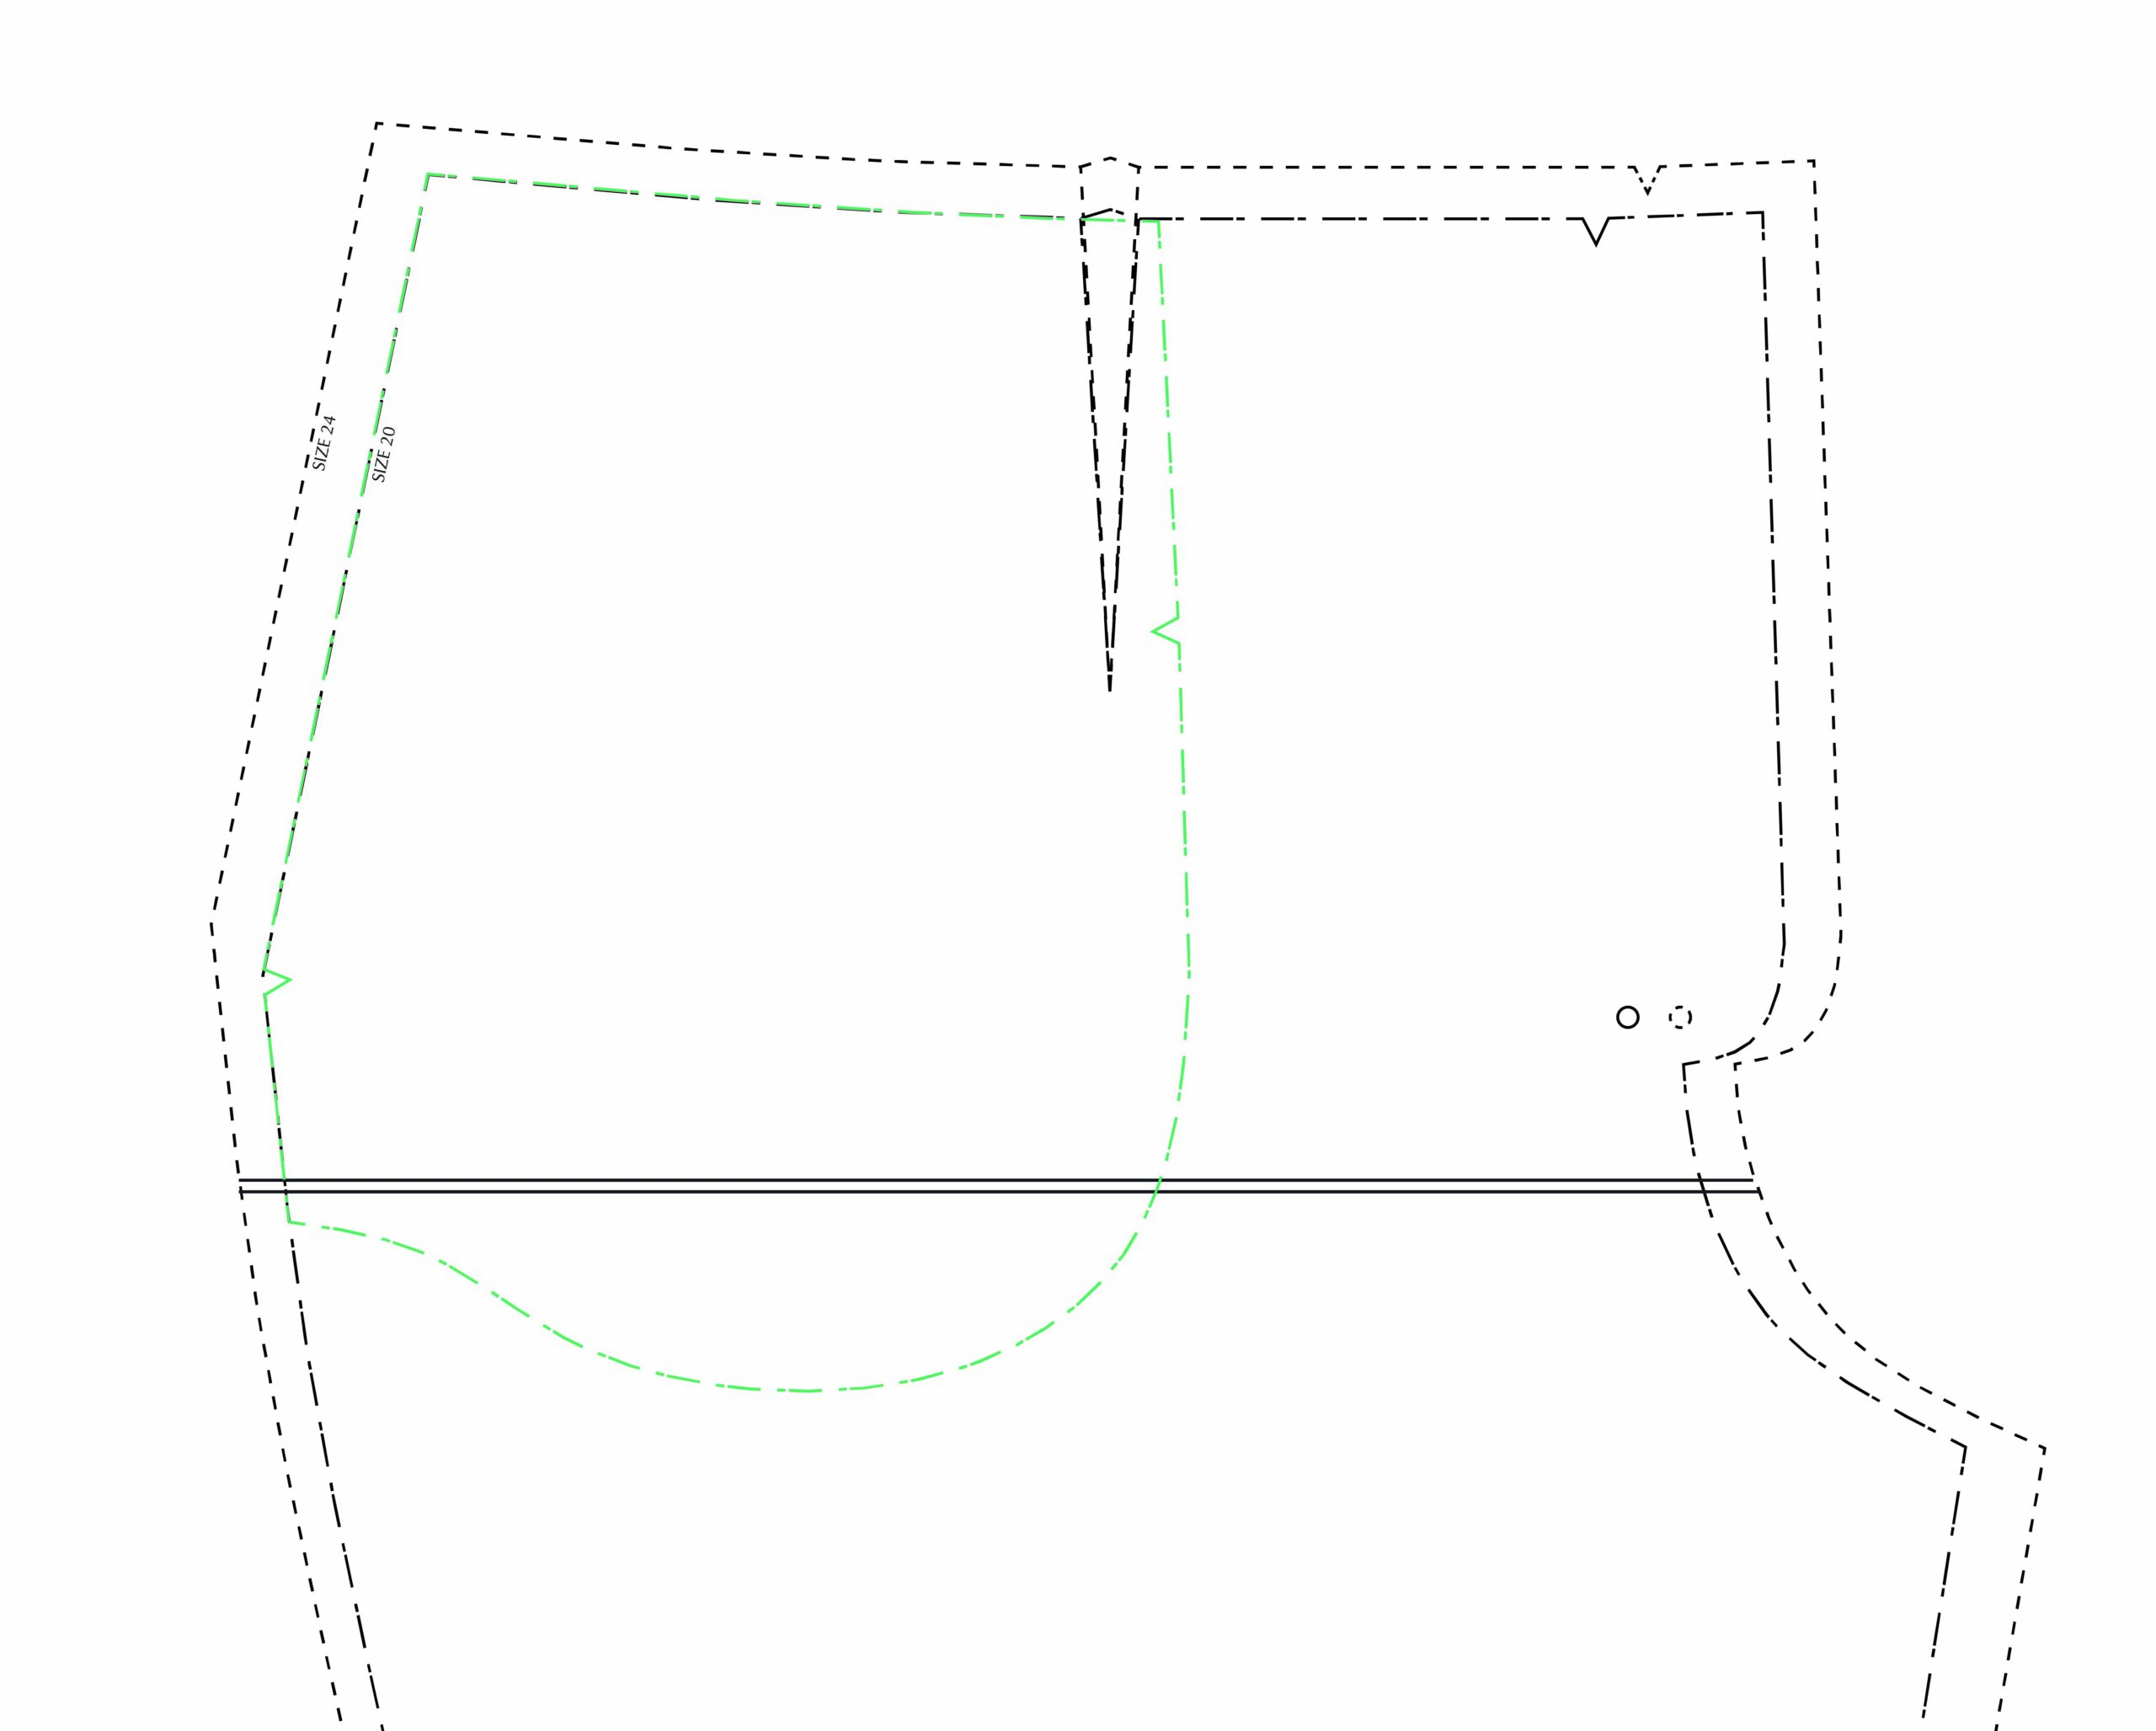
3. Temporarily tape the lower pocket (5) and pocket facing (6) behind the top pocket (7), aligning the two pocket pieces.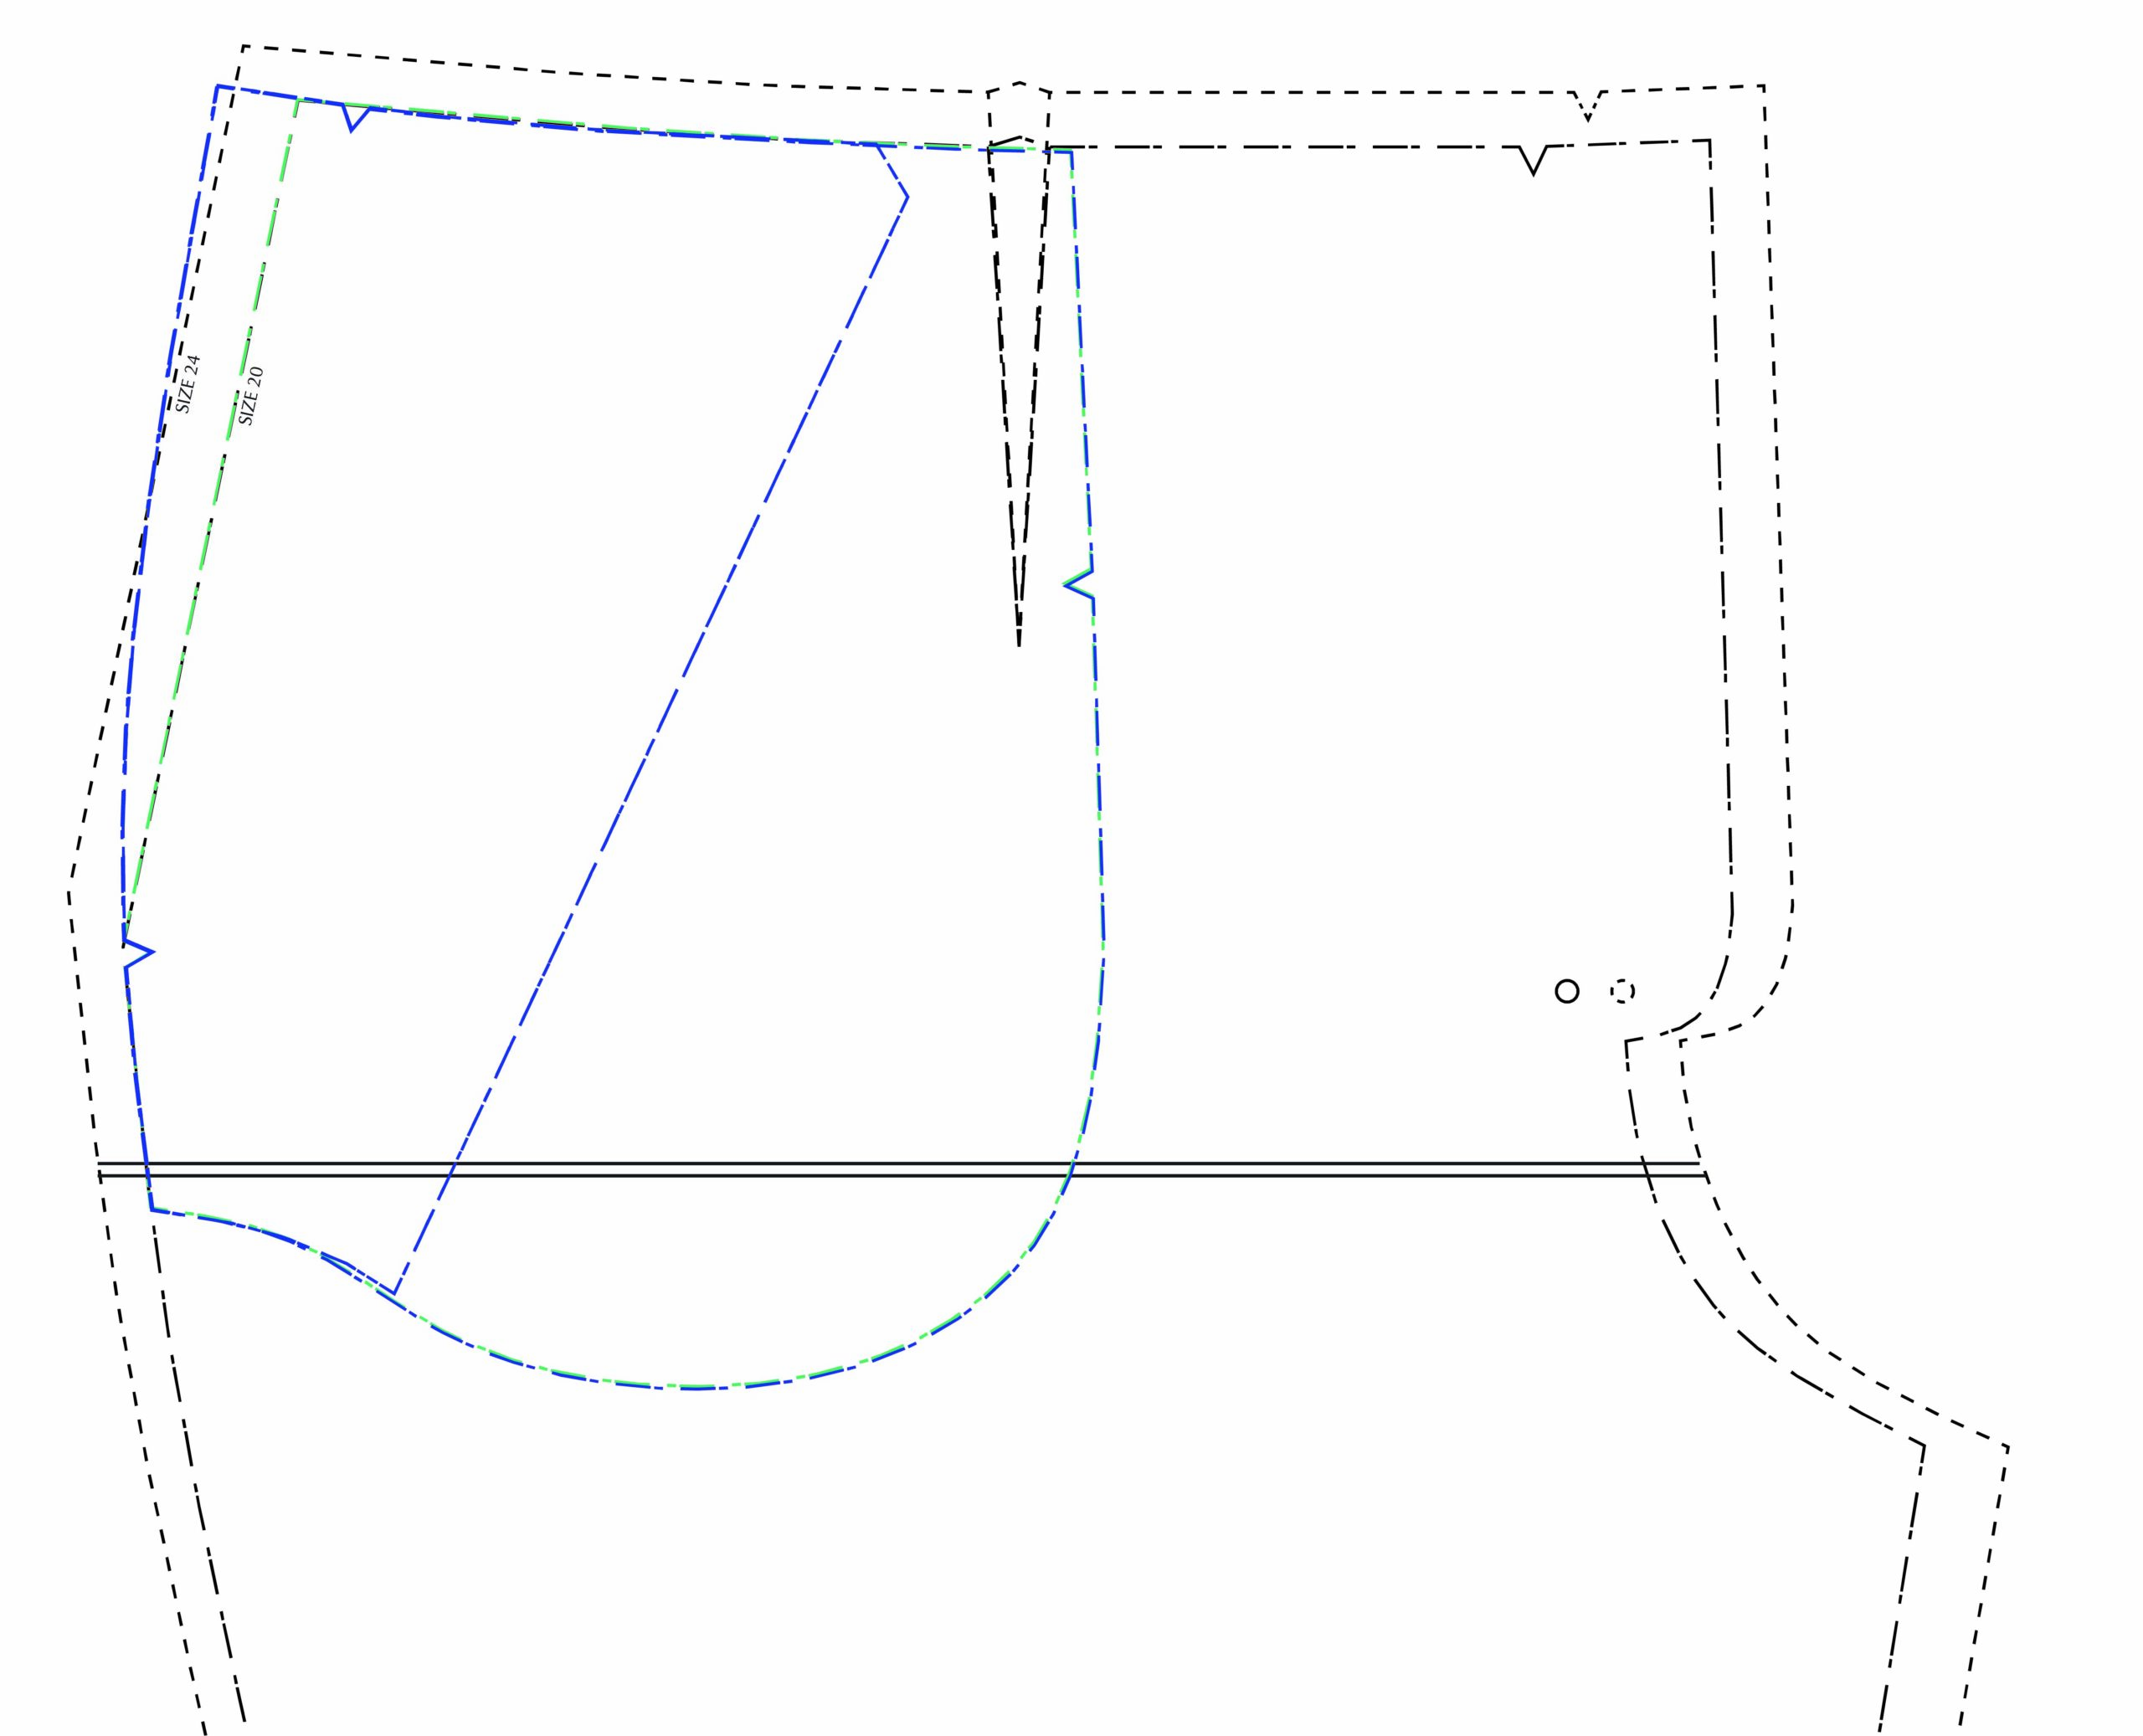
4. Mark the two top corners based on your waist size — in this case, the size 20 pattern. The outer corner will be the corner of the lower pocket (5). NOTE: if you are only grading one size the outer corner may be hidden behind front (1). 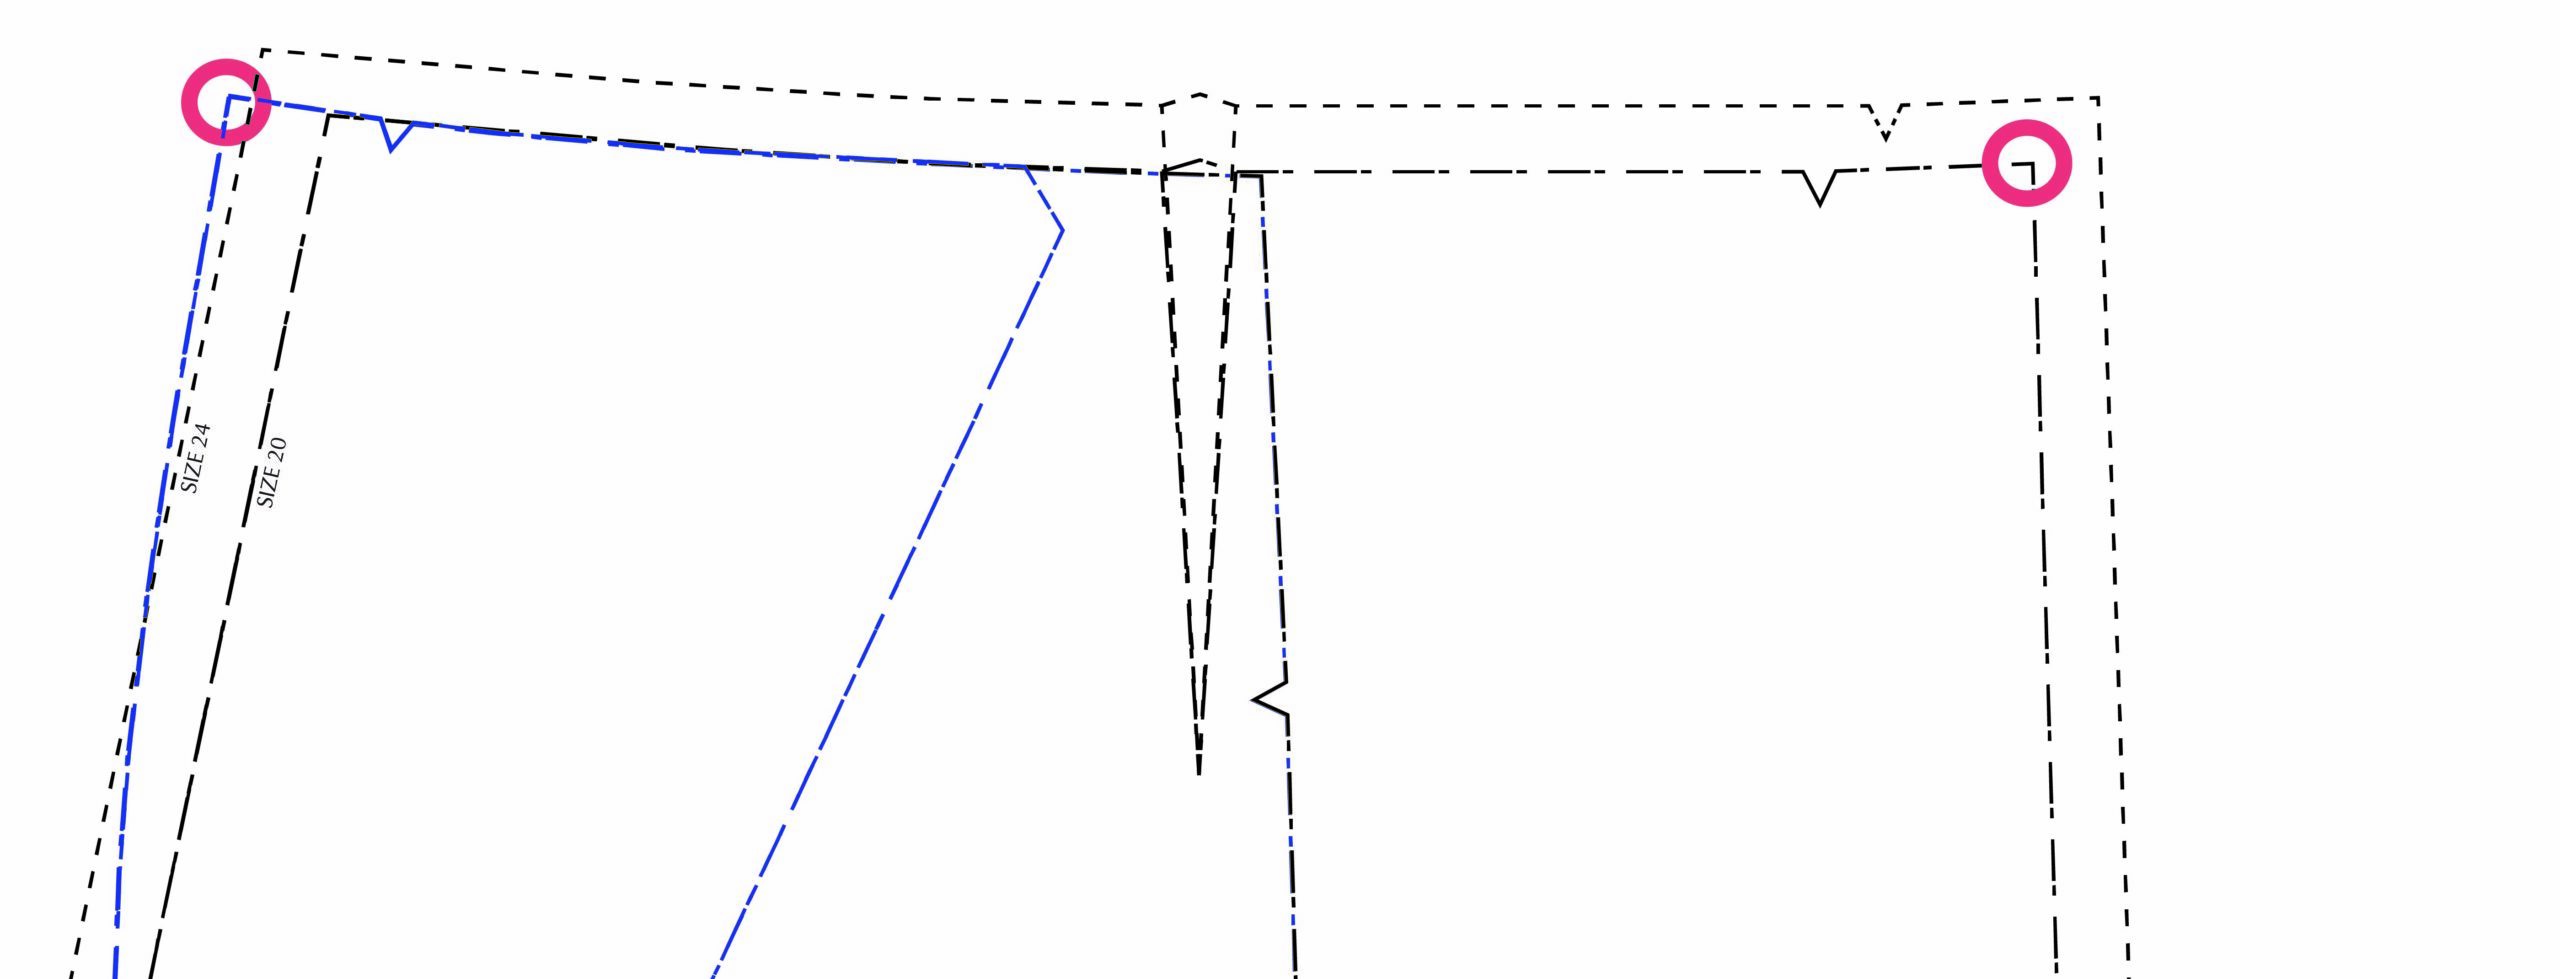
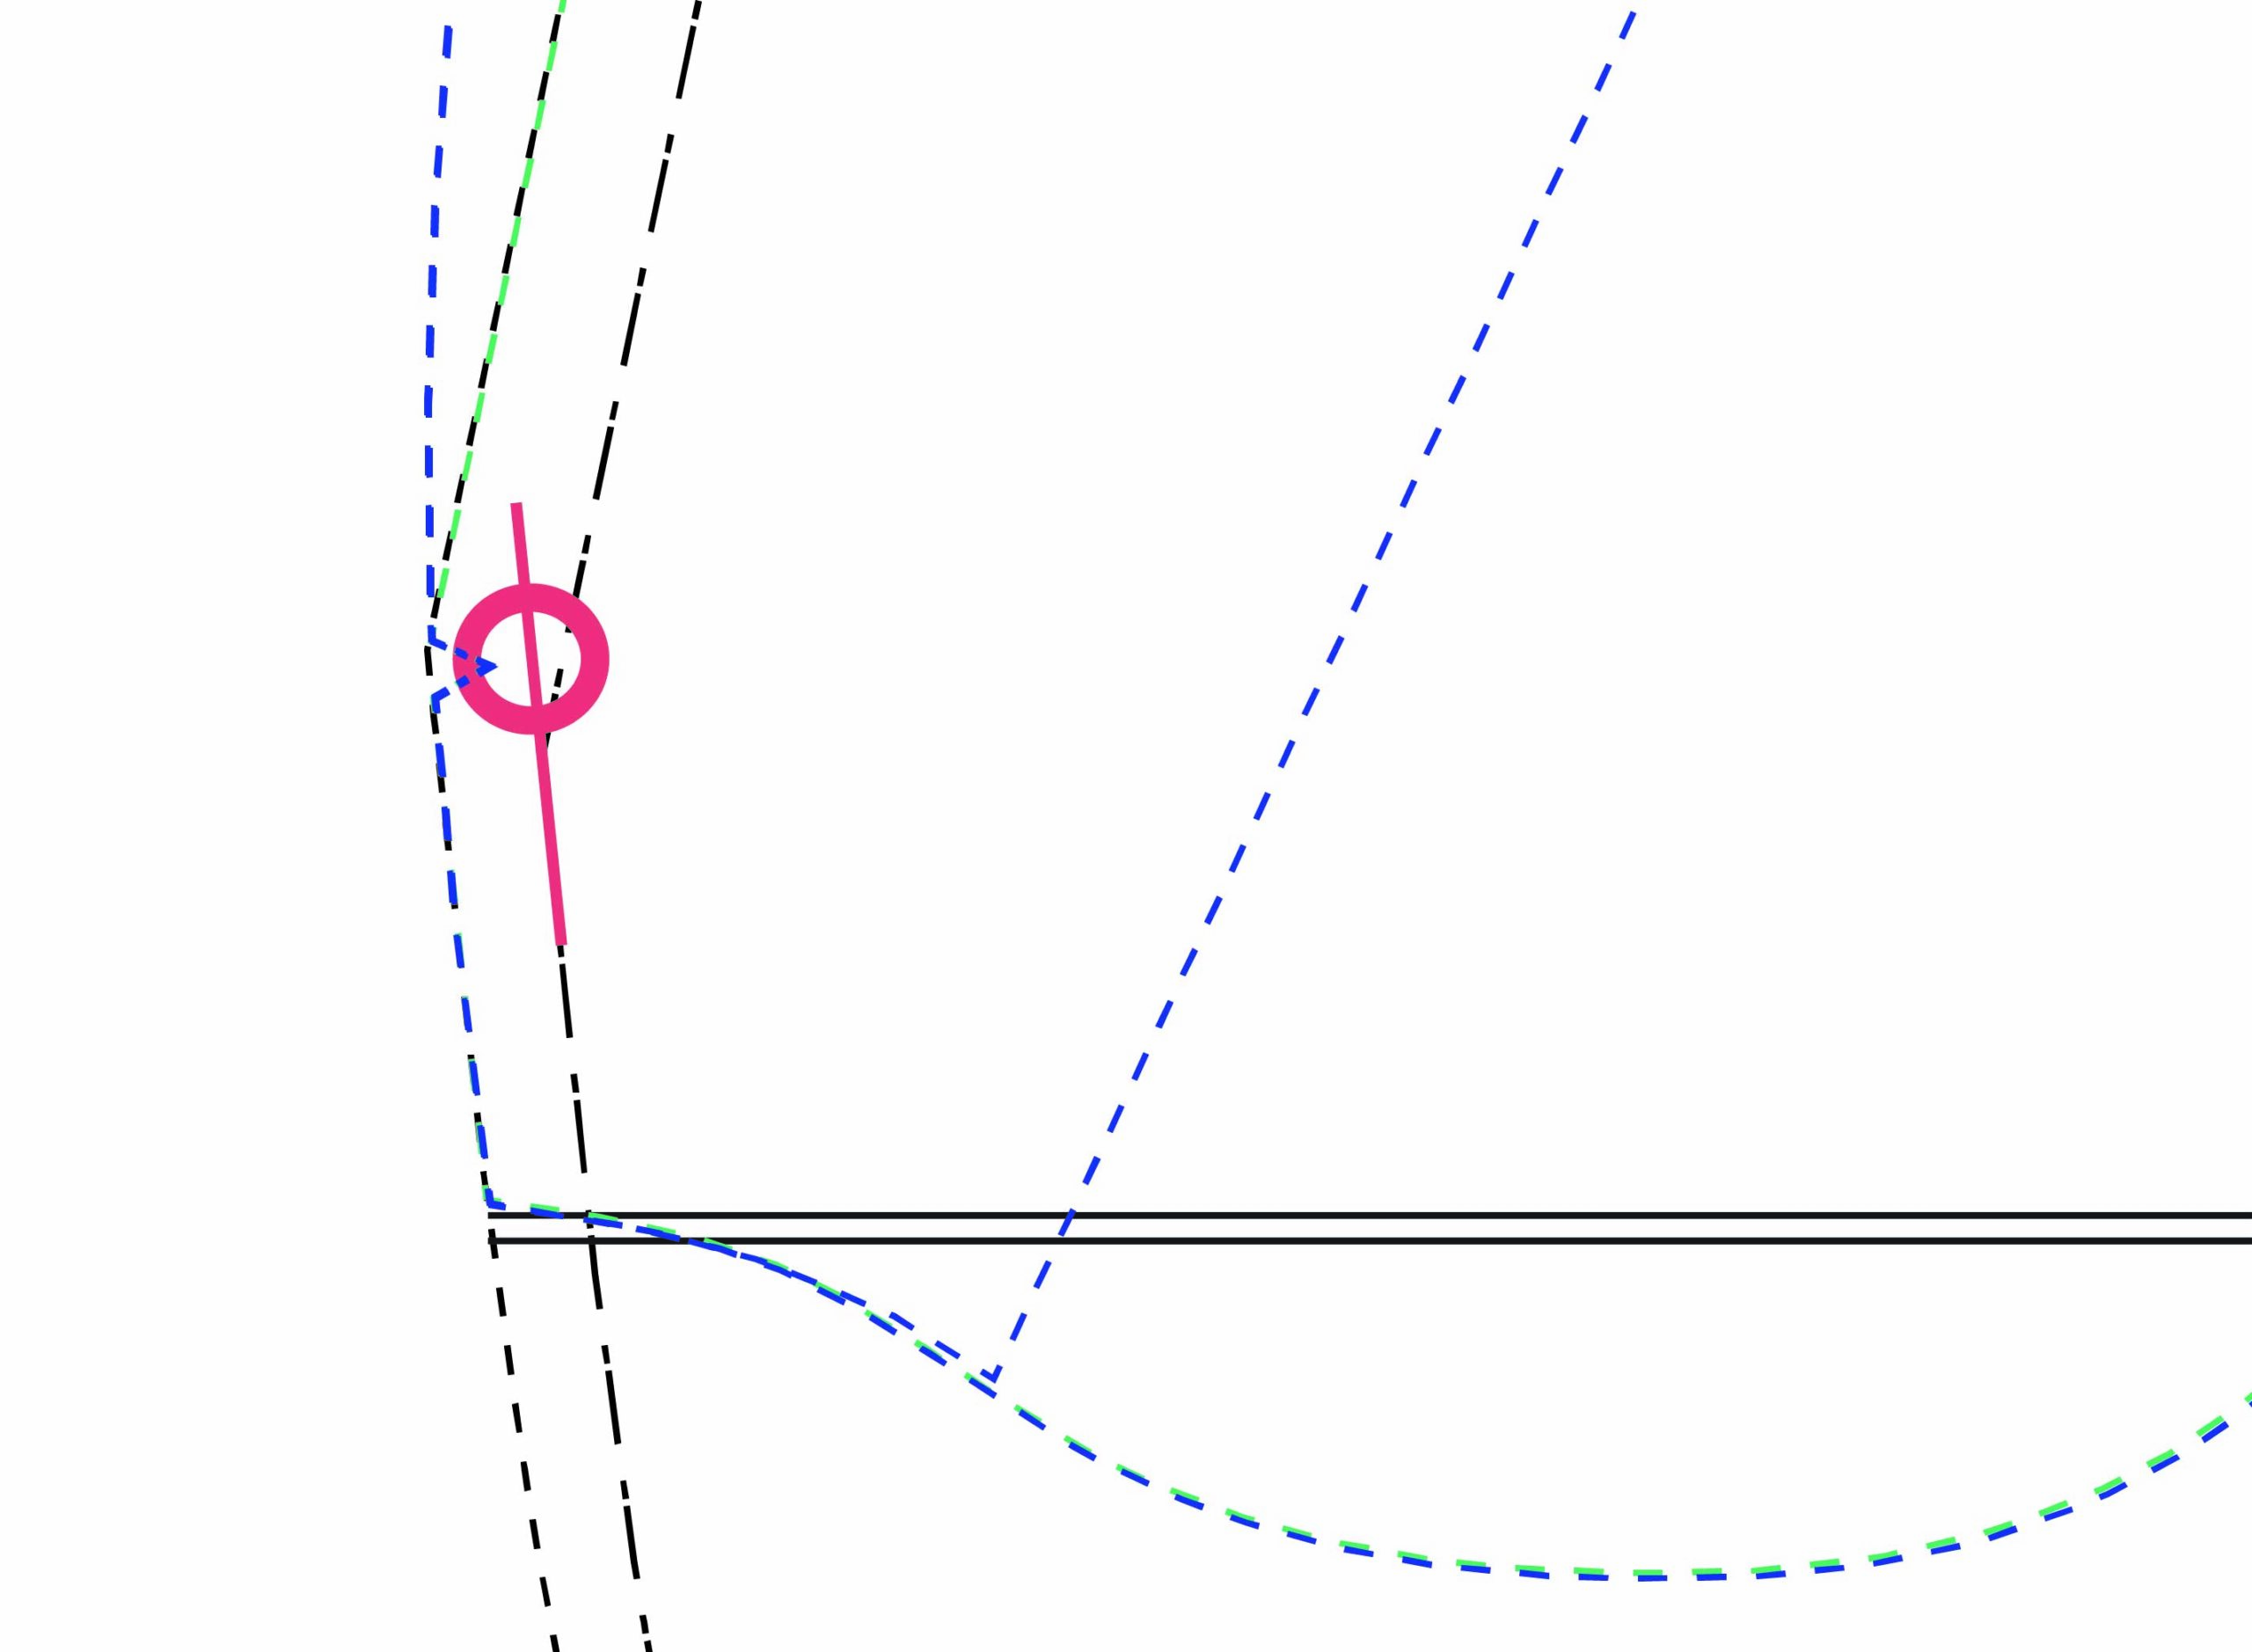
5. Mark the bottom of the pocket and the bottom of the fly extension at your hip size (size 24). On the outer edge, mark the hip width at the height of the pocket notch location. Mark the bottom of the crotch curve at your hip size (size 24).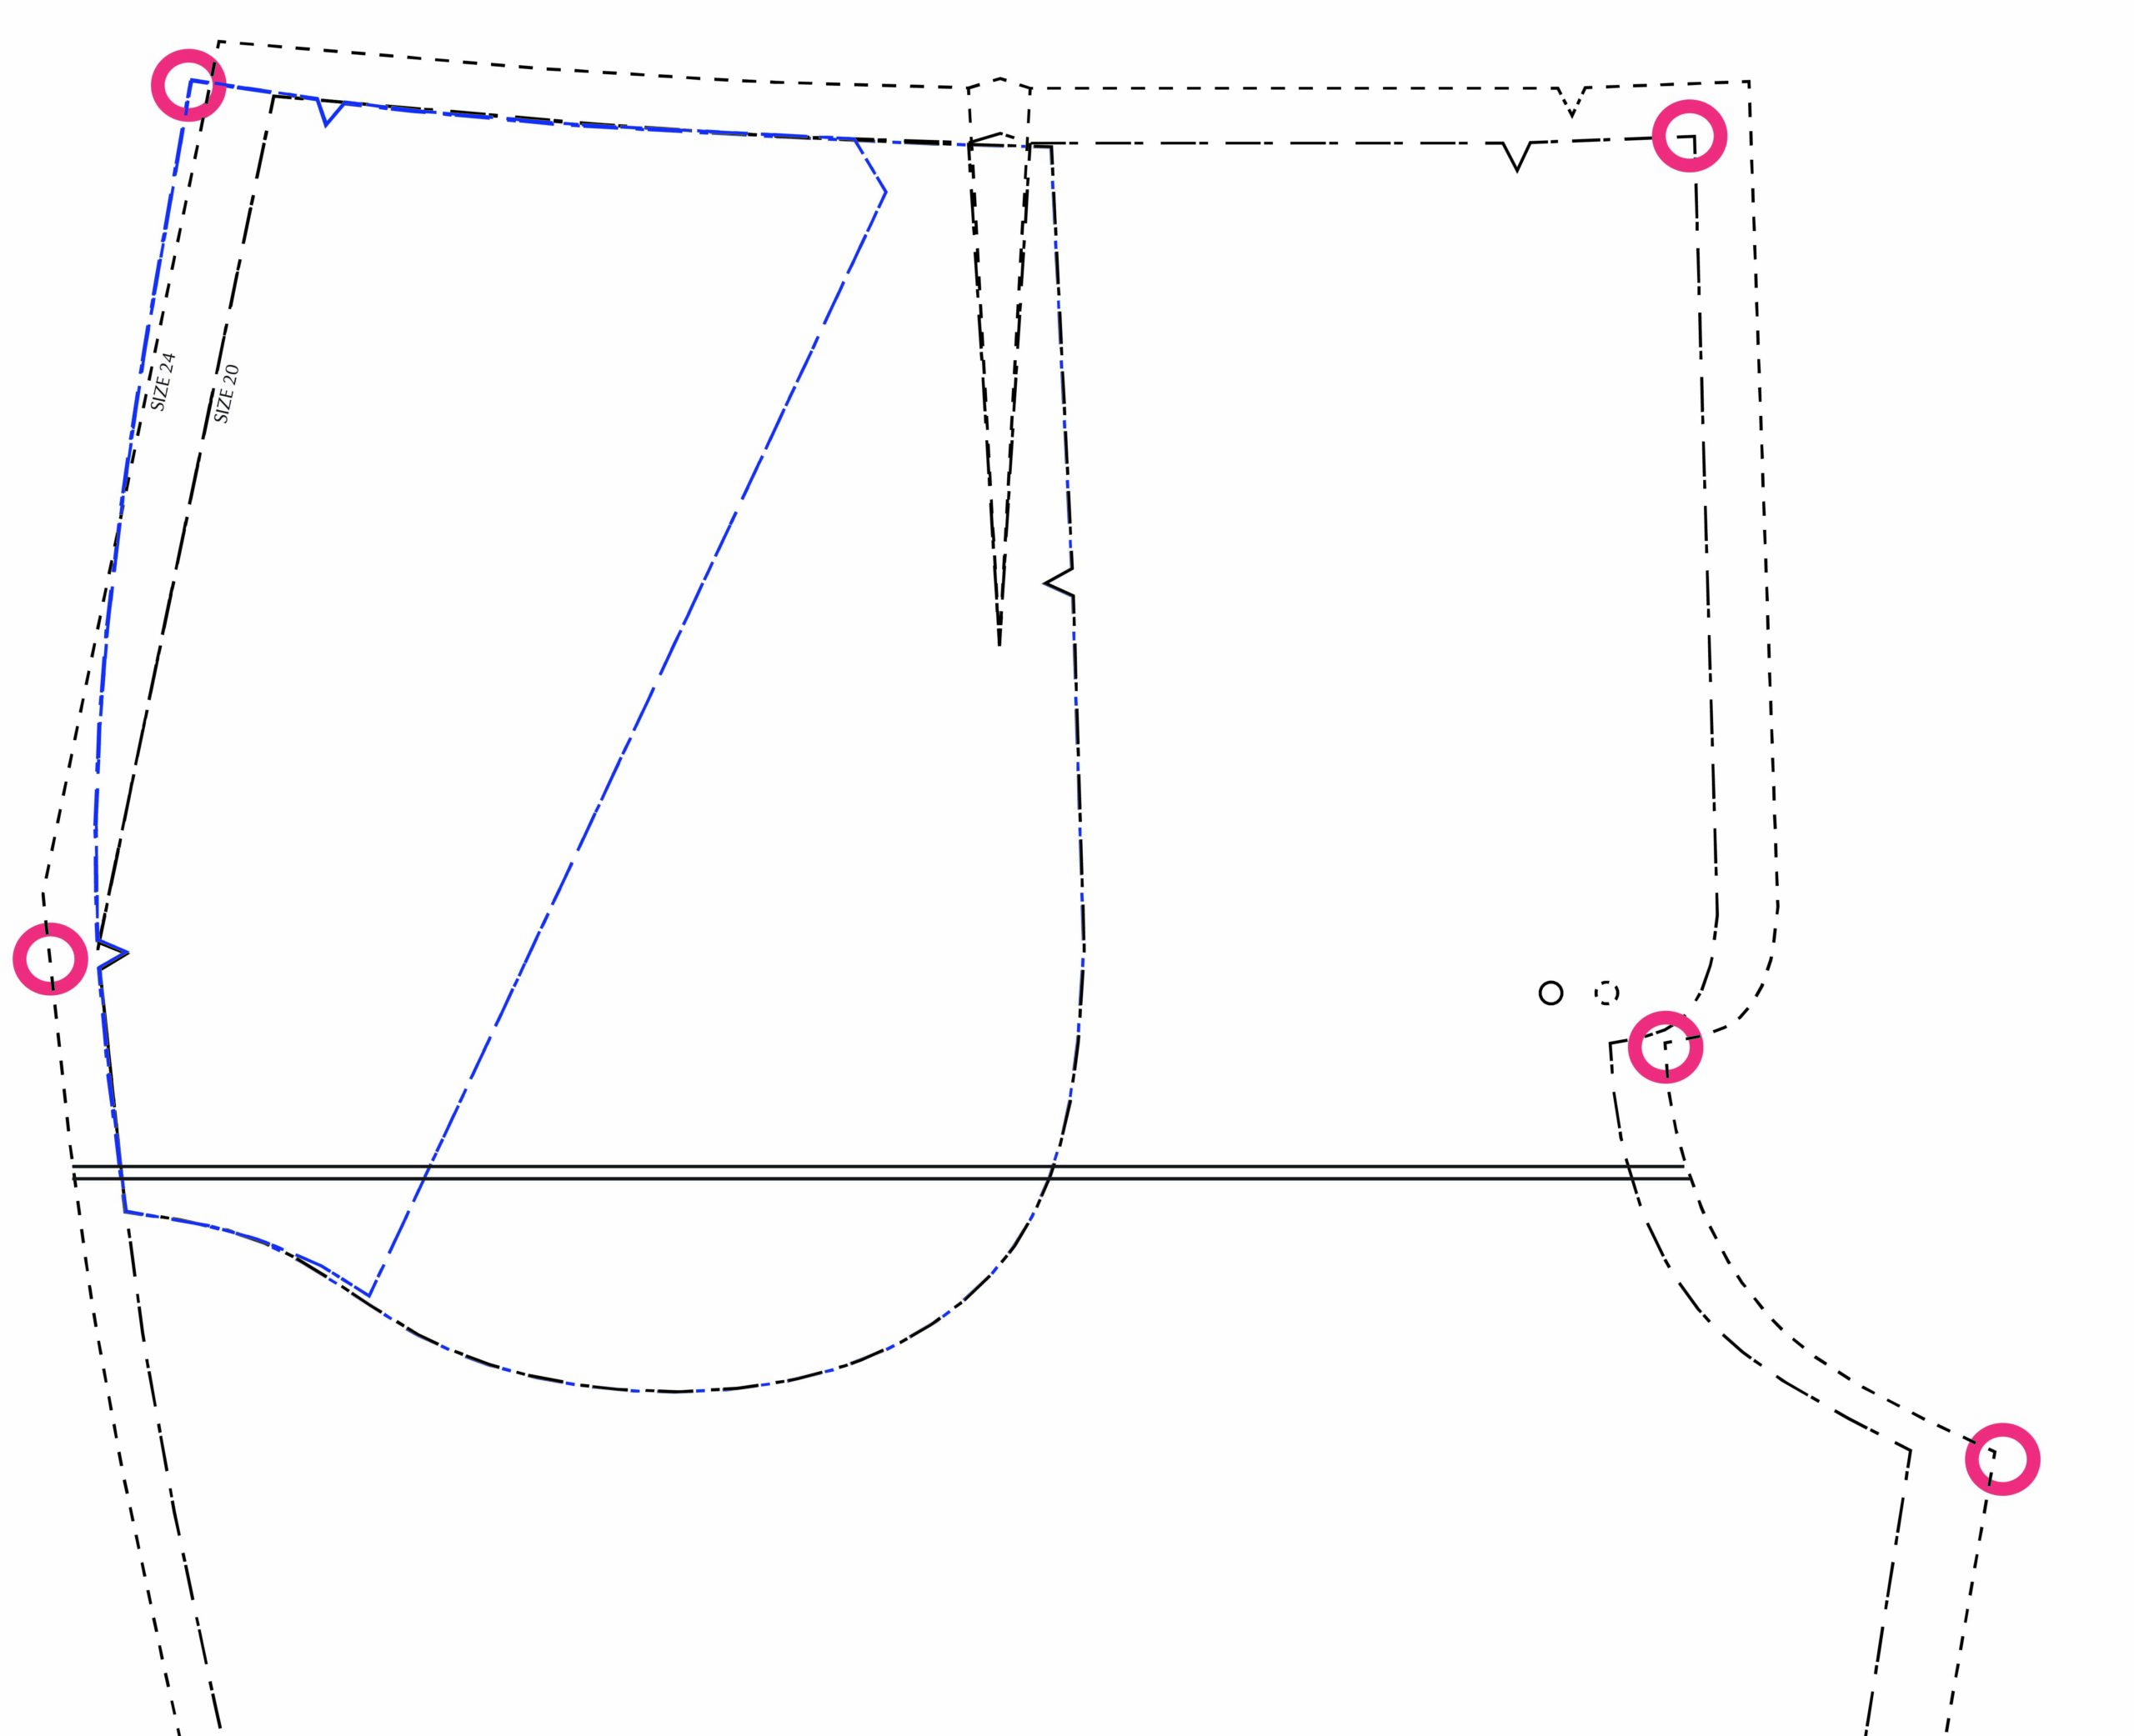
6. On the outer edge, re-draw the side seam between the two marked points – use a French curve to create a smooth curve at the hip. 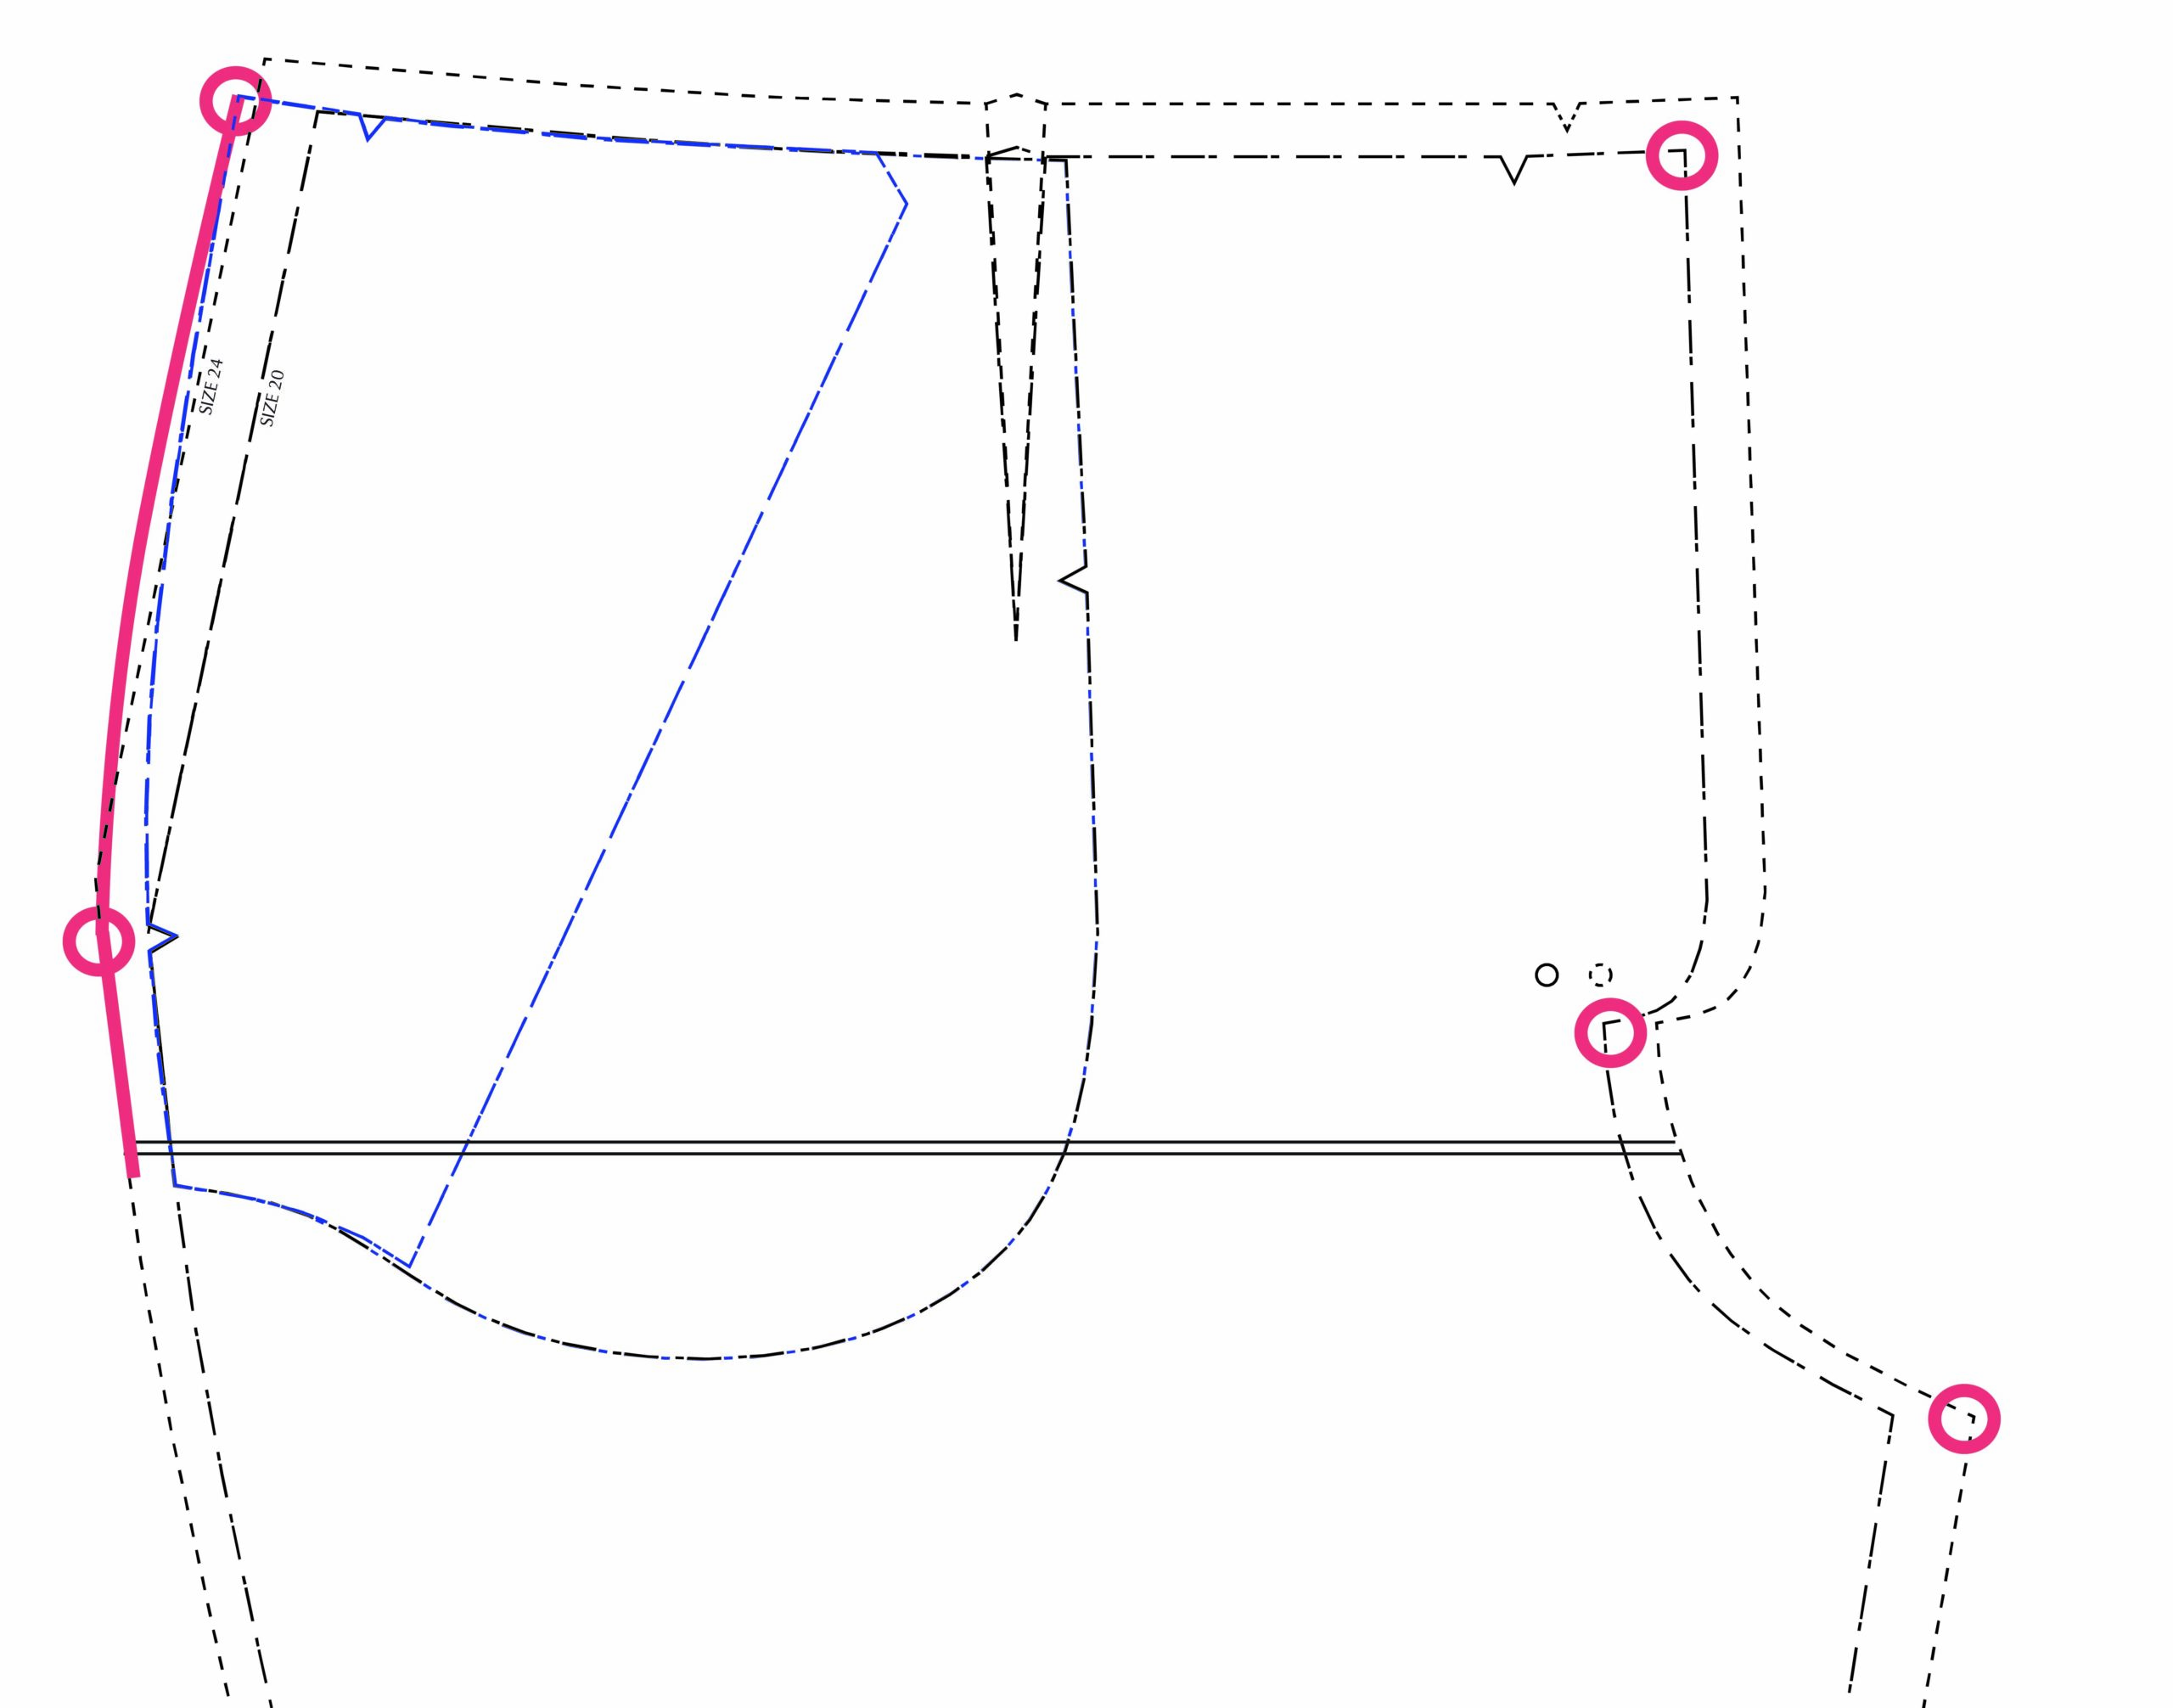
7. Now draw a straight line from the top corner of the front (1) piece at the waistband size (size 20) down to the same lower point. This is your new pocket opening. 
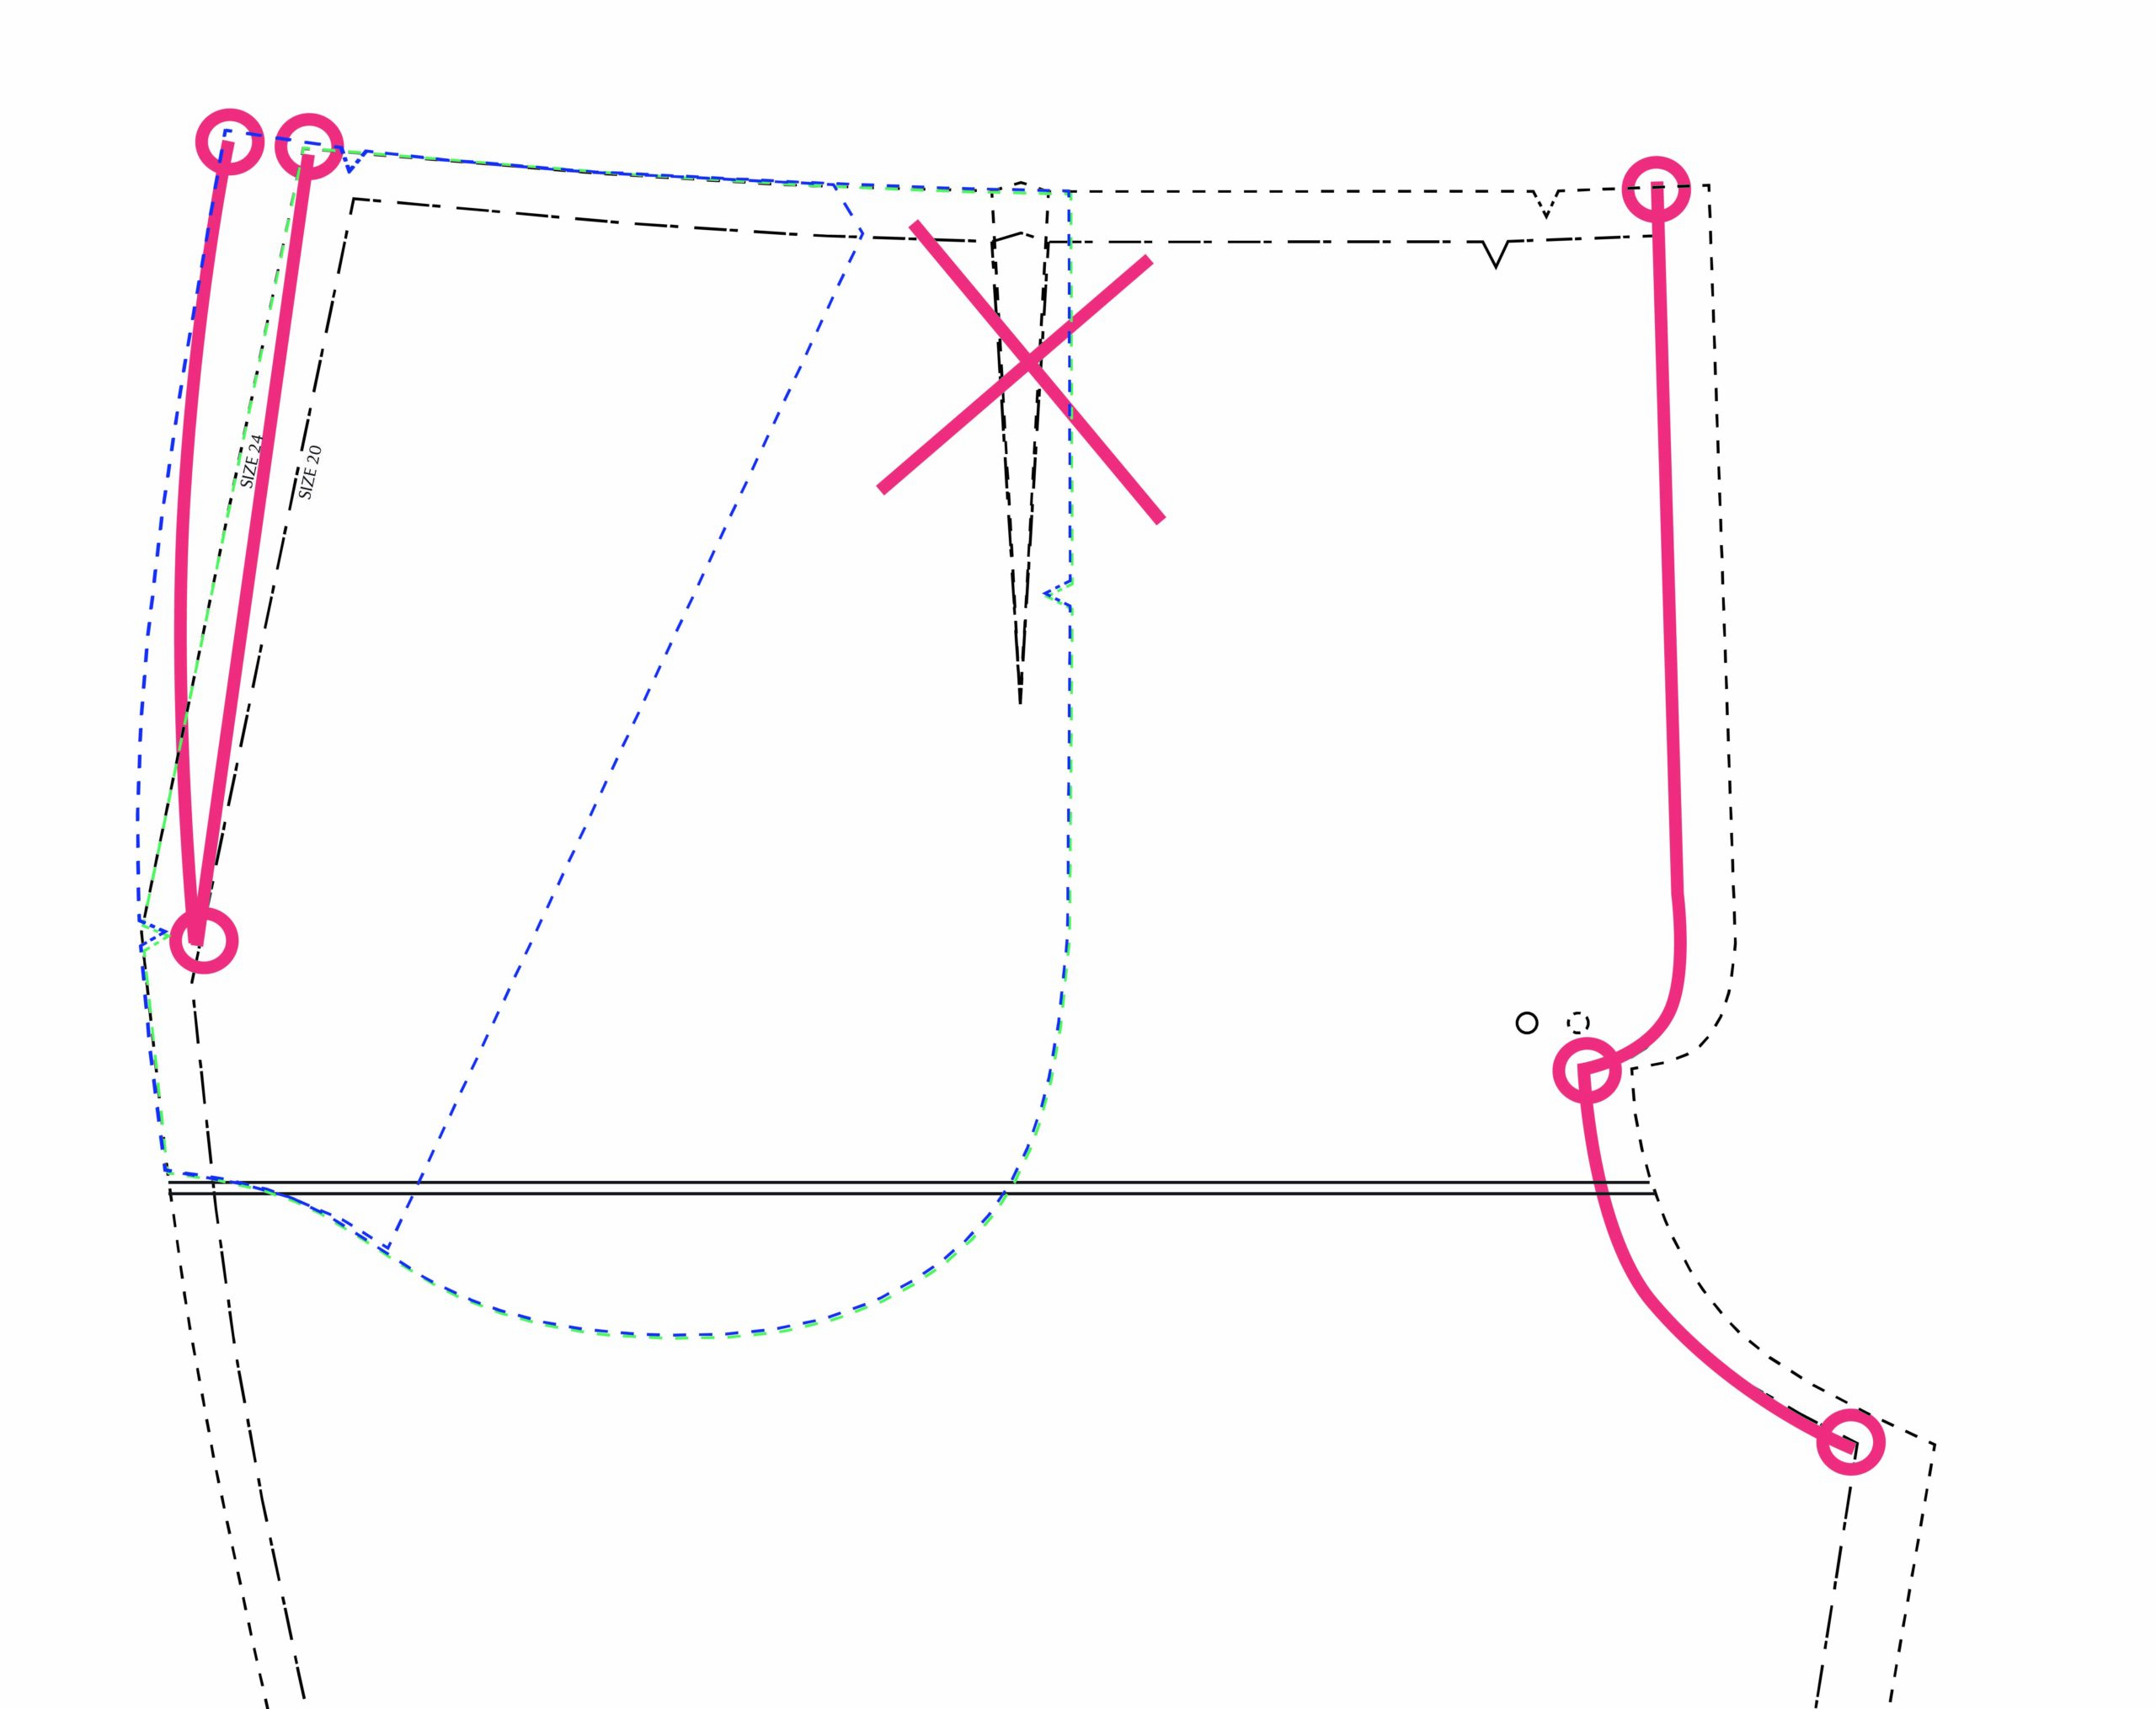
8. There are two different options for how to deal with the center front grading:
Option 1: Grade through the crotch curve. To do this, use the smaller waist size for the entire fly area and then grade out to the larger size through the crotch curve.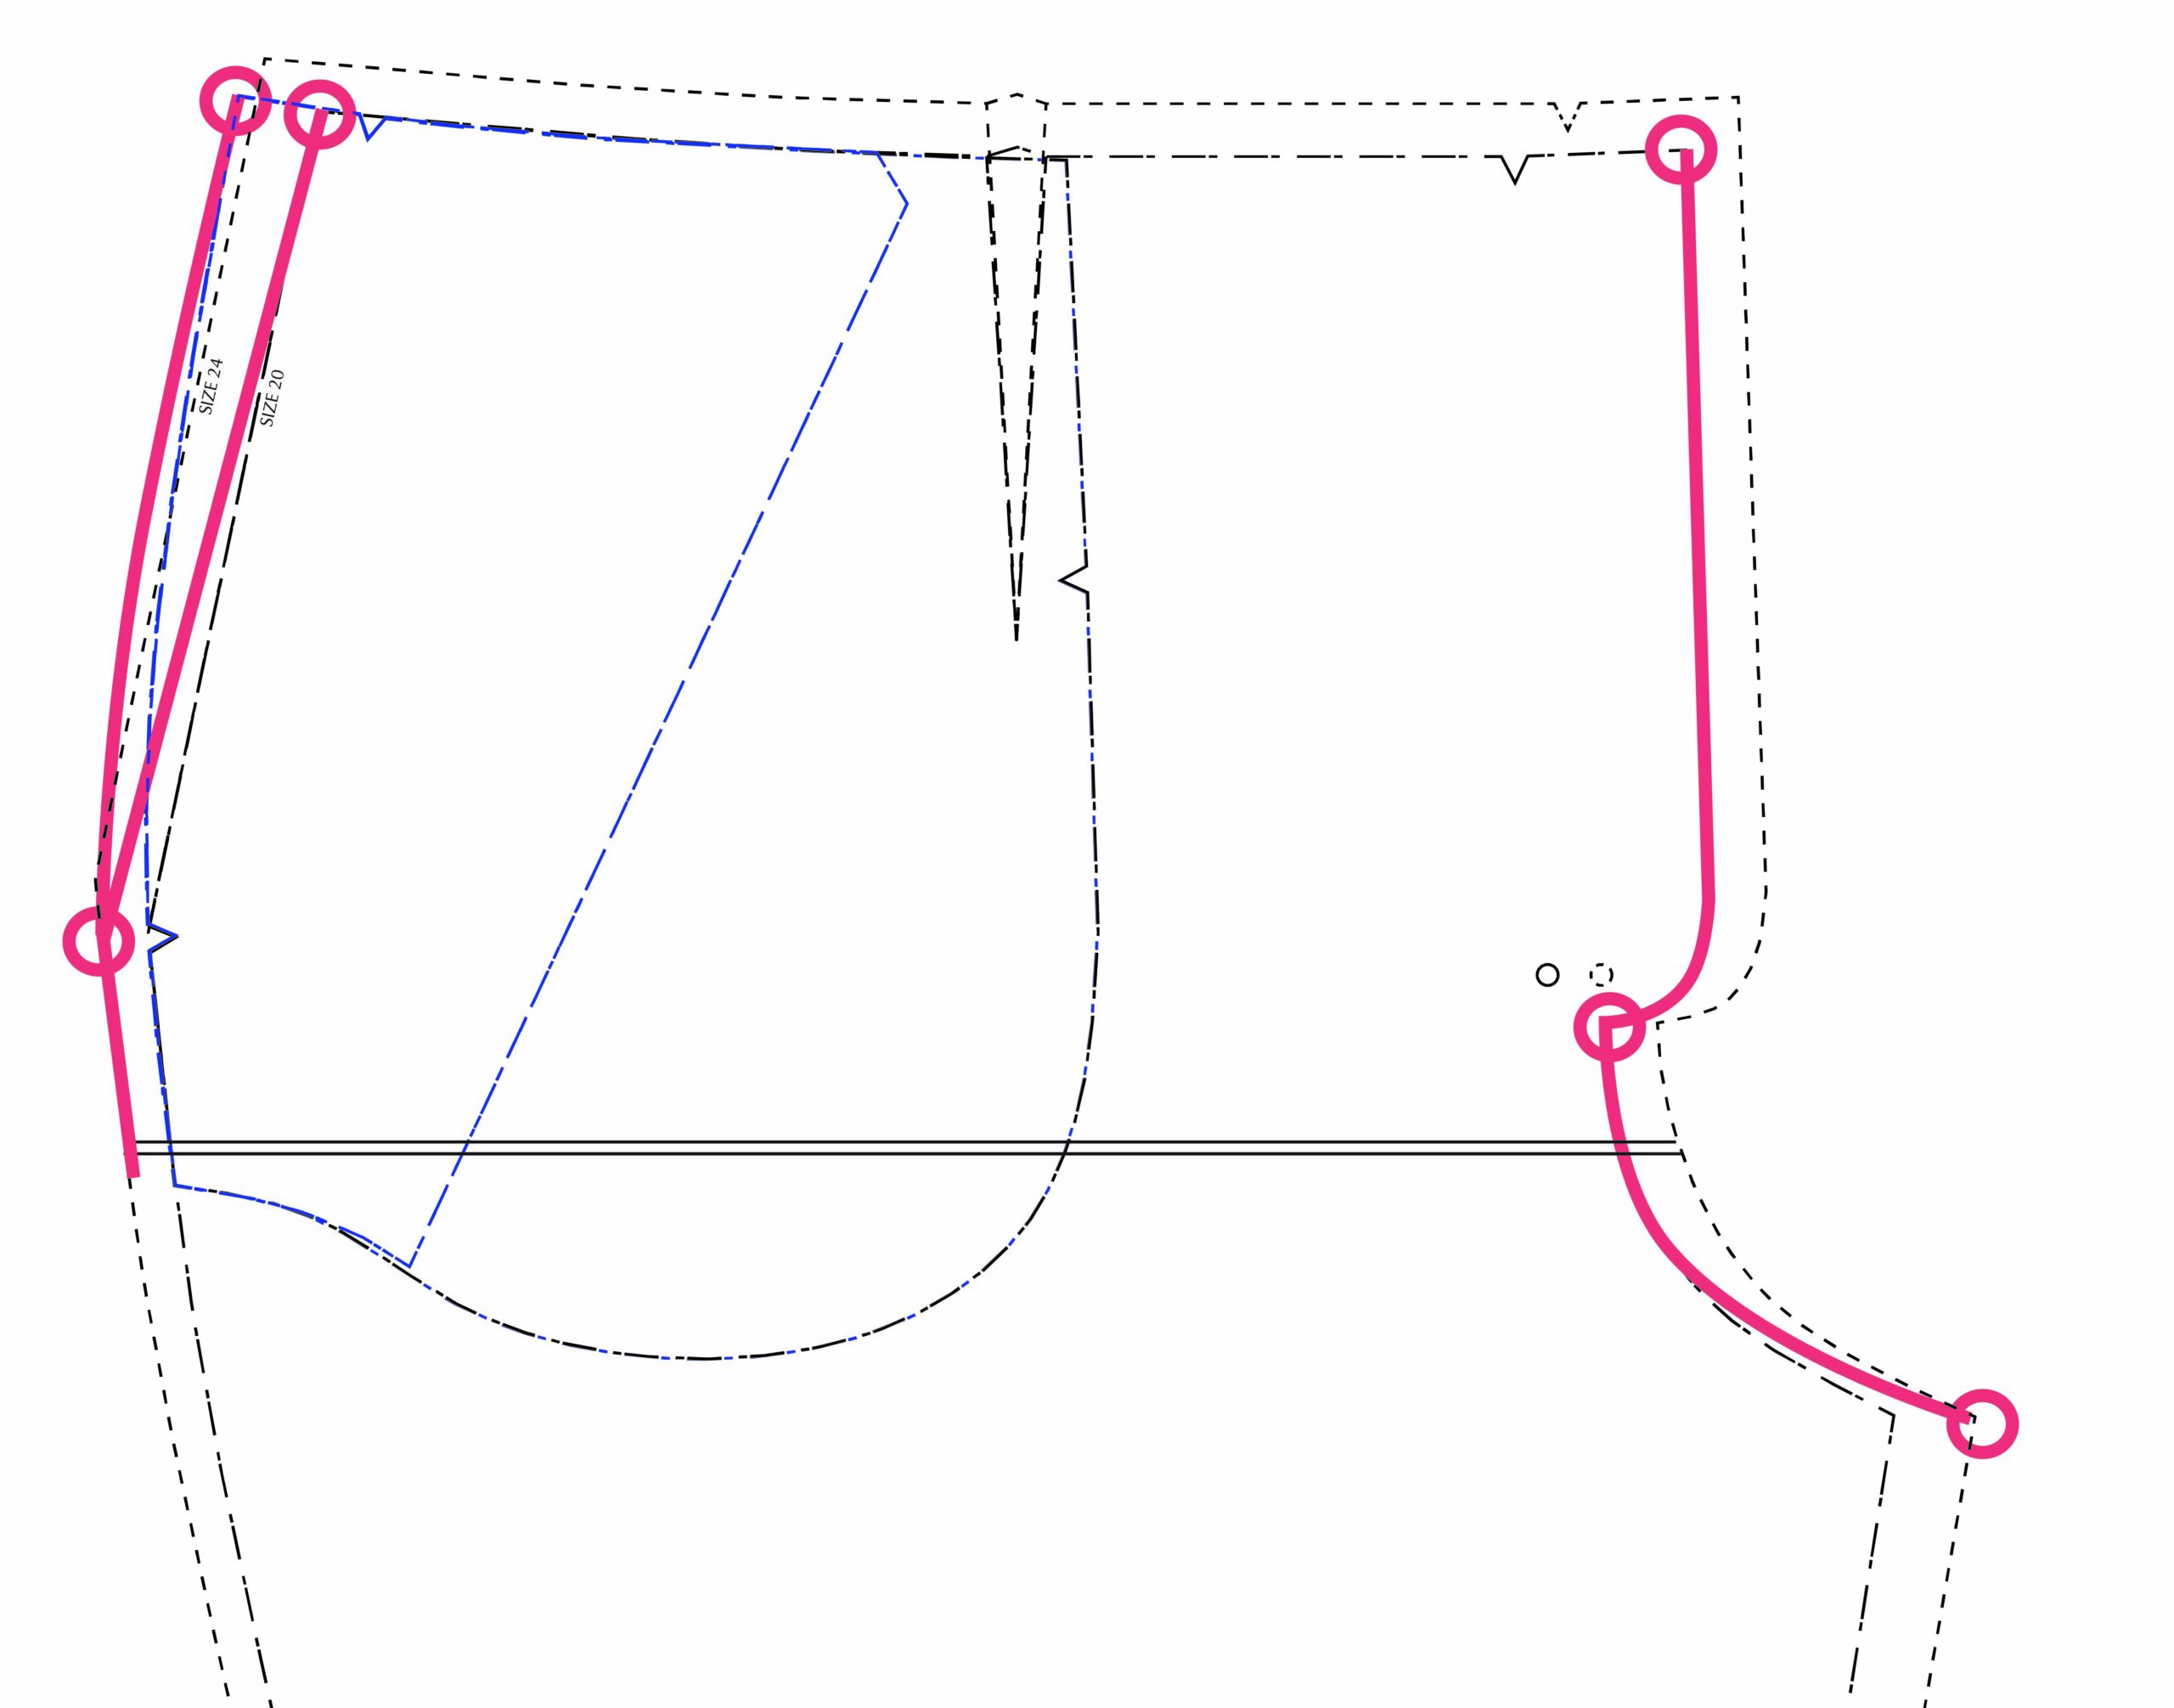
Option 2: Use the darts. To do this use the larger size for the entire center front seam (fly extension and crotch curve) and then increase the width of the dart to reduce the waist back to the required size. To do this, measure the distance between the two sizes you are grading between at the center front and then add that amount onto the dart.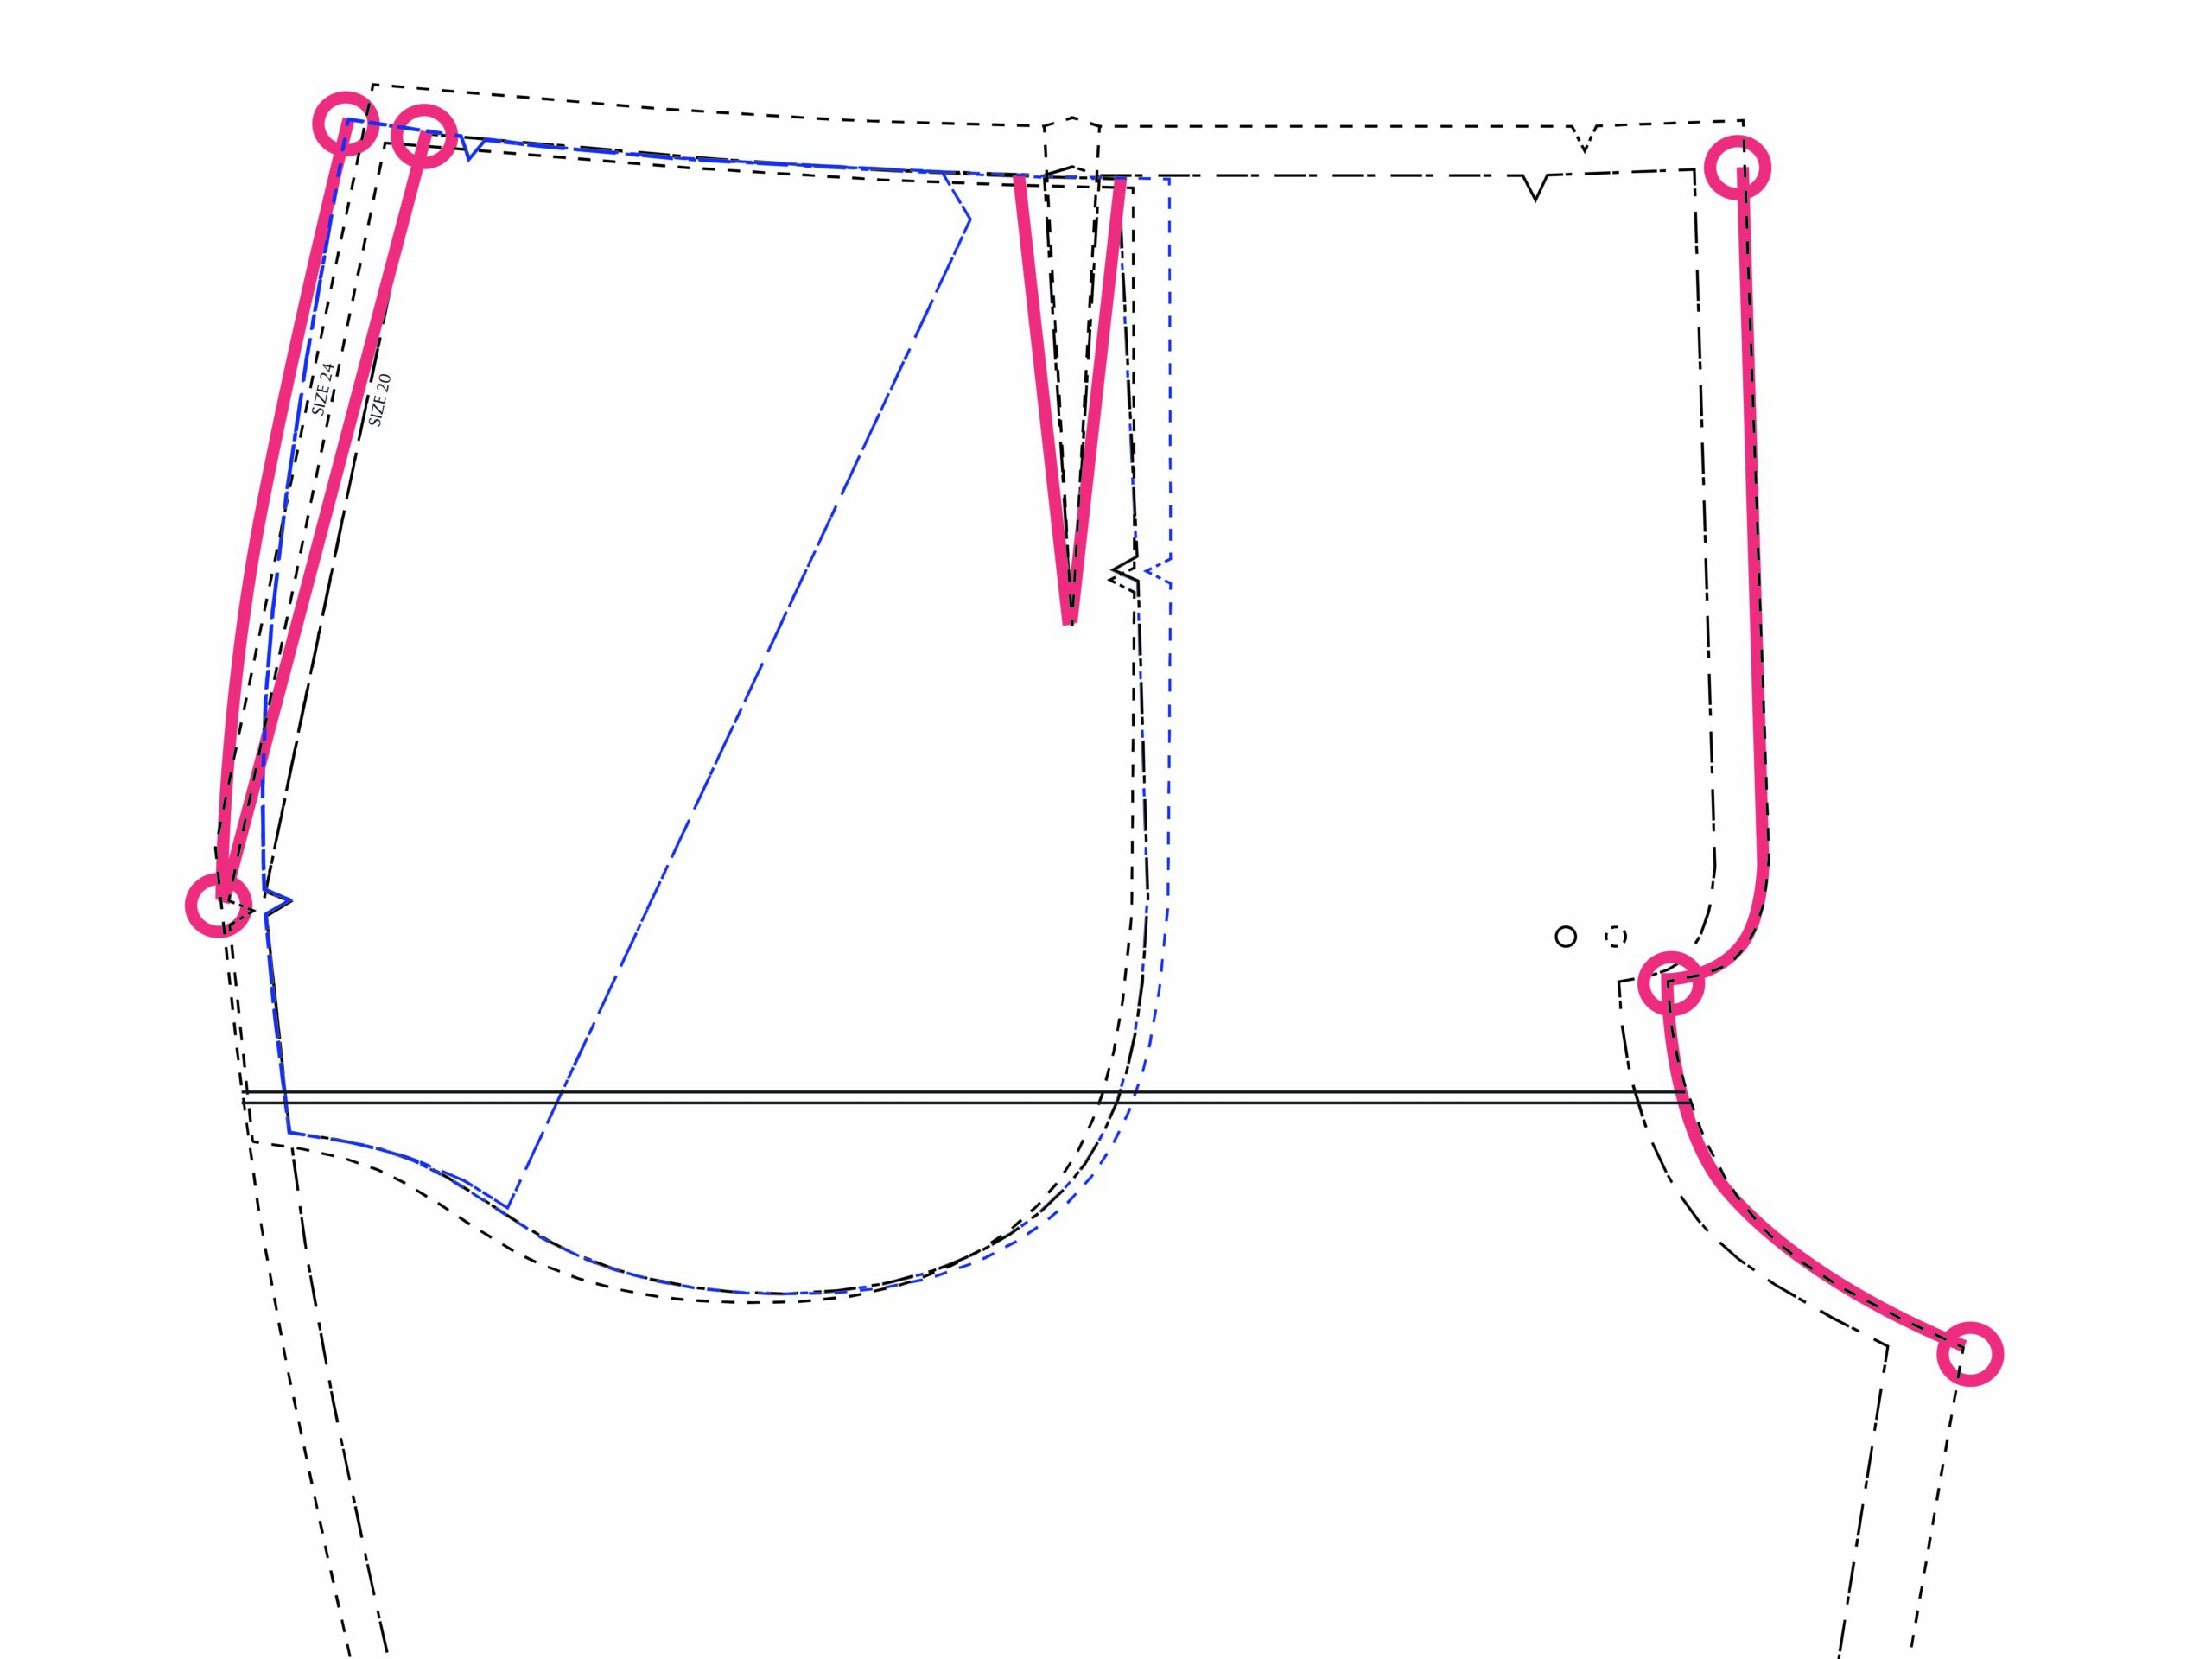
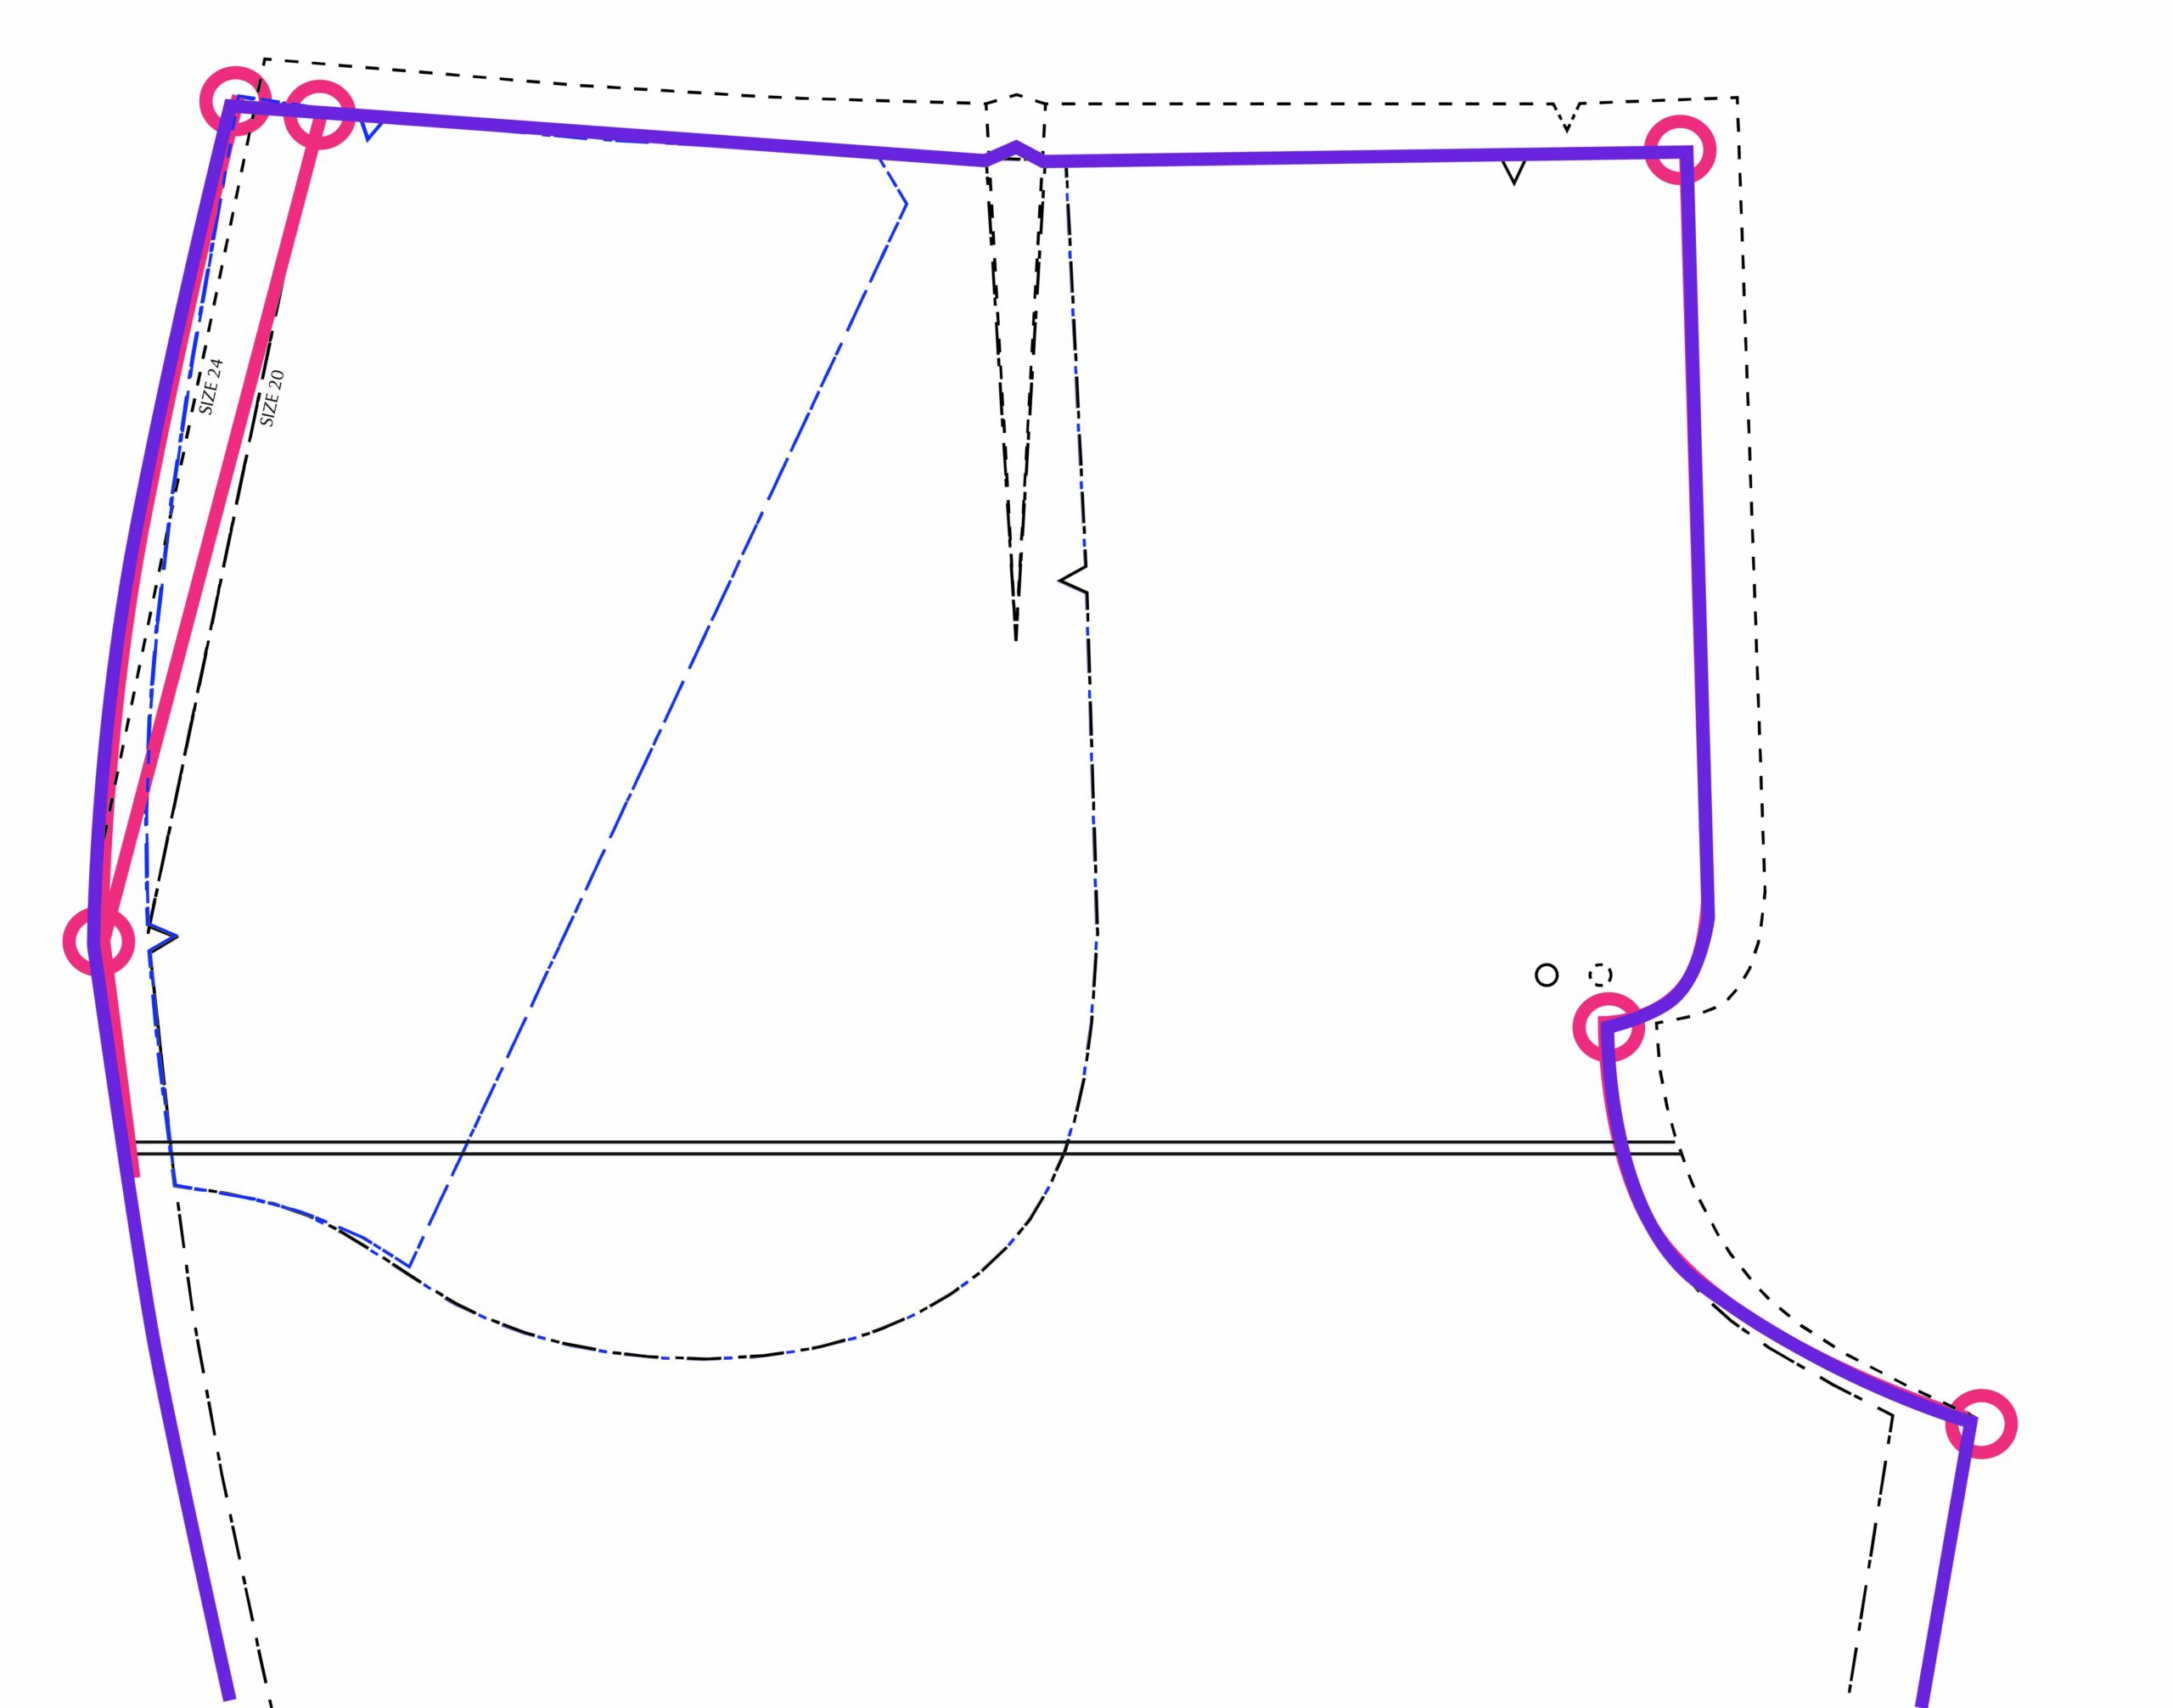
- Now, we will be transferring the markings to all the layered pieces, cutting and separating them. Start by leaving all the layers taped together, and cut the legs out at the hip size (24). Continue cutting up the side seam along the new marked OUTER seam line. Cut across the top of the waist (if you modified the darts remember you’ll need to also modify the dart uptake), and then cut down the front along your marked line. In the image below, the purple line is the cutting line:
10. Carefully remove the lower pocket (5) and pocket facing (6) from underneath the other pattern pieces and place to one side. Make sure that the top pocket (7) is still attached to the front (1). Now trim the front (1) and top pocket (7) piece (through both layers) along the new pocket opening line. Separate the two pieces and they are ready. 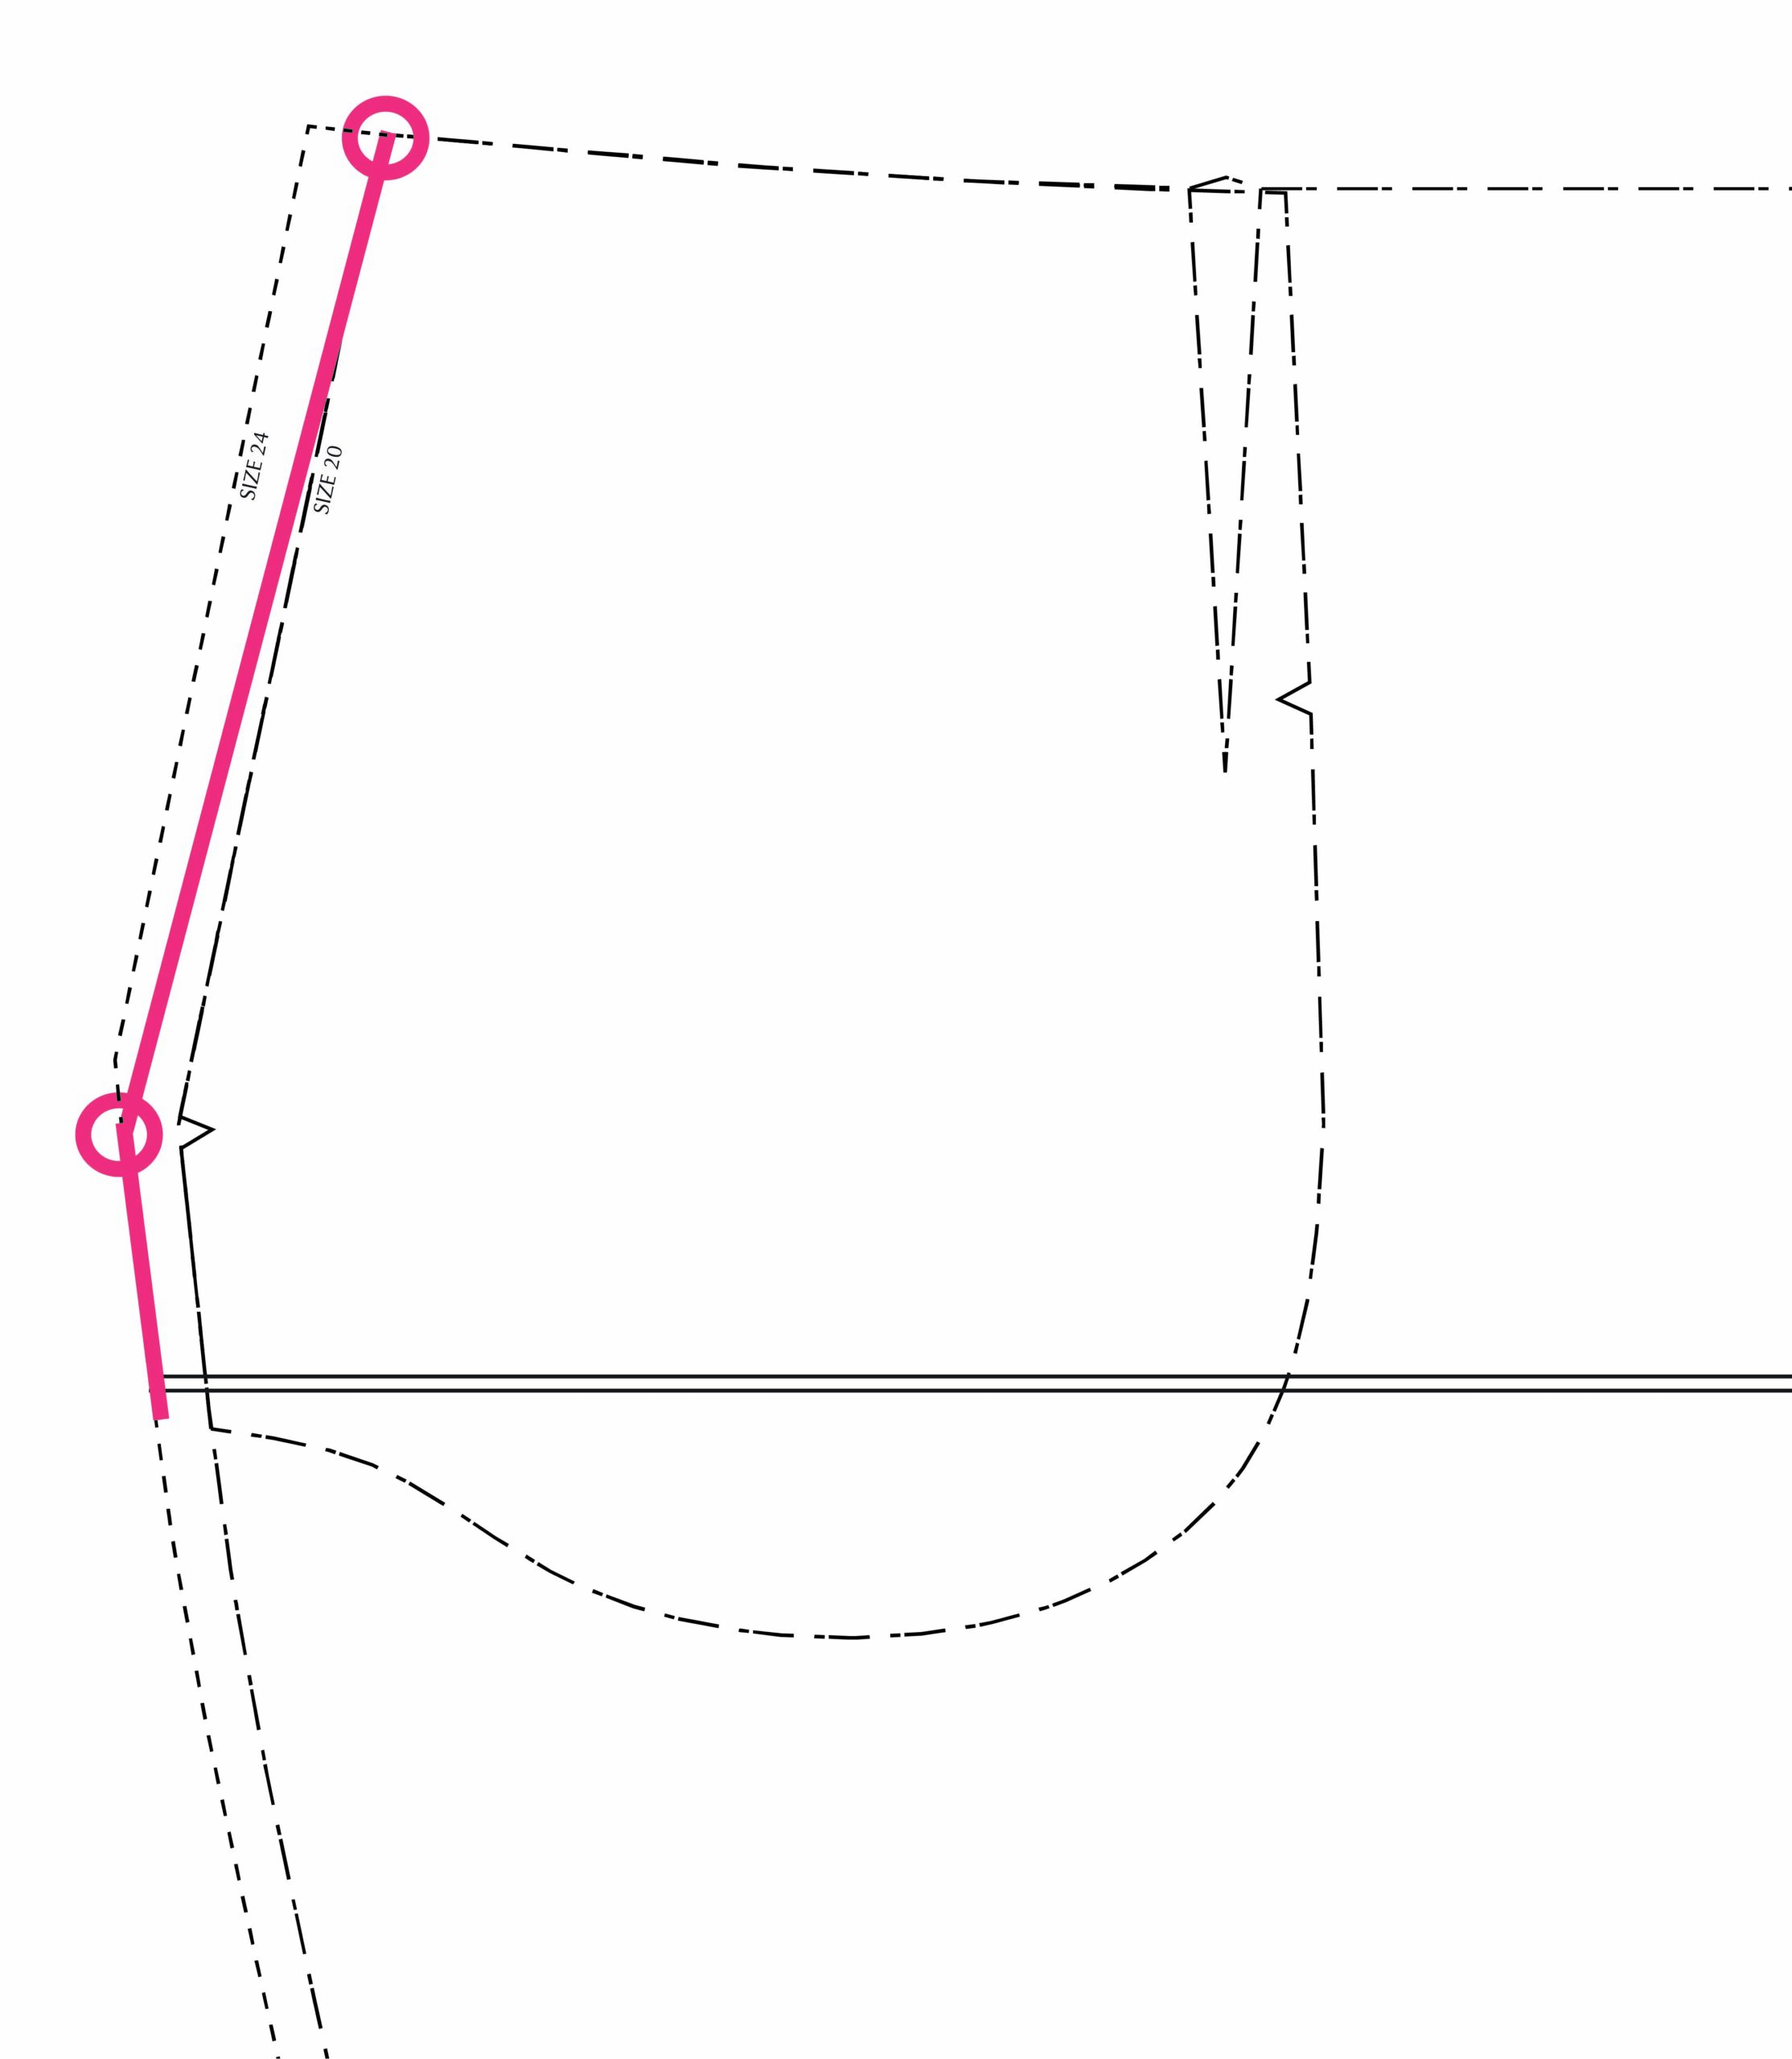
11. Finally, separate out the lower pocket (5) and pocket facing (6) and extend the lower edges out to meet the new side seams, and have a smooth curve to the bottom of the pocket as shown. Trim any excess paper off the side seam. 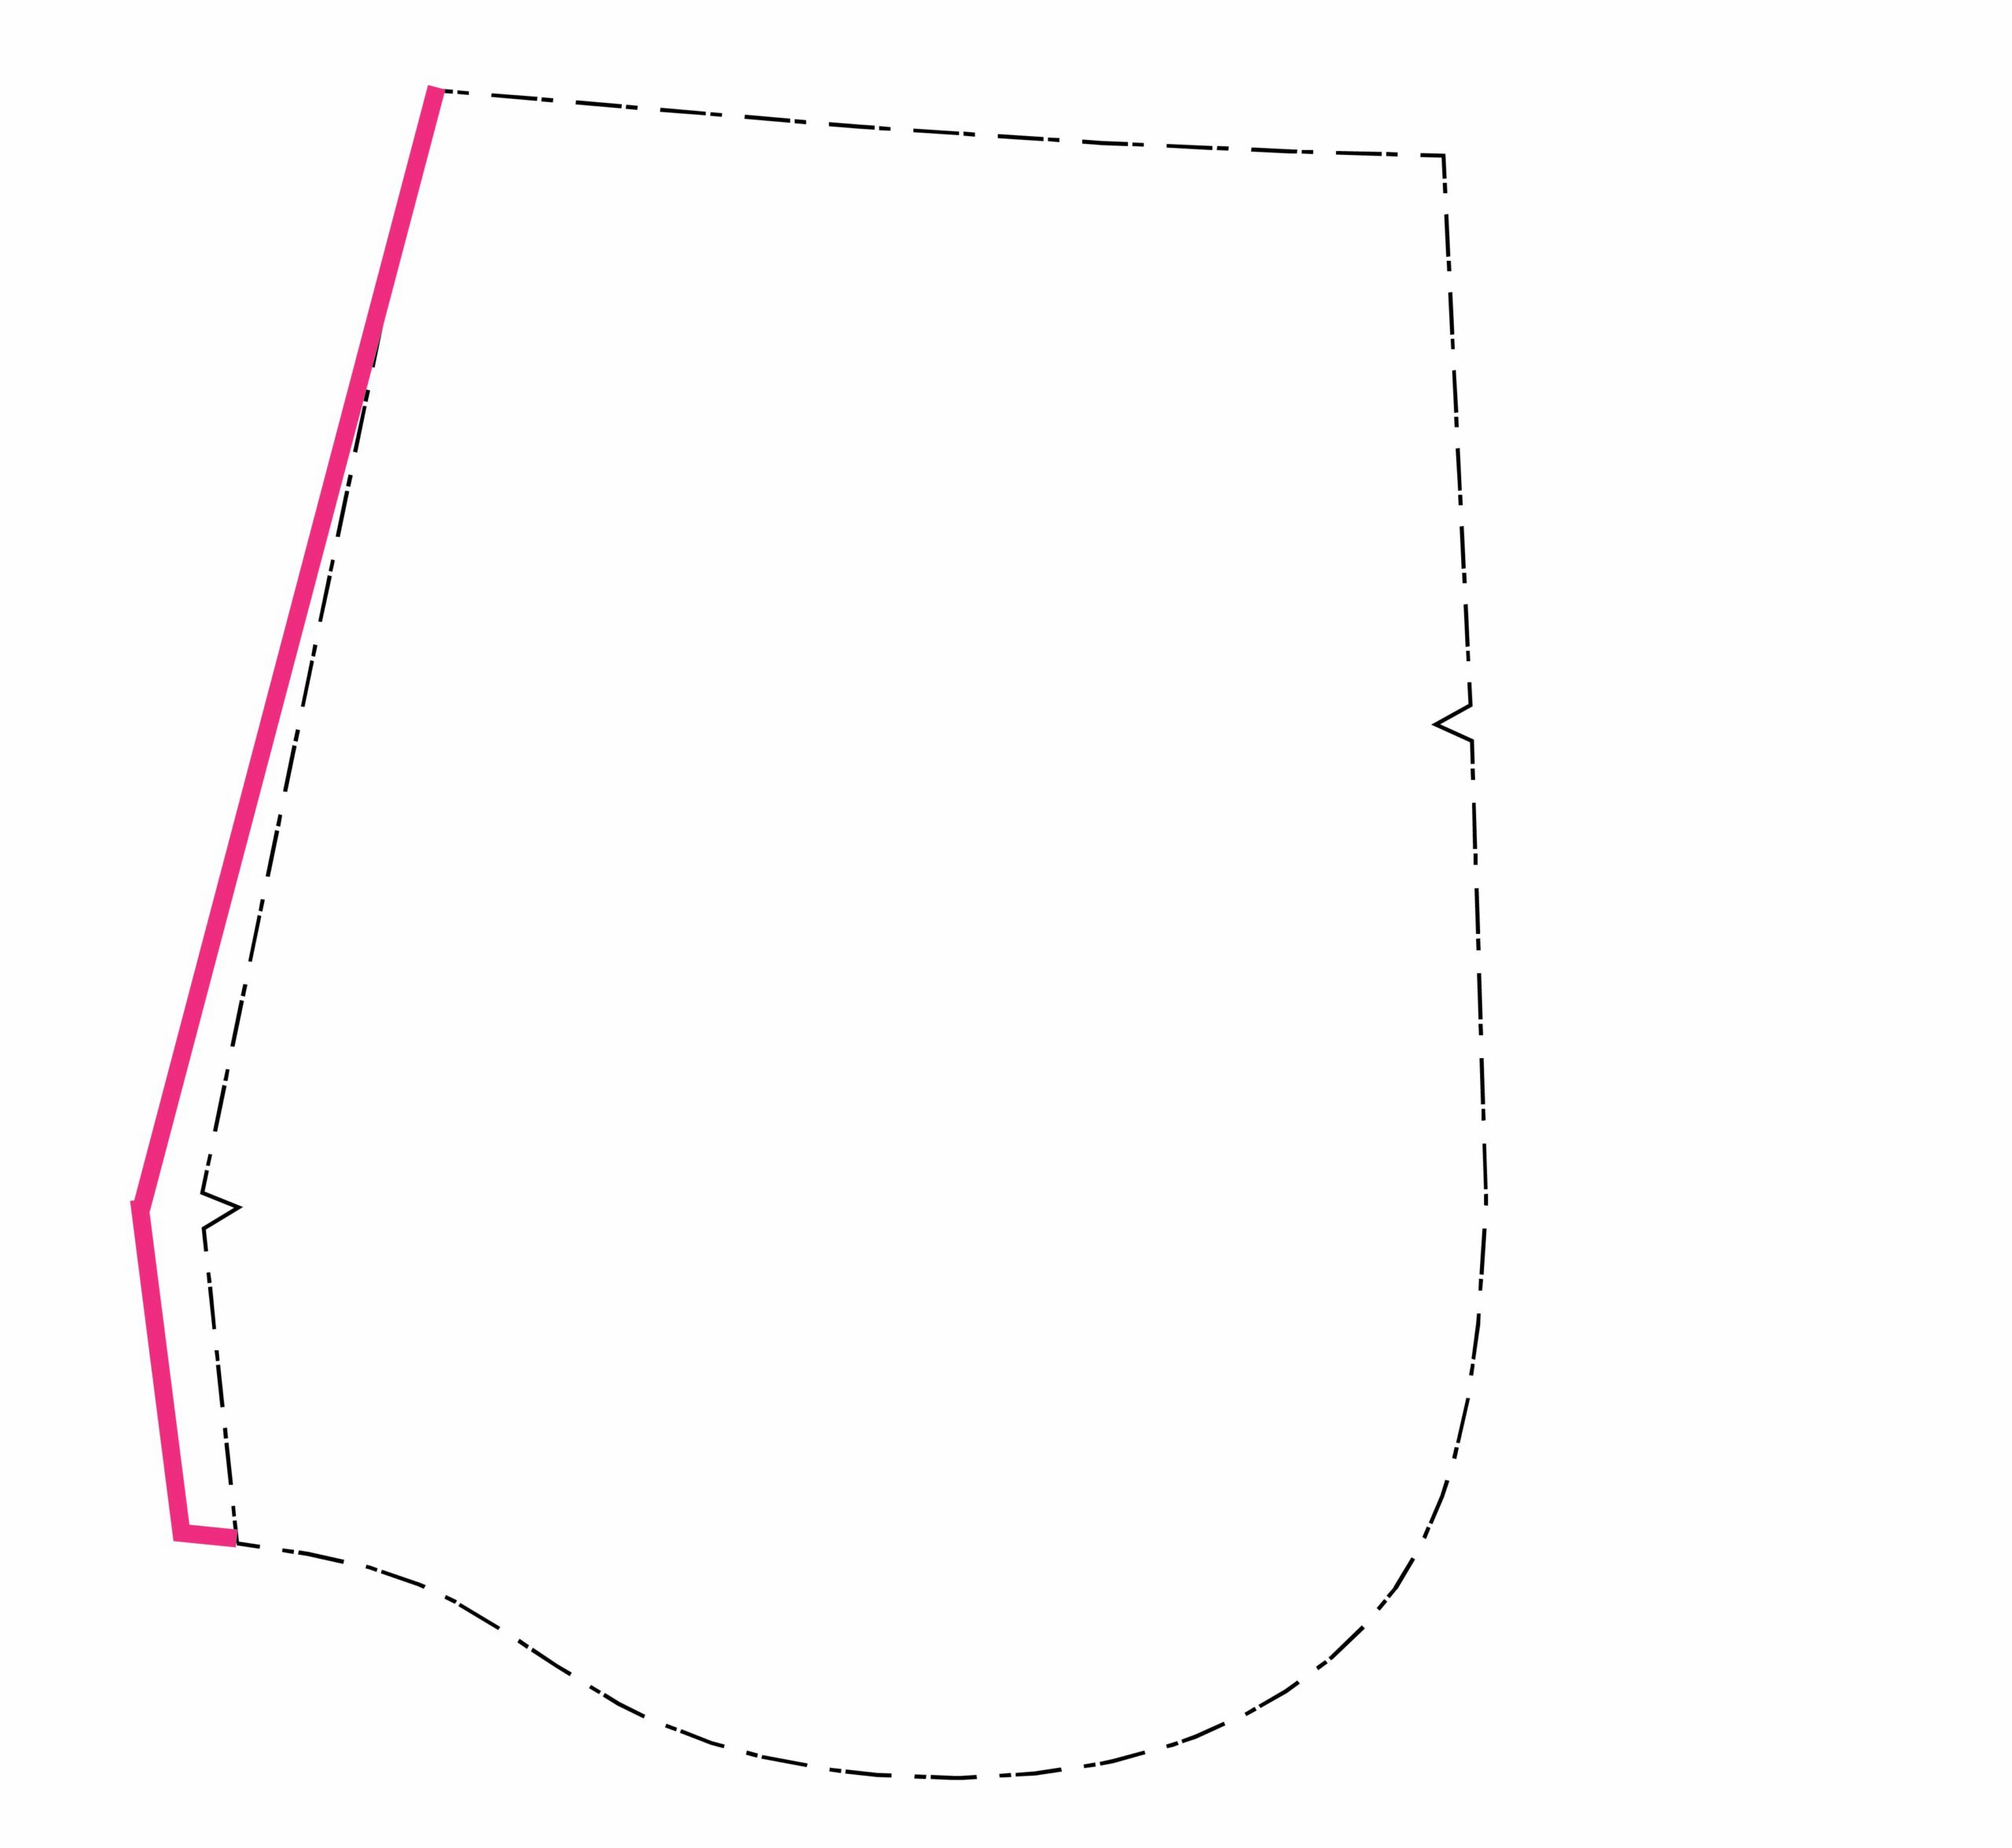
Grading the back leg
Grading the back (2 A/B) piece is done in a similar way, but is easier as we don’t have to worry about the pockets.
1. Mark the top corners of back (2 A/B) based on your waist size (size 20). Mark the side seam notch and the back crotch curve at your hip size (size 24) at the height of the waistband size (size 20) notch location.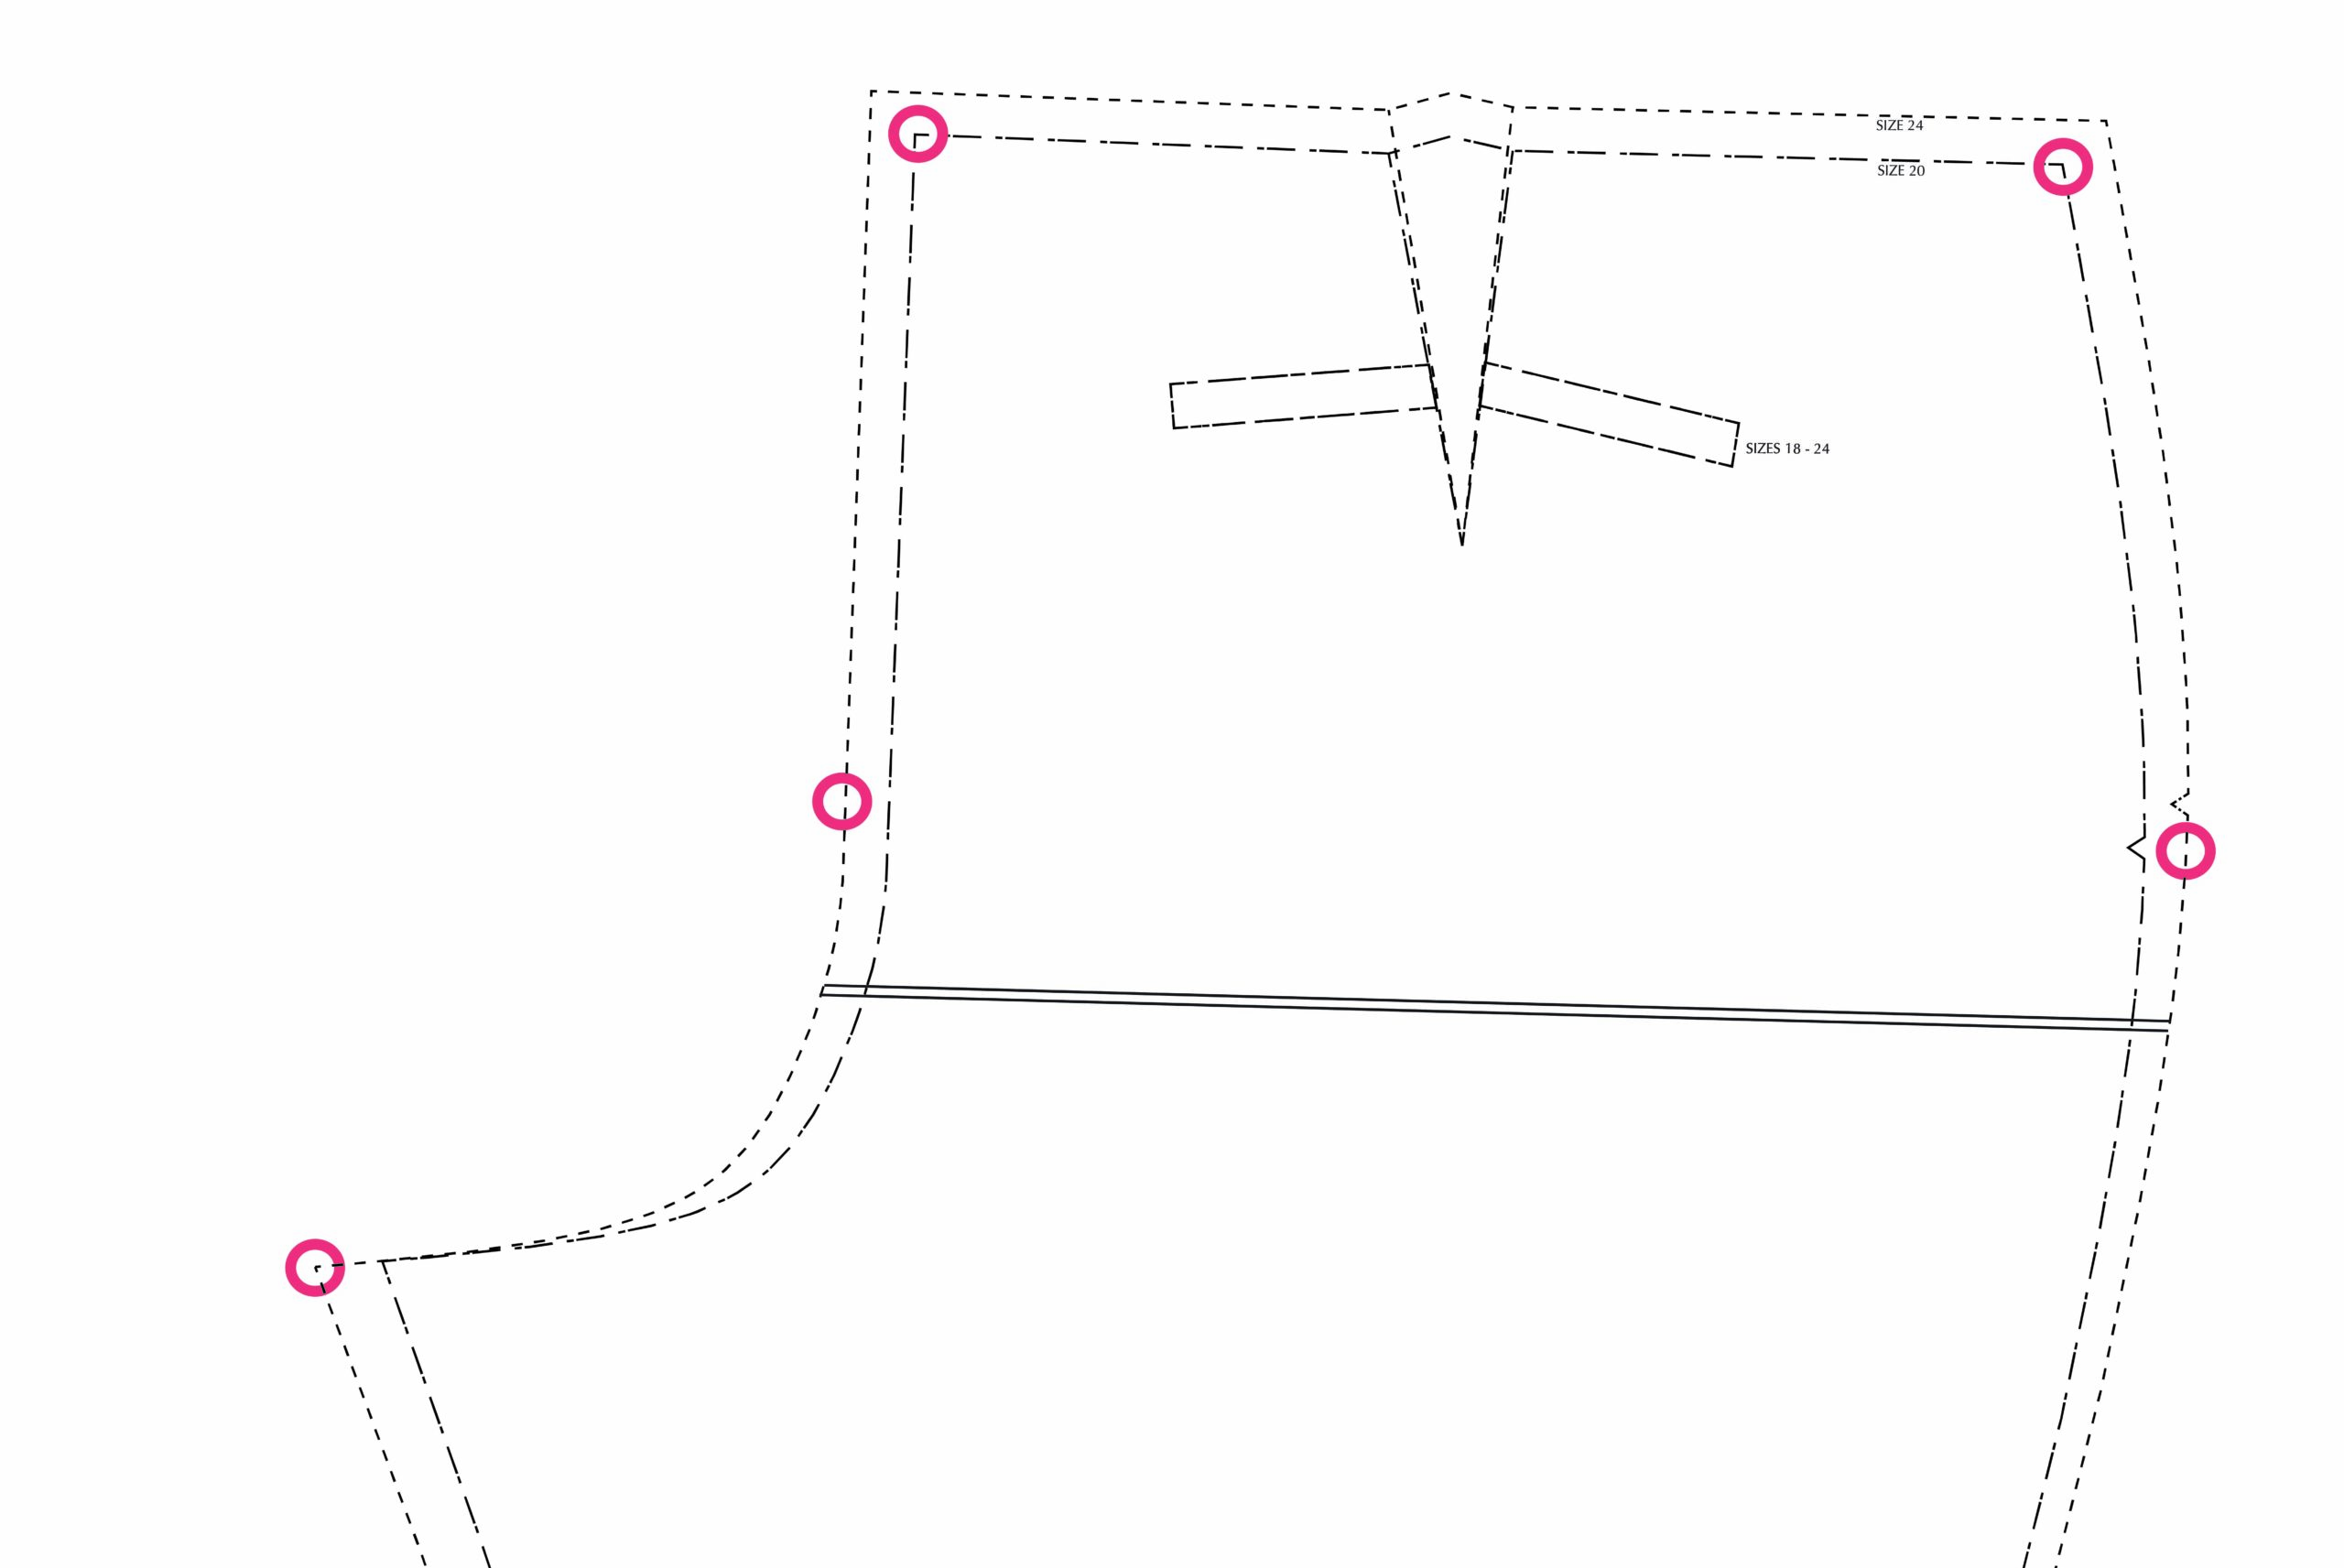
2. On the outer edge, re-draw the side seam between the two points.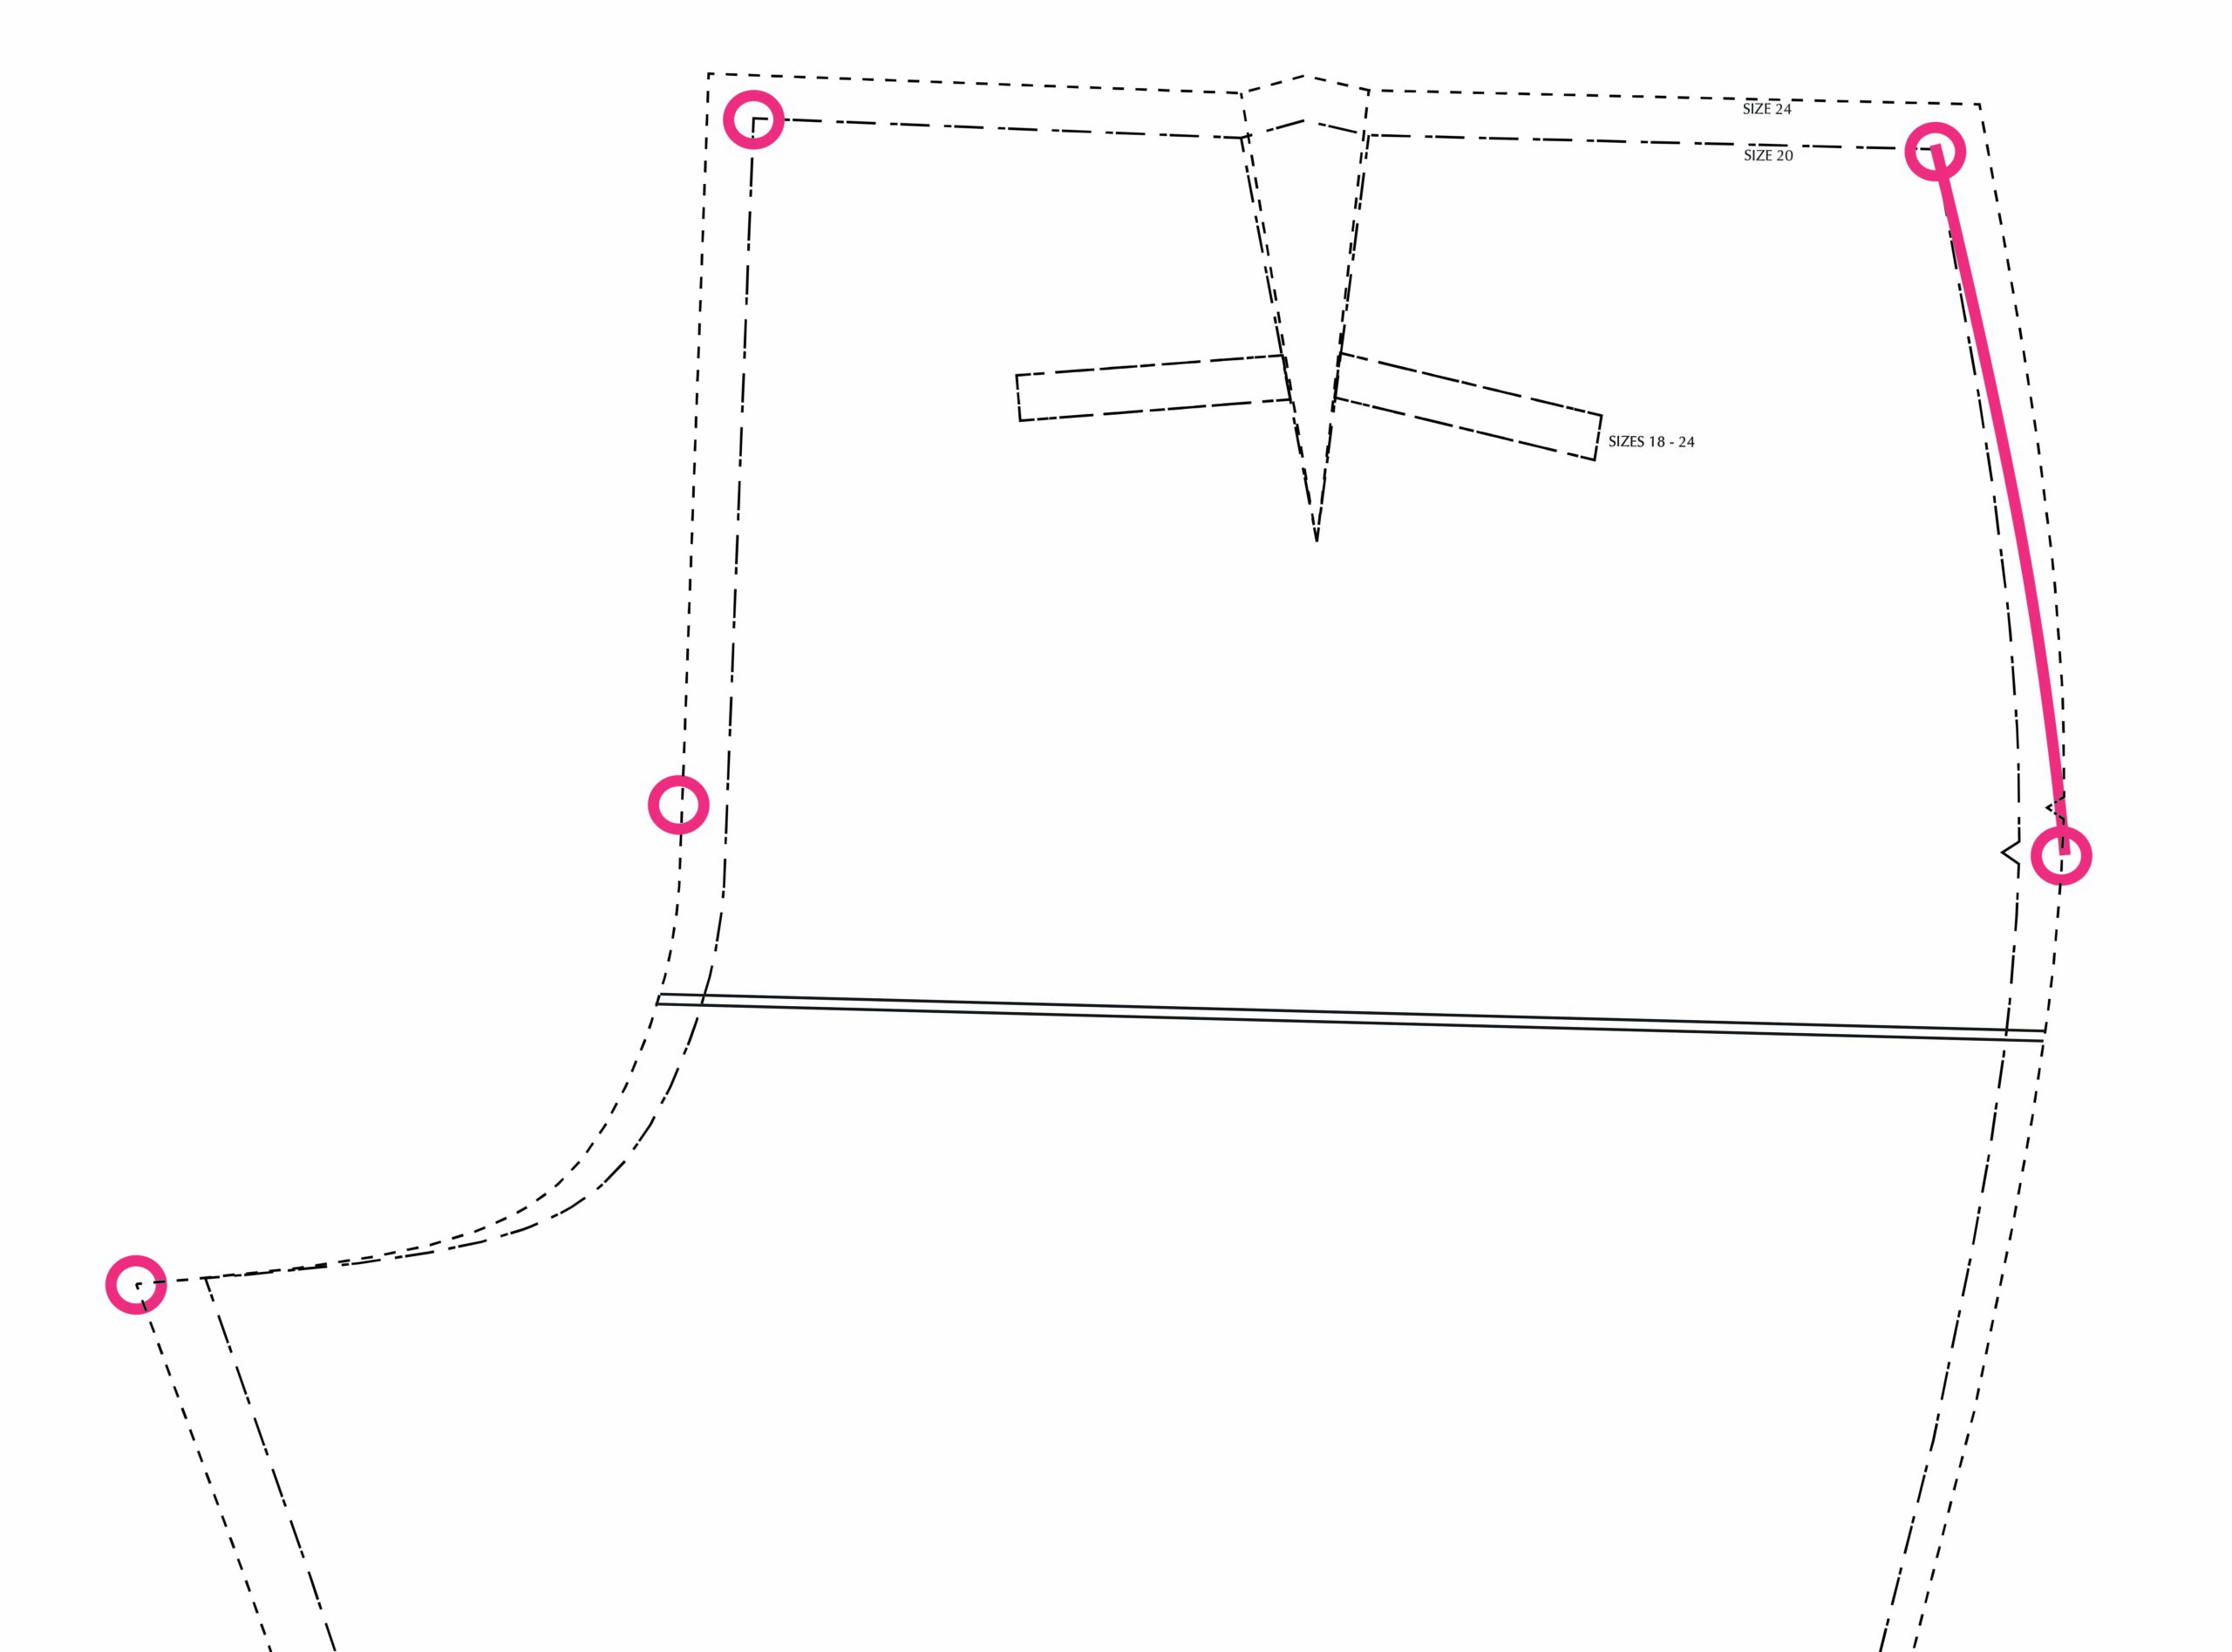
3. For the back crotch curve, you have two options again:
Option 1: Grade through the crotch curve. Join the two points from waist to hips and then continue following the crotch curve for the larger hips size (24) through the bottom of the crotch curve. 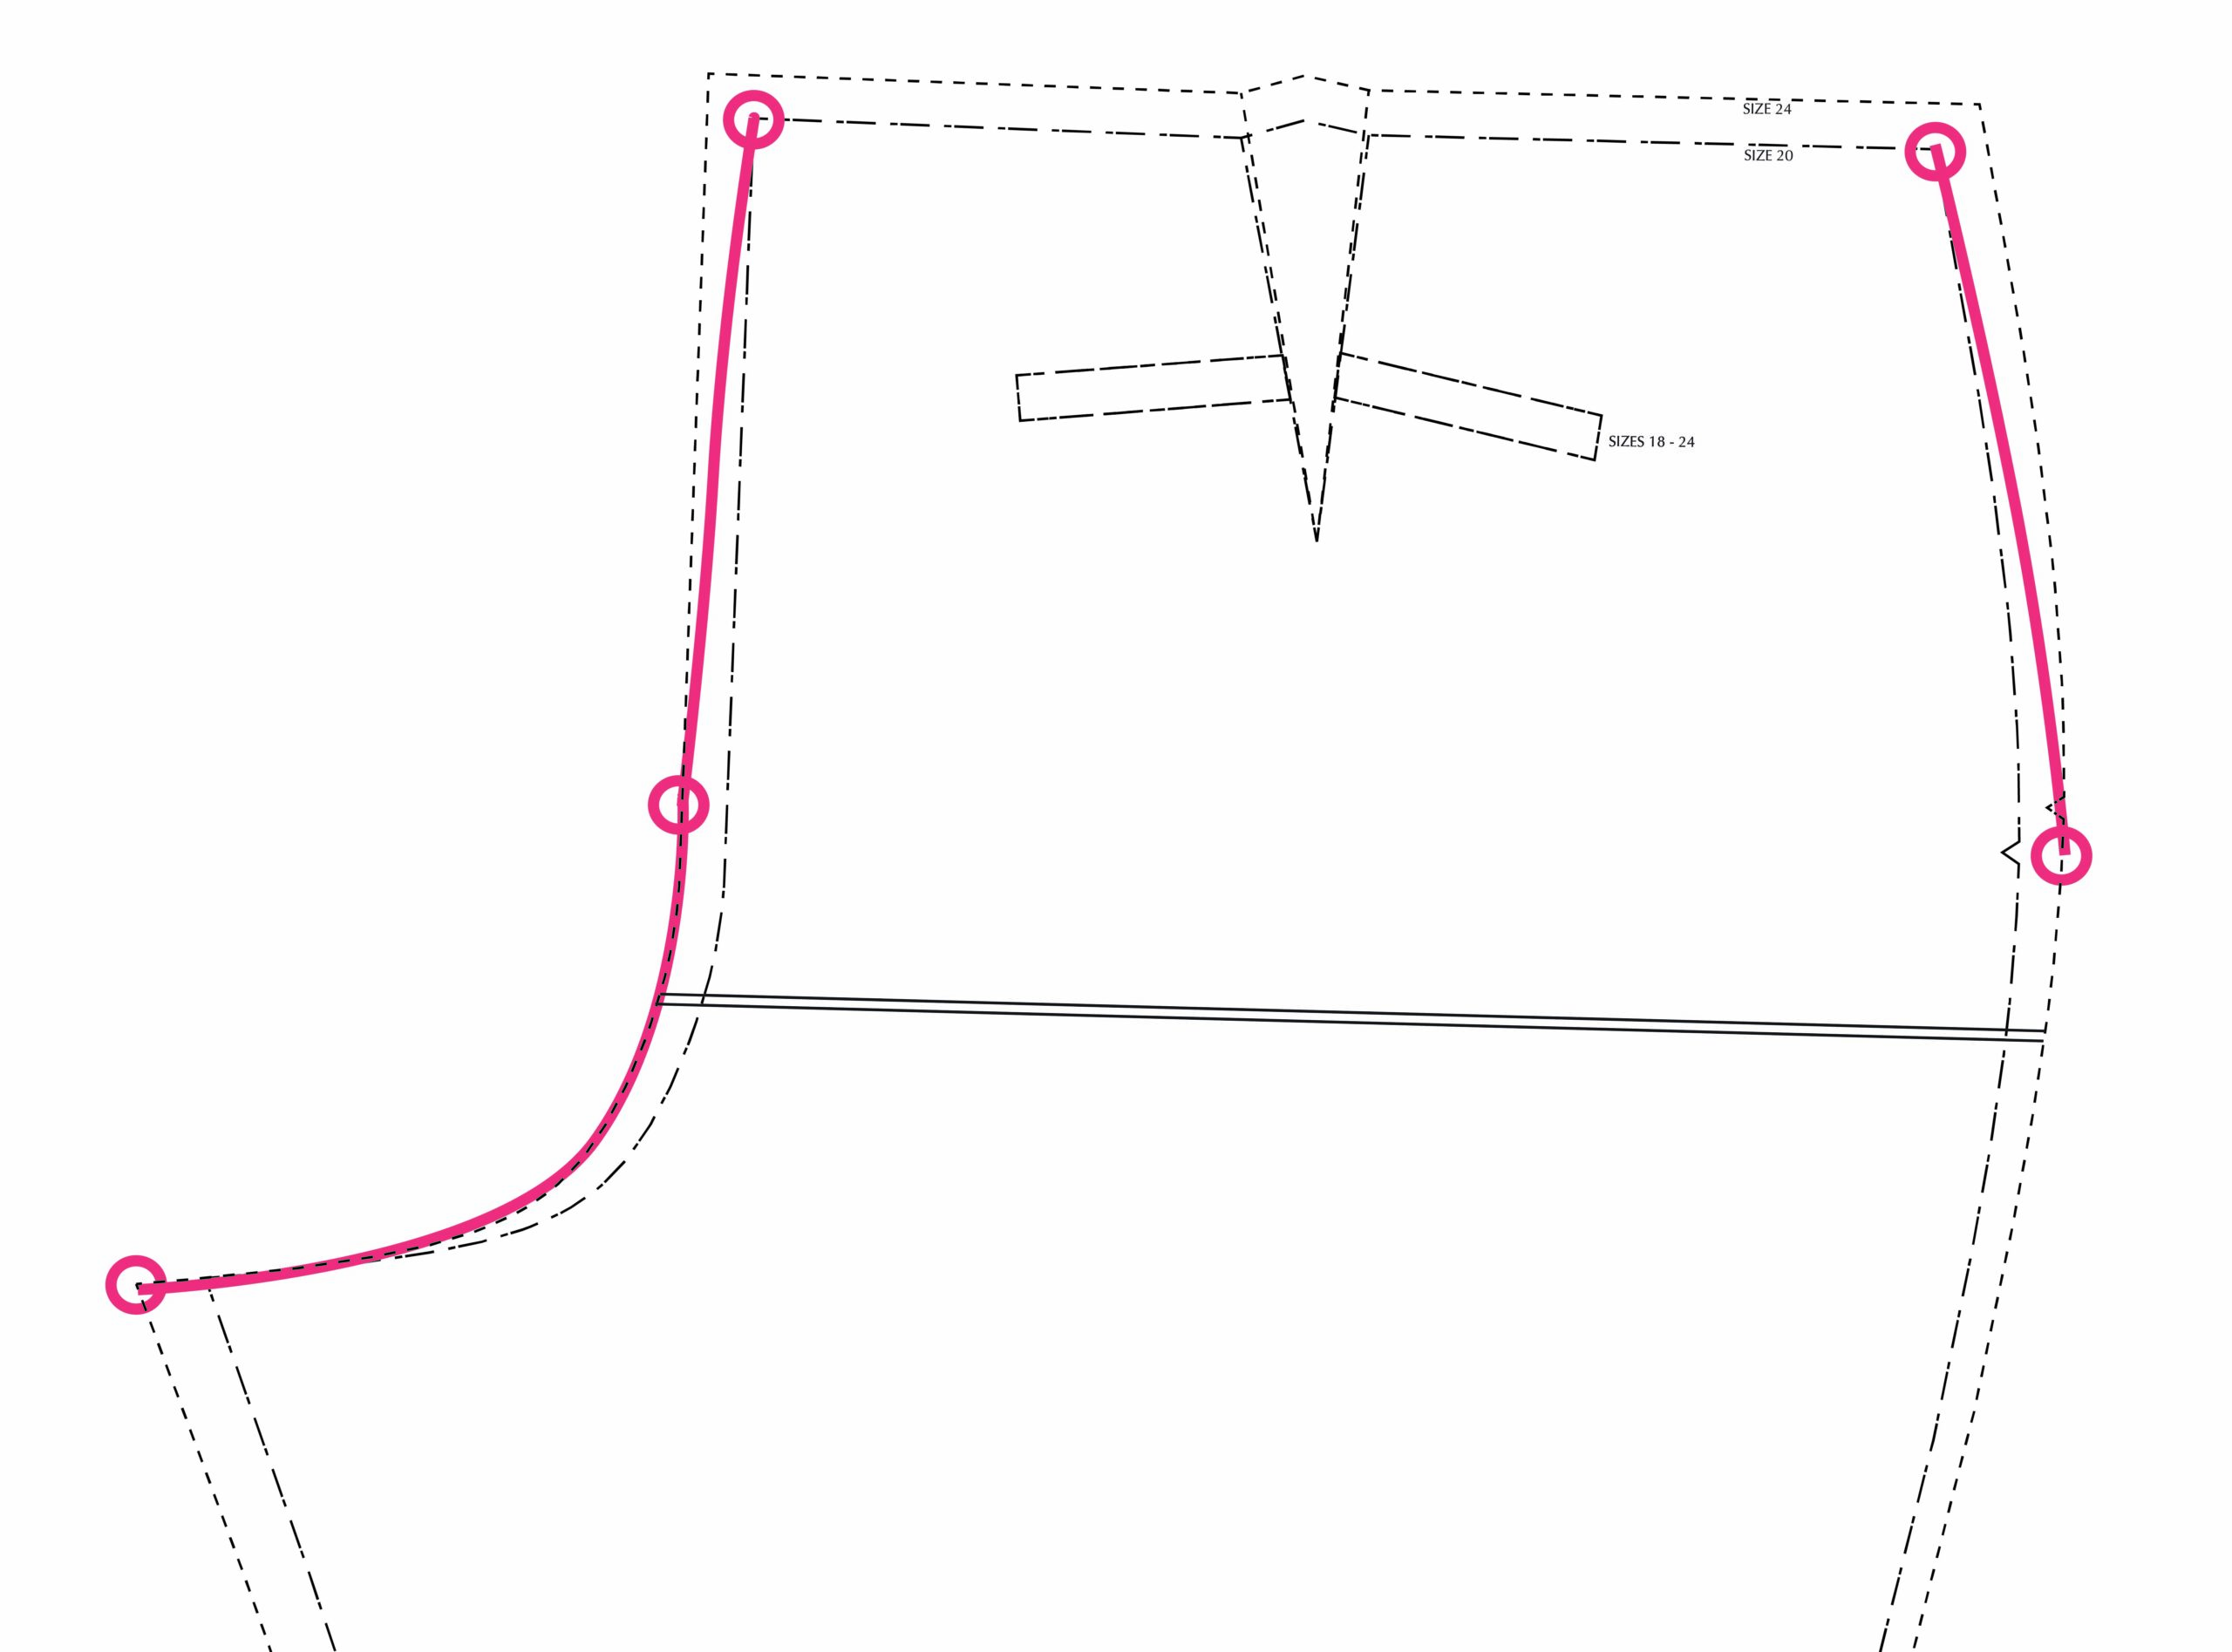
Option 2: Use the dart. Use the whole crotch curve based on your hip size and remove the additional length at the waist seam by taking a wider dart. To do this, measure the distance between the two sizes you are grading between at the center back and then add that amount onto the dart.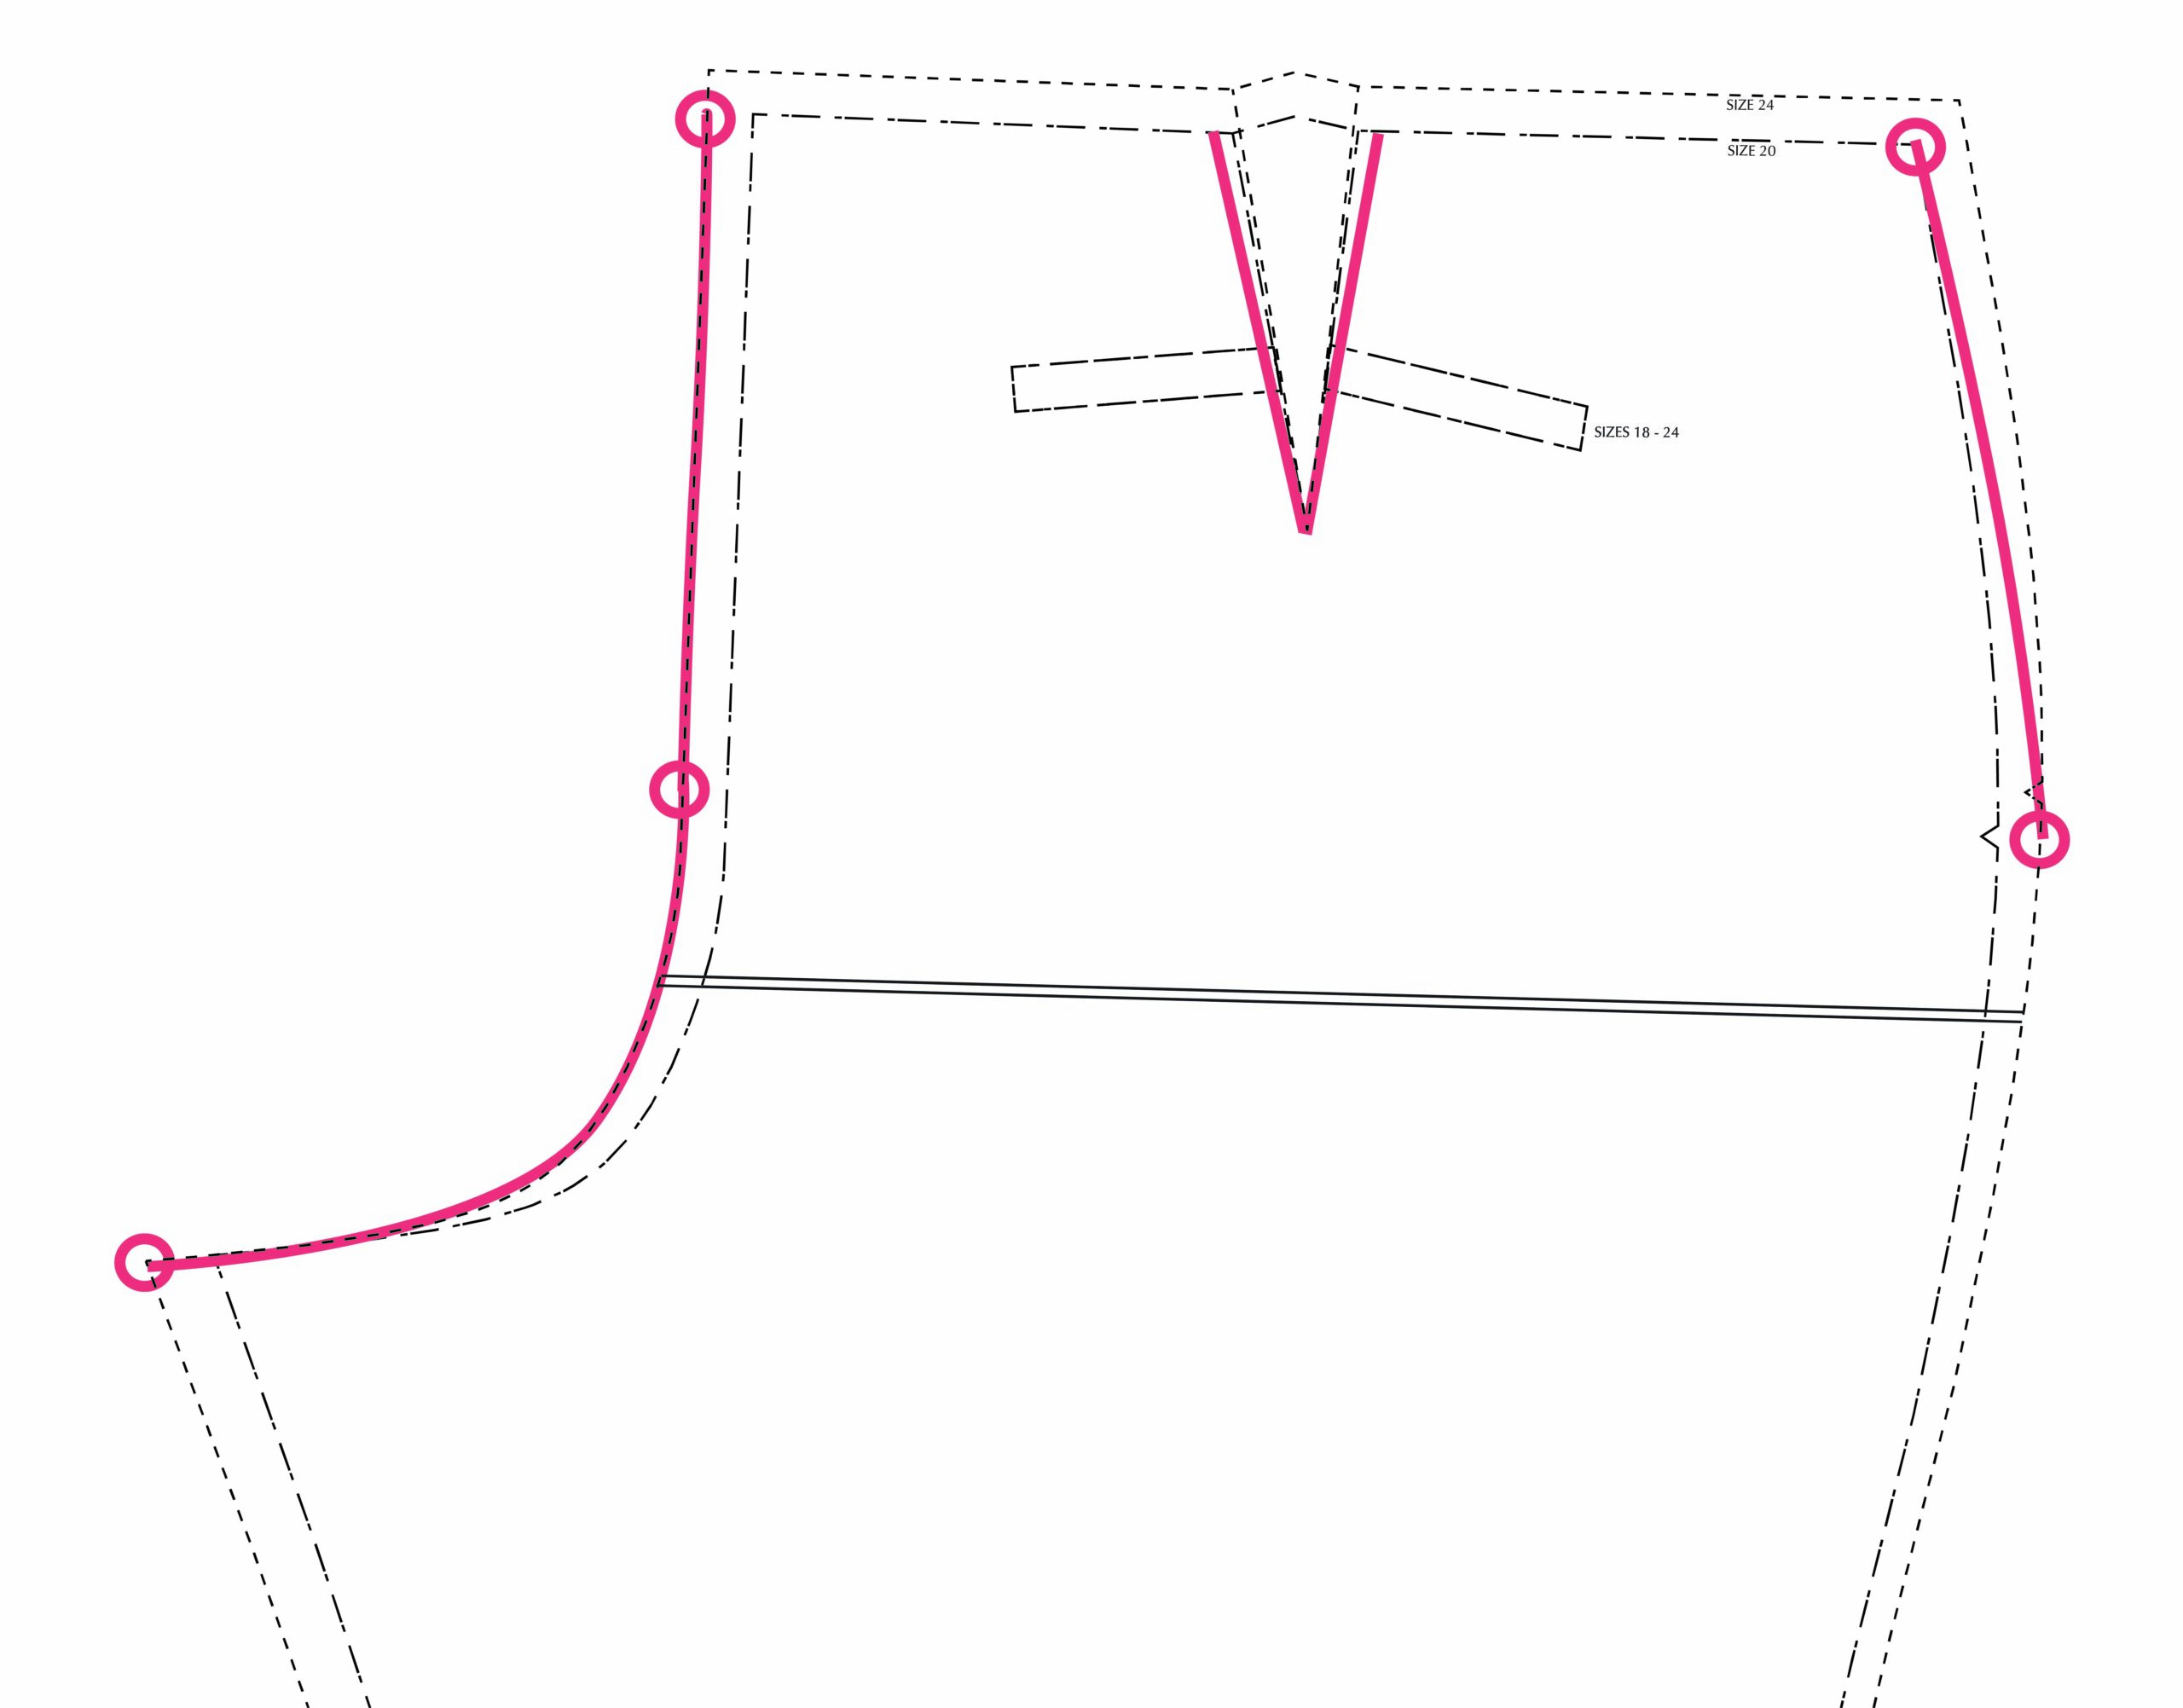
4. Now you can cut out your pattern piece. Cut the legs out at the hip size (24). Continue cutting up the side seam along your new marked outer seam line. Cut across the top at the waist size (remember if you modified the darts you will also need to modify the dart uptake) and the cut down the front along your marked lines. The cut lines are purple in the image below: 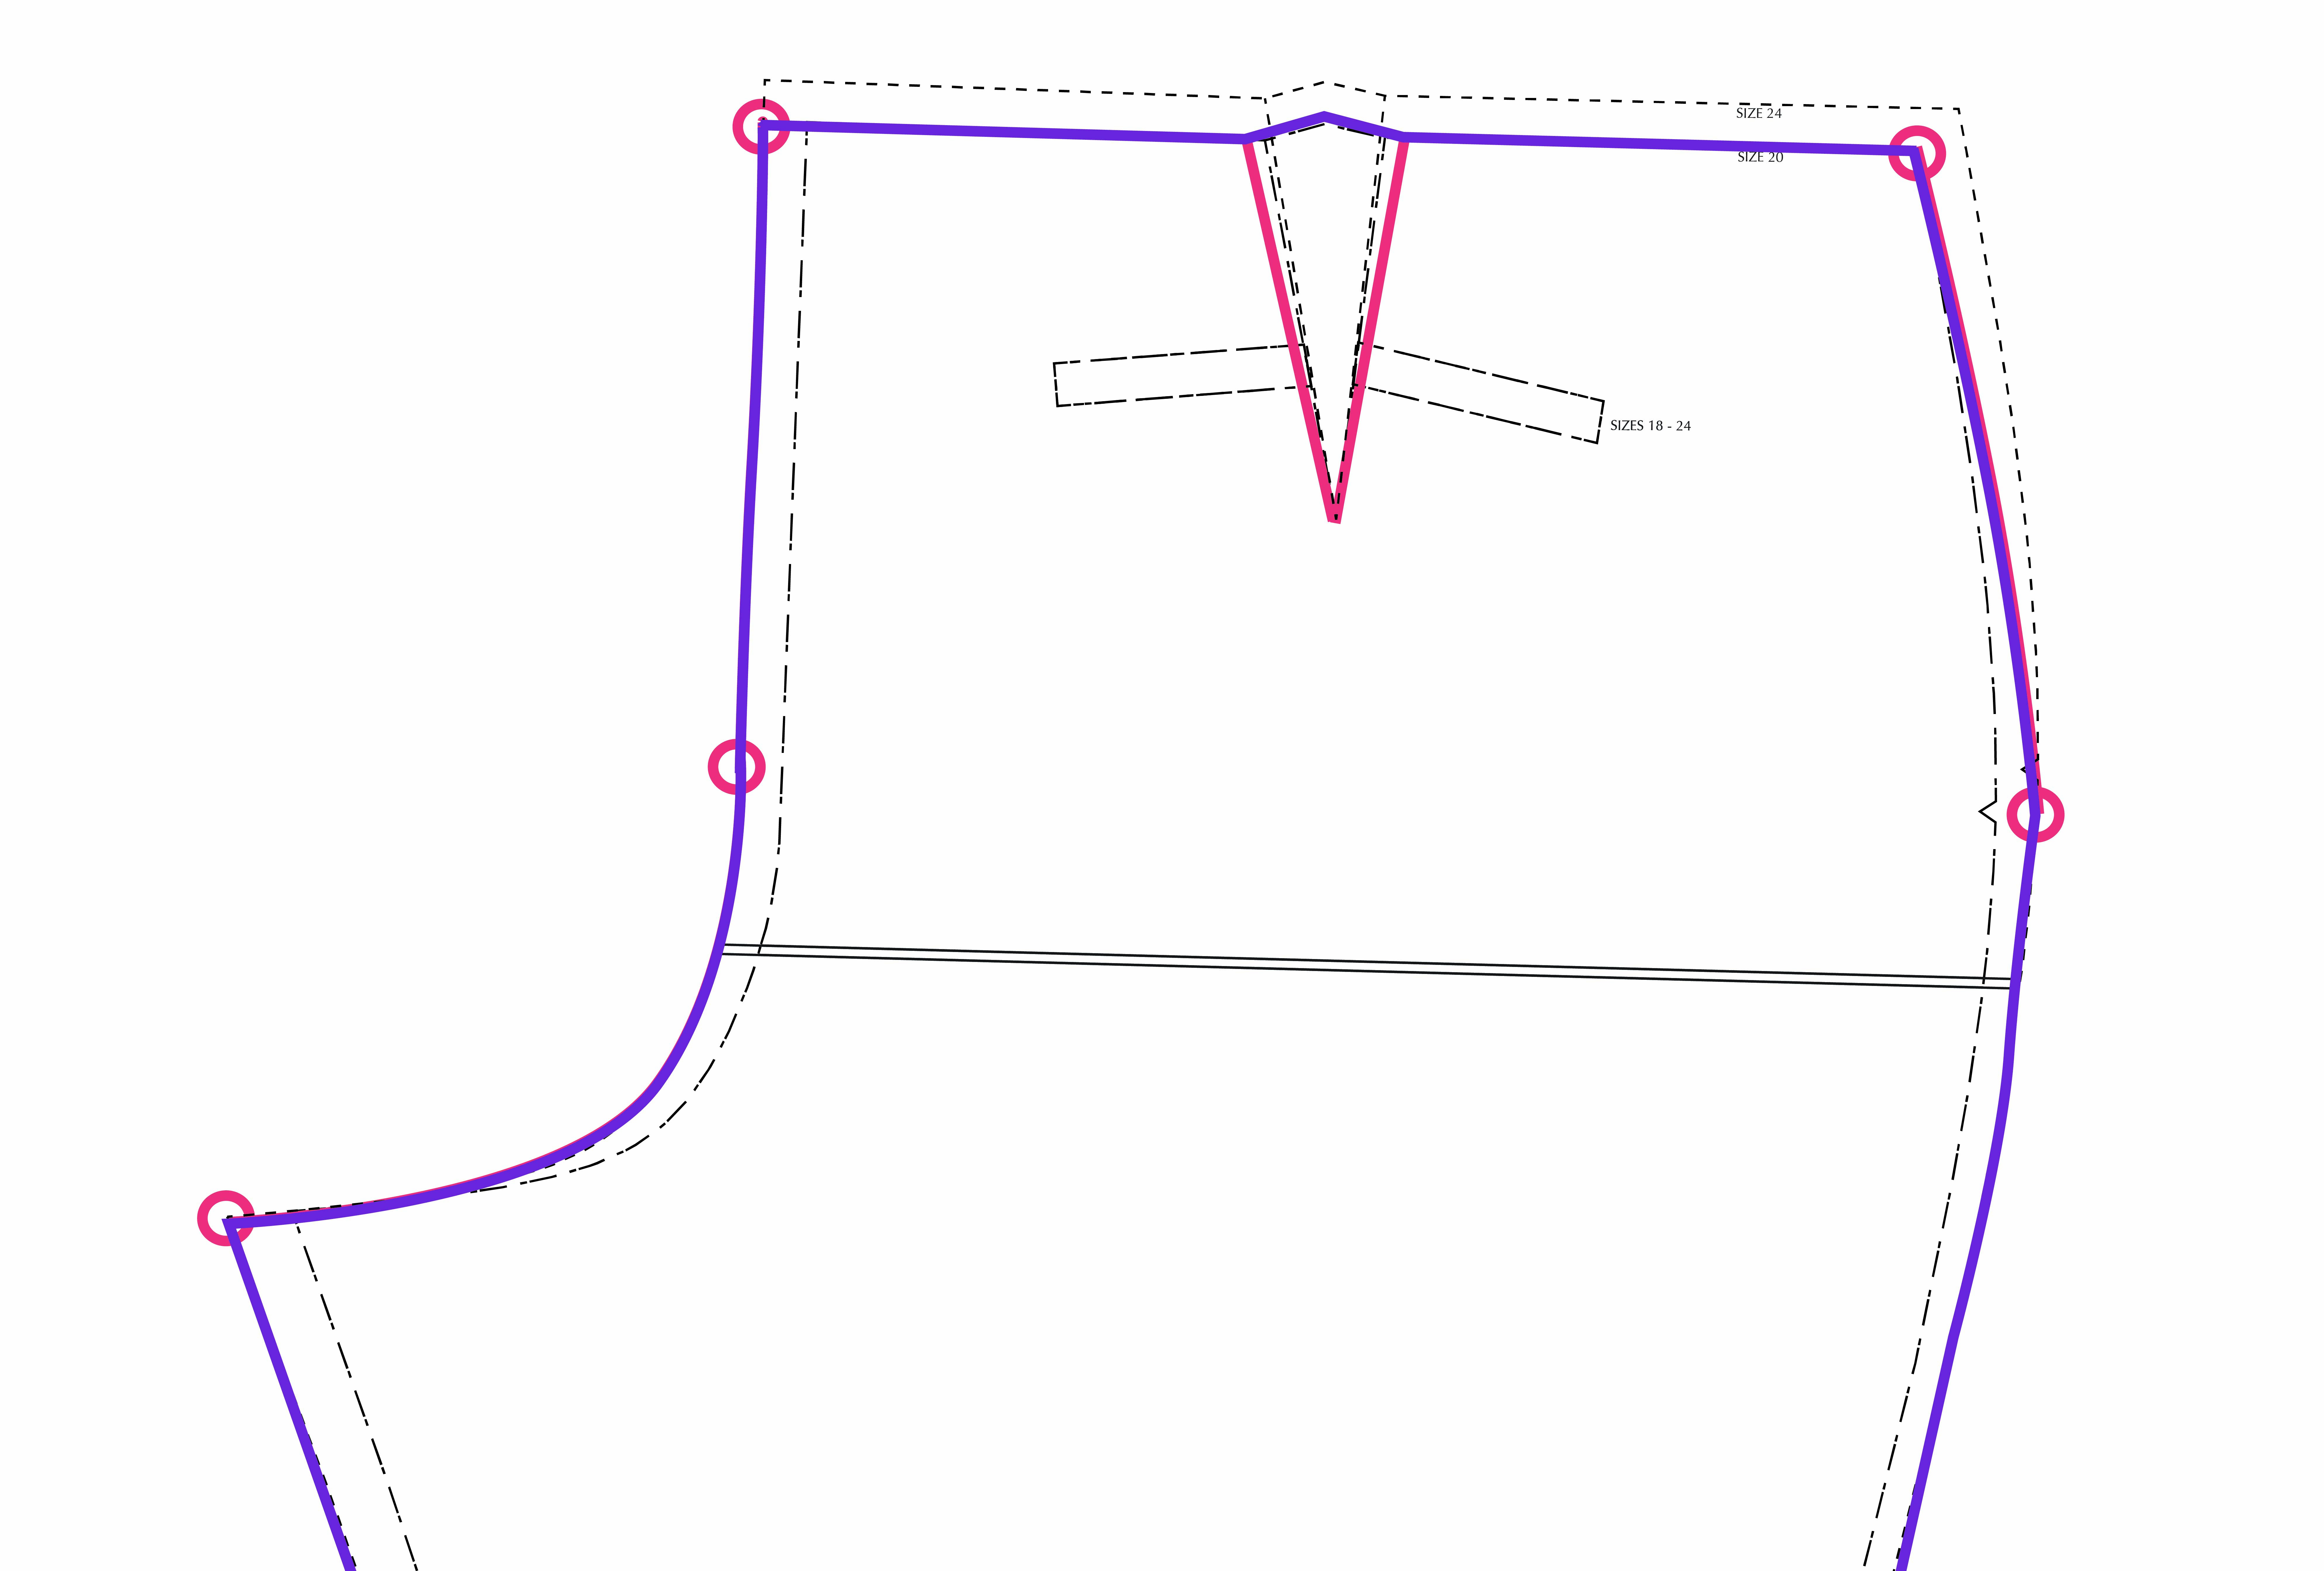
How to grade from a larger waist size to a smaller hip size
For this example we will be grading from a 24 waist to a 20 hips.
Grading the Front Leg
To begin, we are going to tape all the pocket pieces together with the front leg so that we only need to make our changes once – they’ll be joined as if they were being sewn so the all pocket pieces will end up behind the front piece, and when it’s all laid flat it’ll look like the final garment. Use the pocket pieces associated with your WAIST size – in this case the size 24.
1. Temporarily tape the pocket facing (6) on top of the lower pocket (5), aligning notches.
2. Temporarily tape the top pocket (7) behind the front (1) aligning the pocket edge and top edge with your waistband size (size 24).
3. Temporarily tape the lower pocket (5) and pocket facing (6) behind the top pocket (7), aligning the two pocket pieces.
4. Mark the two top corners based on your waist size — in this case, the size 24 pattern. The outer corner will be the corner of the lower pocket (5). 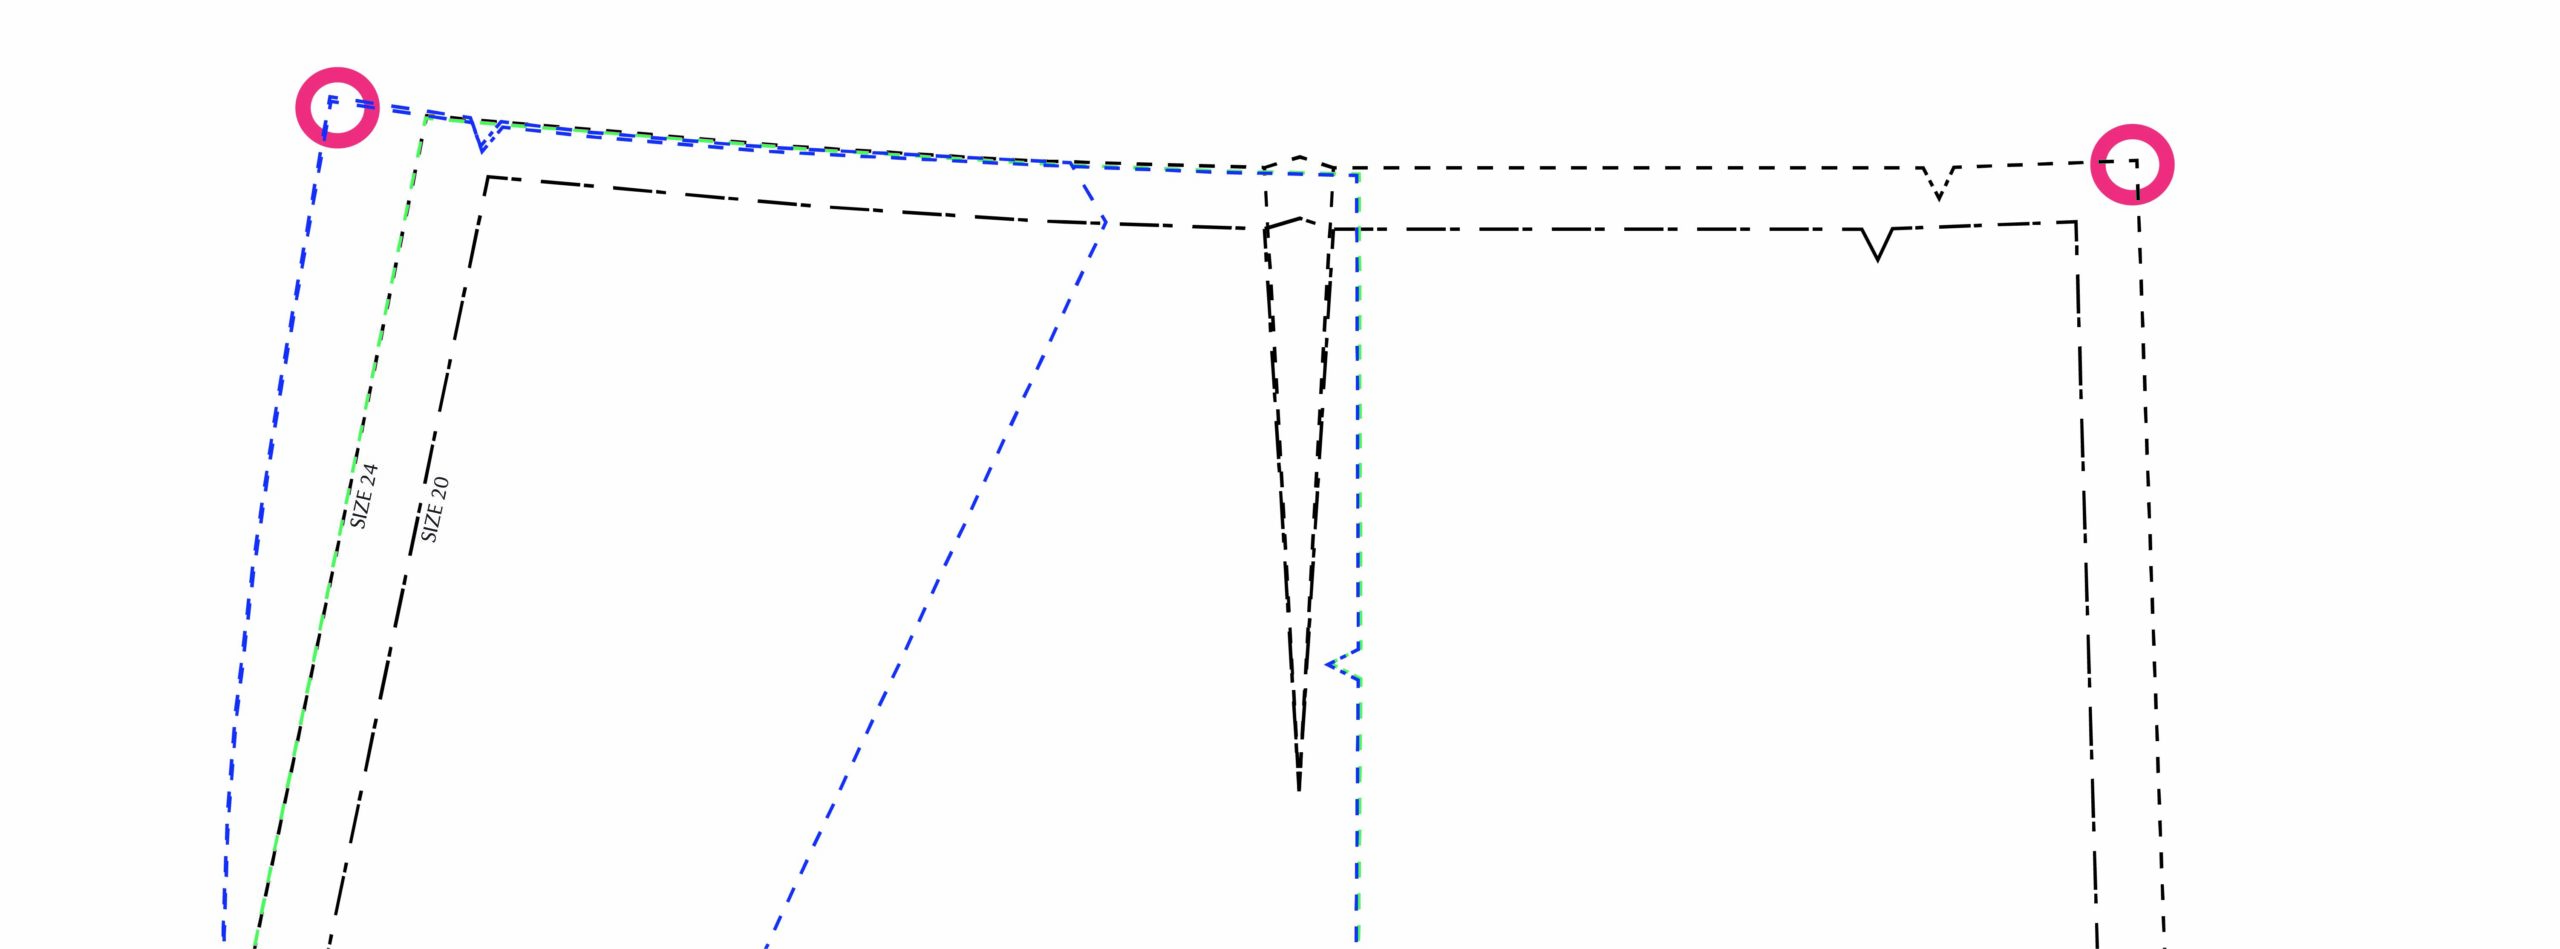
5. Mark the bottom the bottom of the fly extension and the bottom of the crotch curve at your hip size (size 20). Mark the bottom of the pocket on the outer edge, this mark should be at the height of the pocket notch location, but the width of the hips size (20). 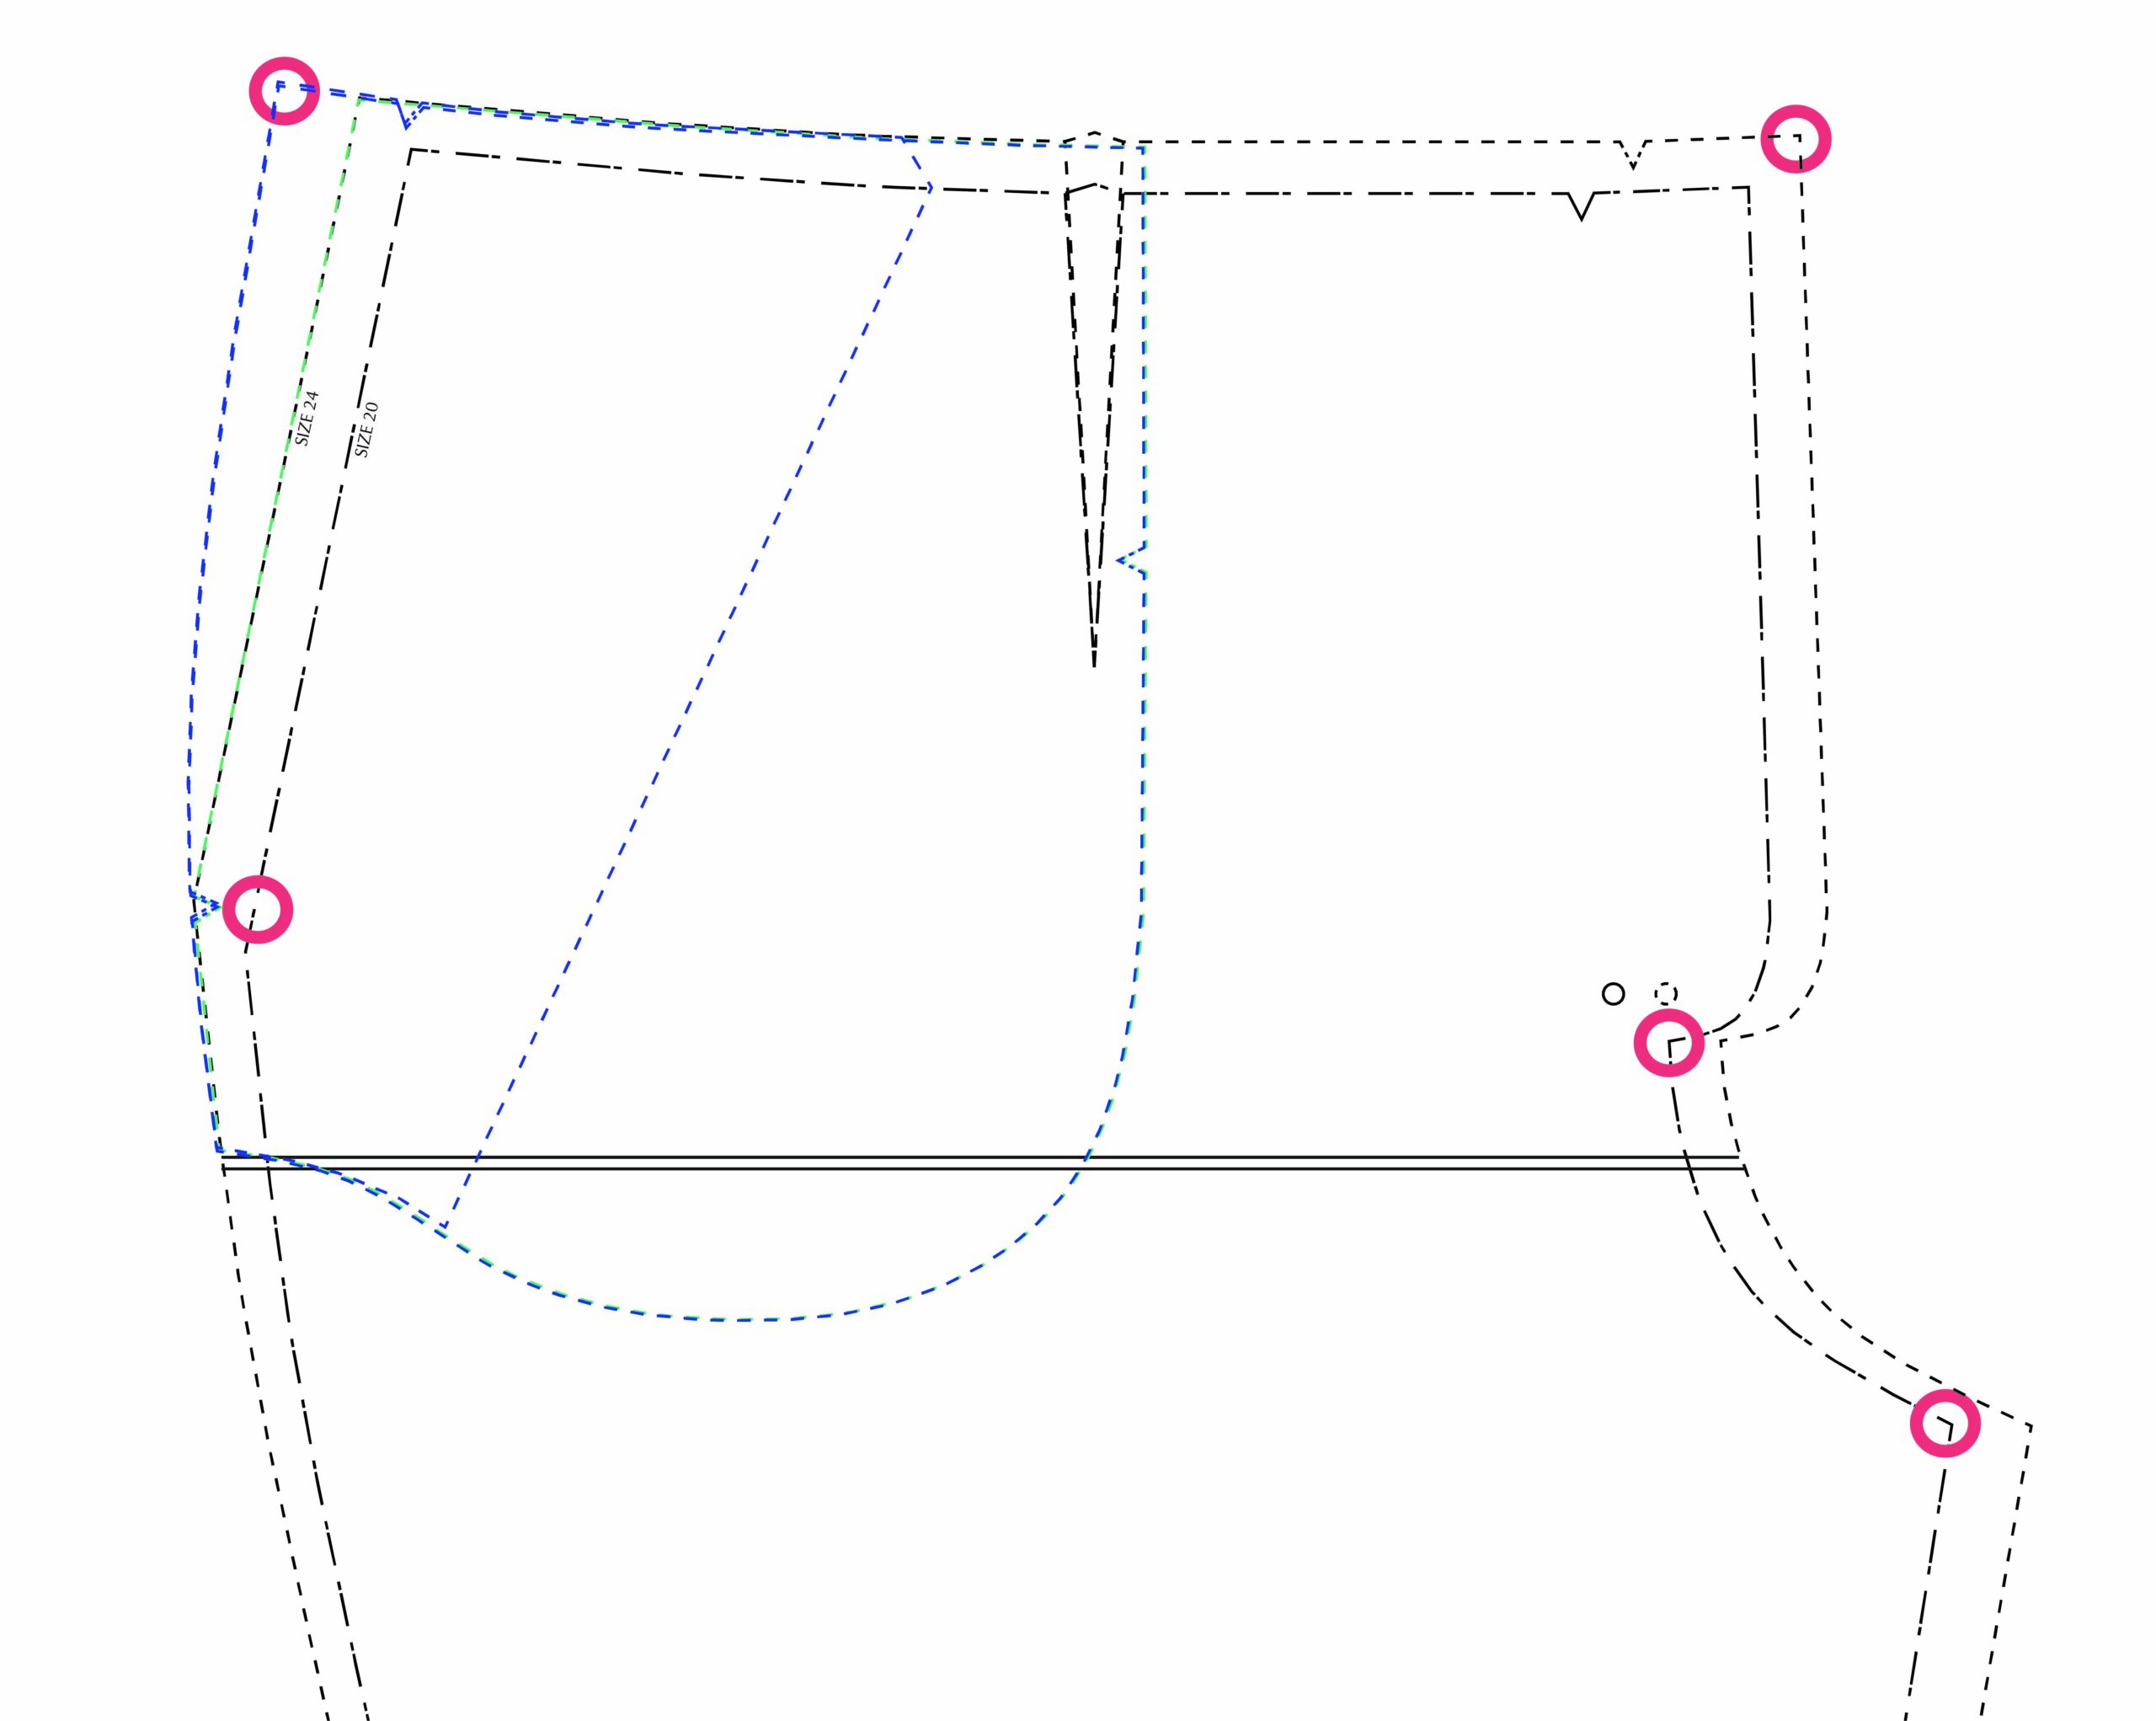
In order to determine the exact location, you will need to extend the outer side seam for your hip size (20) up towards the top for about 1″ (2.5 cm).
6. On the outer edge, re-draw the side seam between the two marked points – use a French curve to create a smooth curve. 
7. Now draw a straight line from the top corner of the front (1) piece at the waistband size (size 24) down to the same point. This is your new pocket opening. 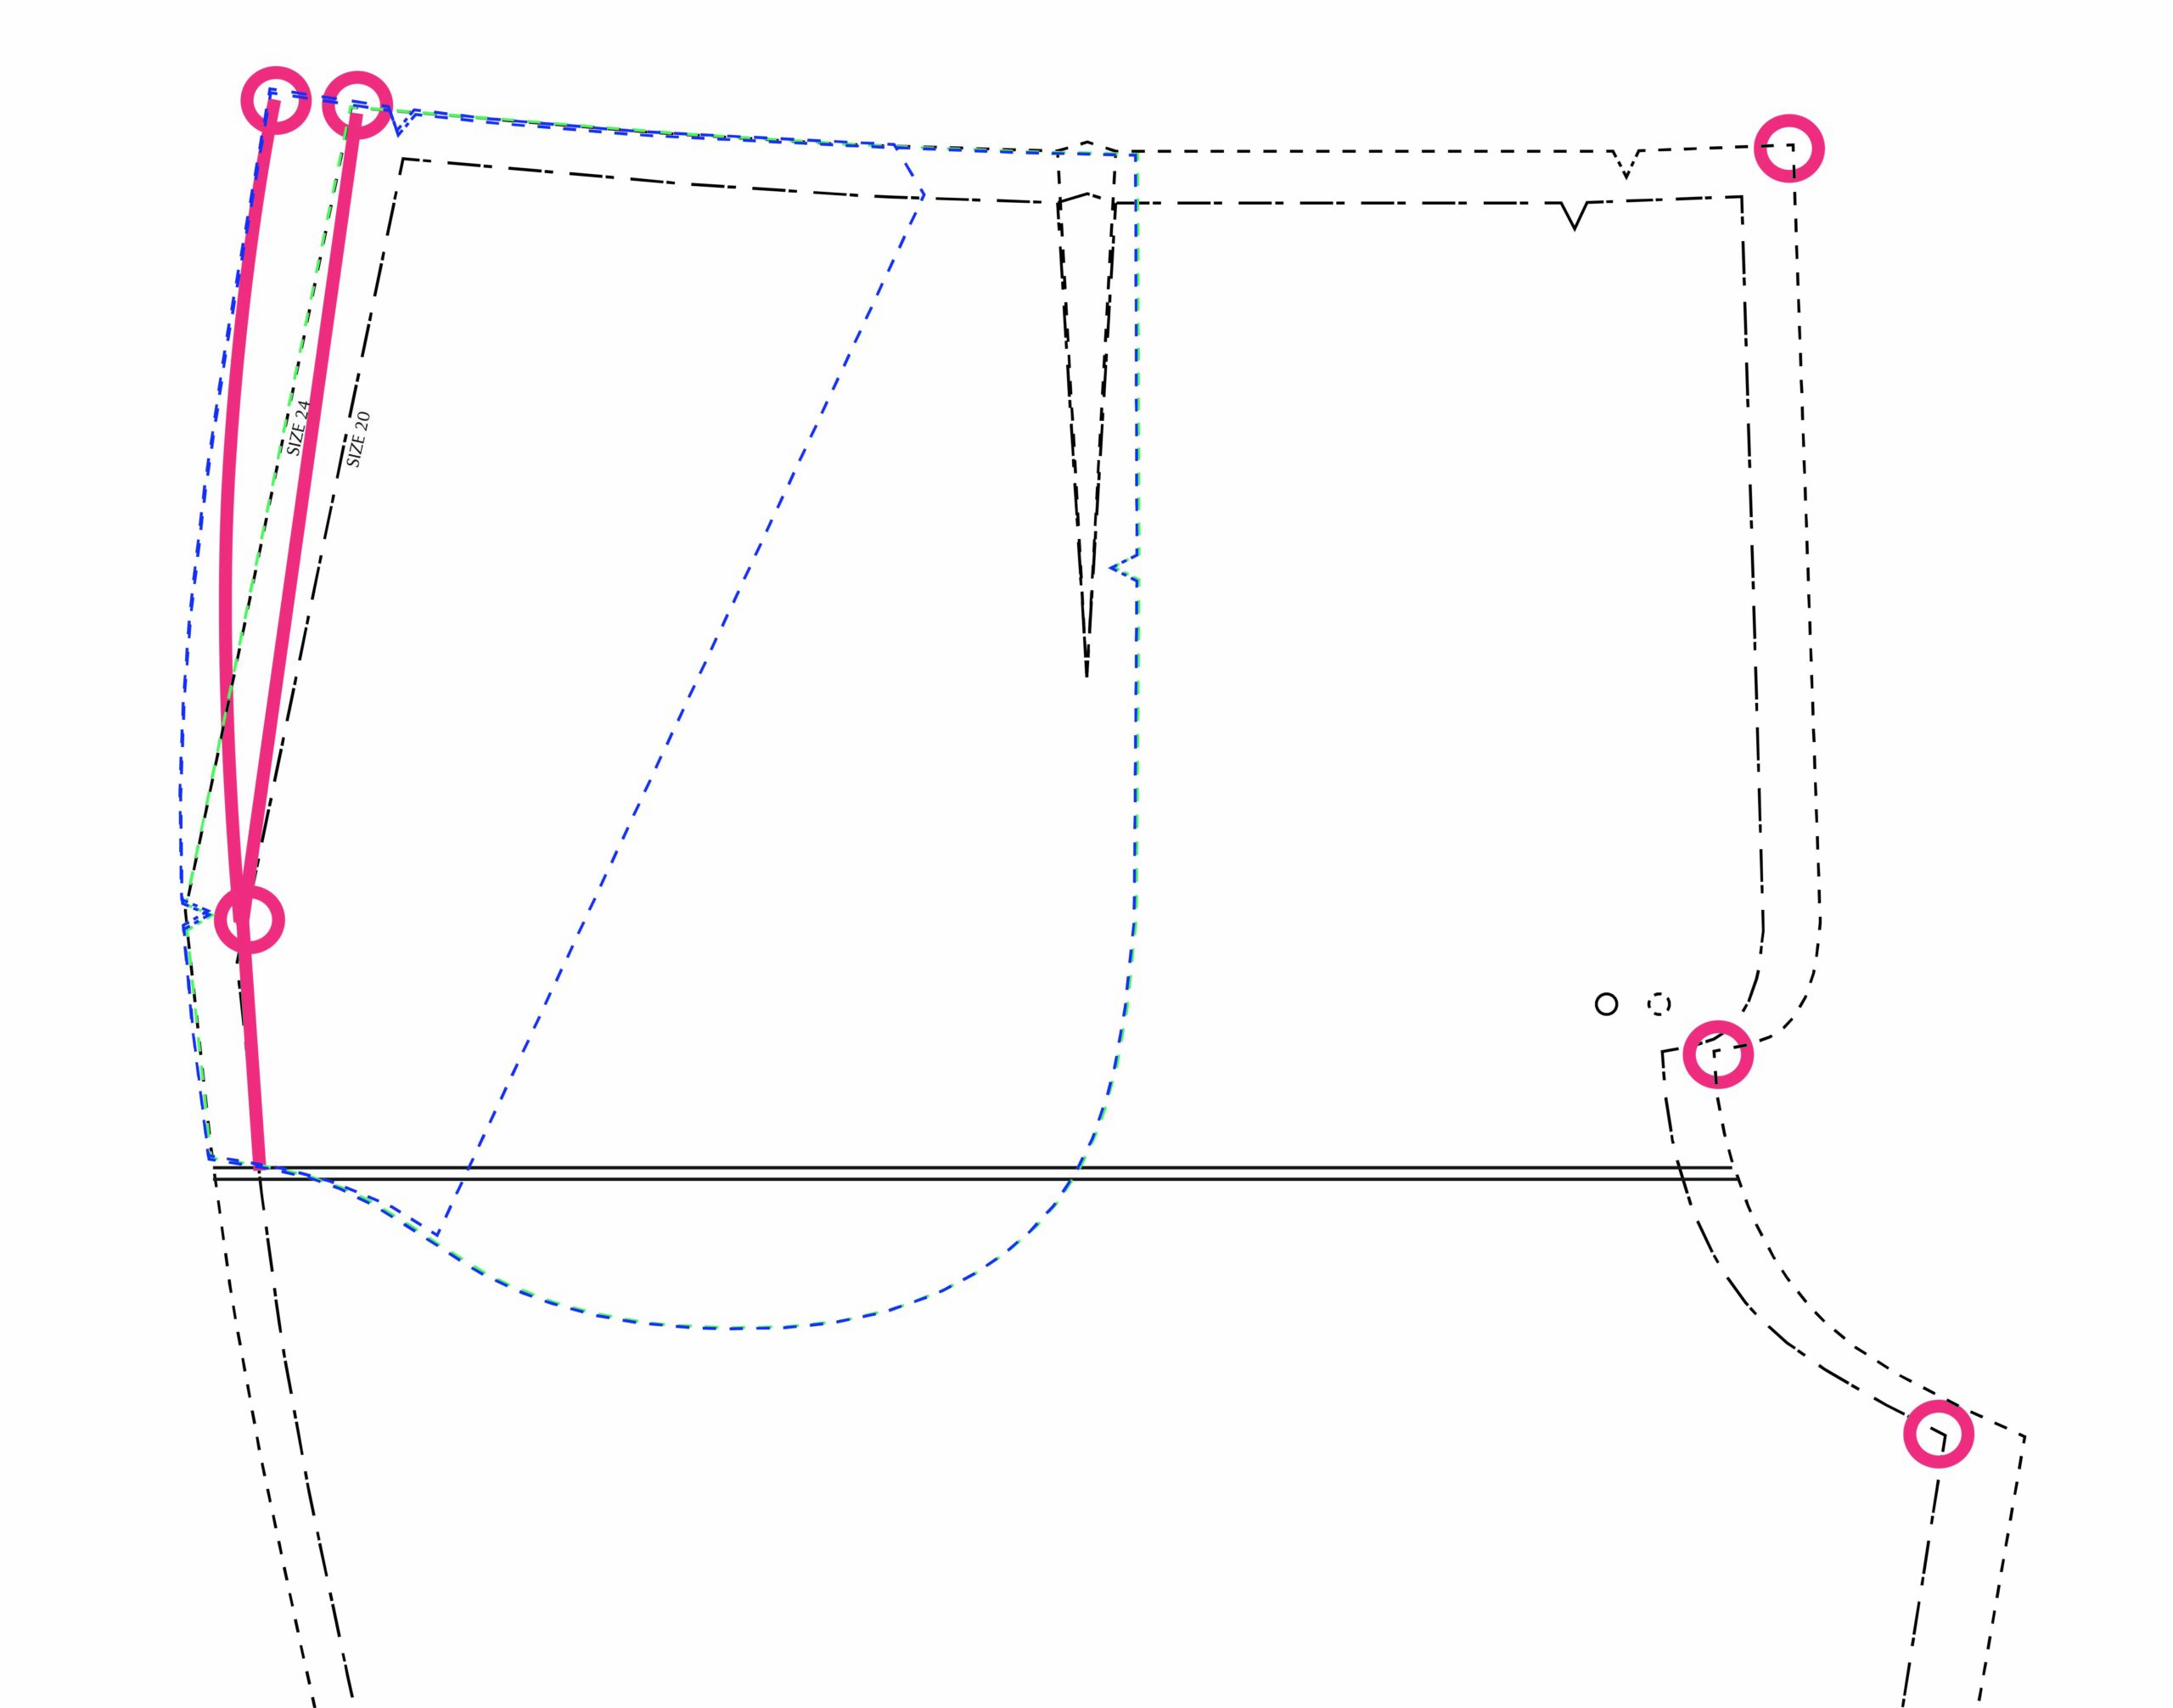
8. There are two different options for how to deal with the center front grading:
Option 1: Grade through the crotch curve. To do this, use the waist size (24) for the entire fly area and then grade down to the hip size (20) through the crotch curve.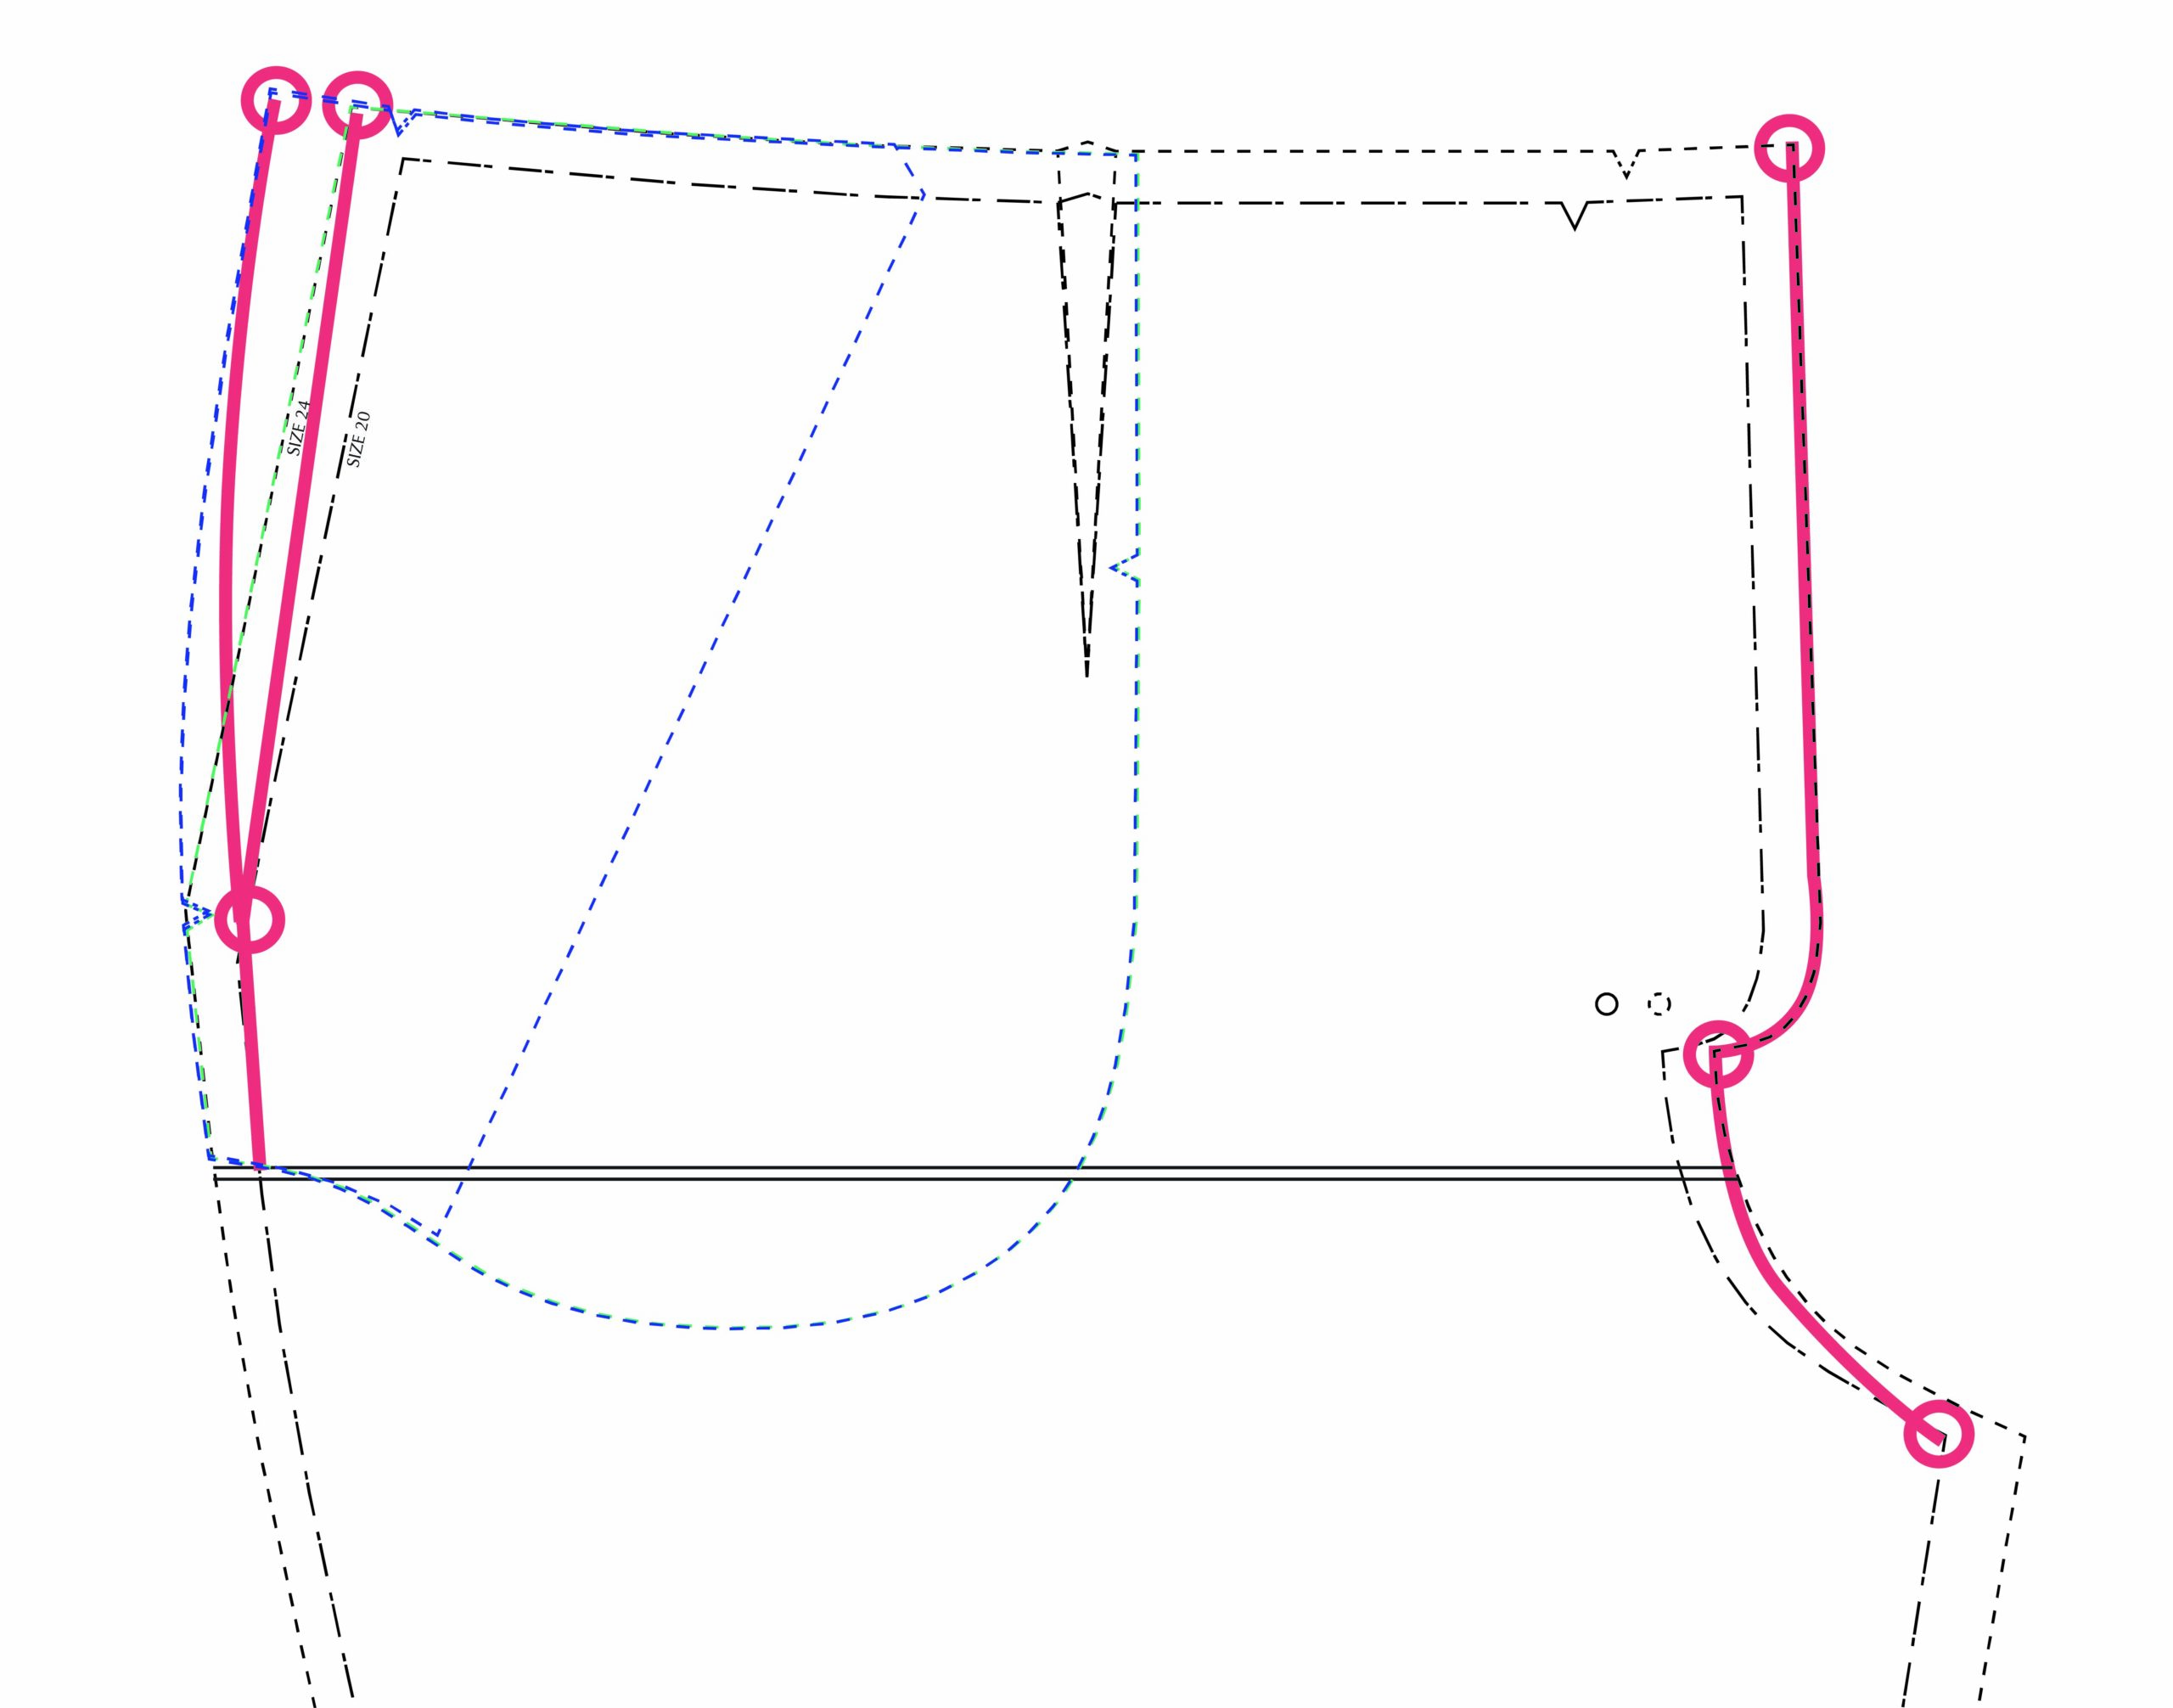
Option 2: Use the darts. To do this, use the hip size (20) for the entire center front seam (fly extension and crotch curve) and then decrease the width of the dart to increase the waist back to the required size. To do this you will need to measure the distance between the two sizes you are grading between at the center front and then remove that amount from the dart.
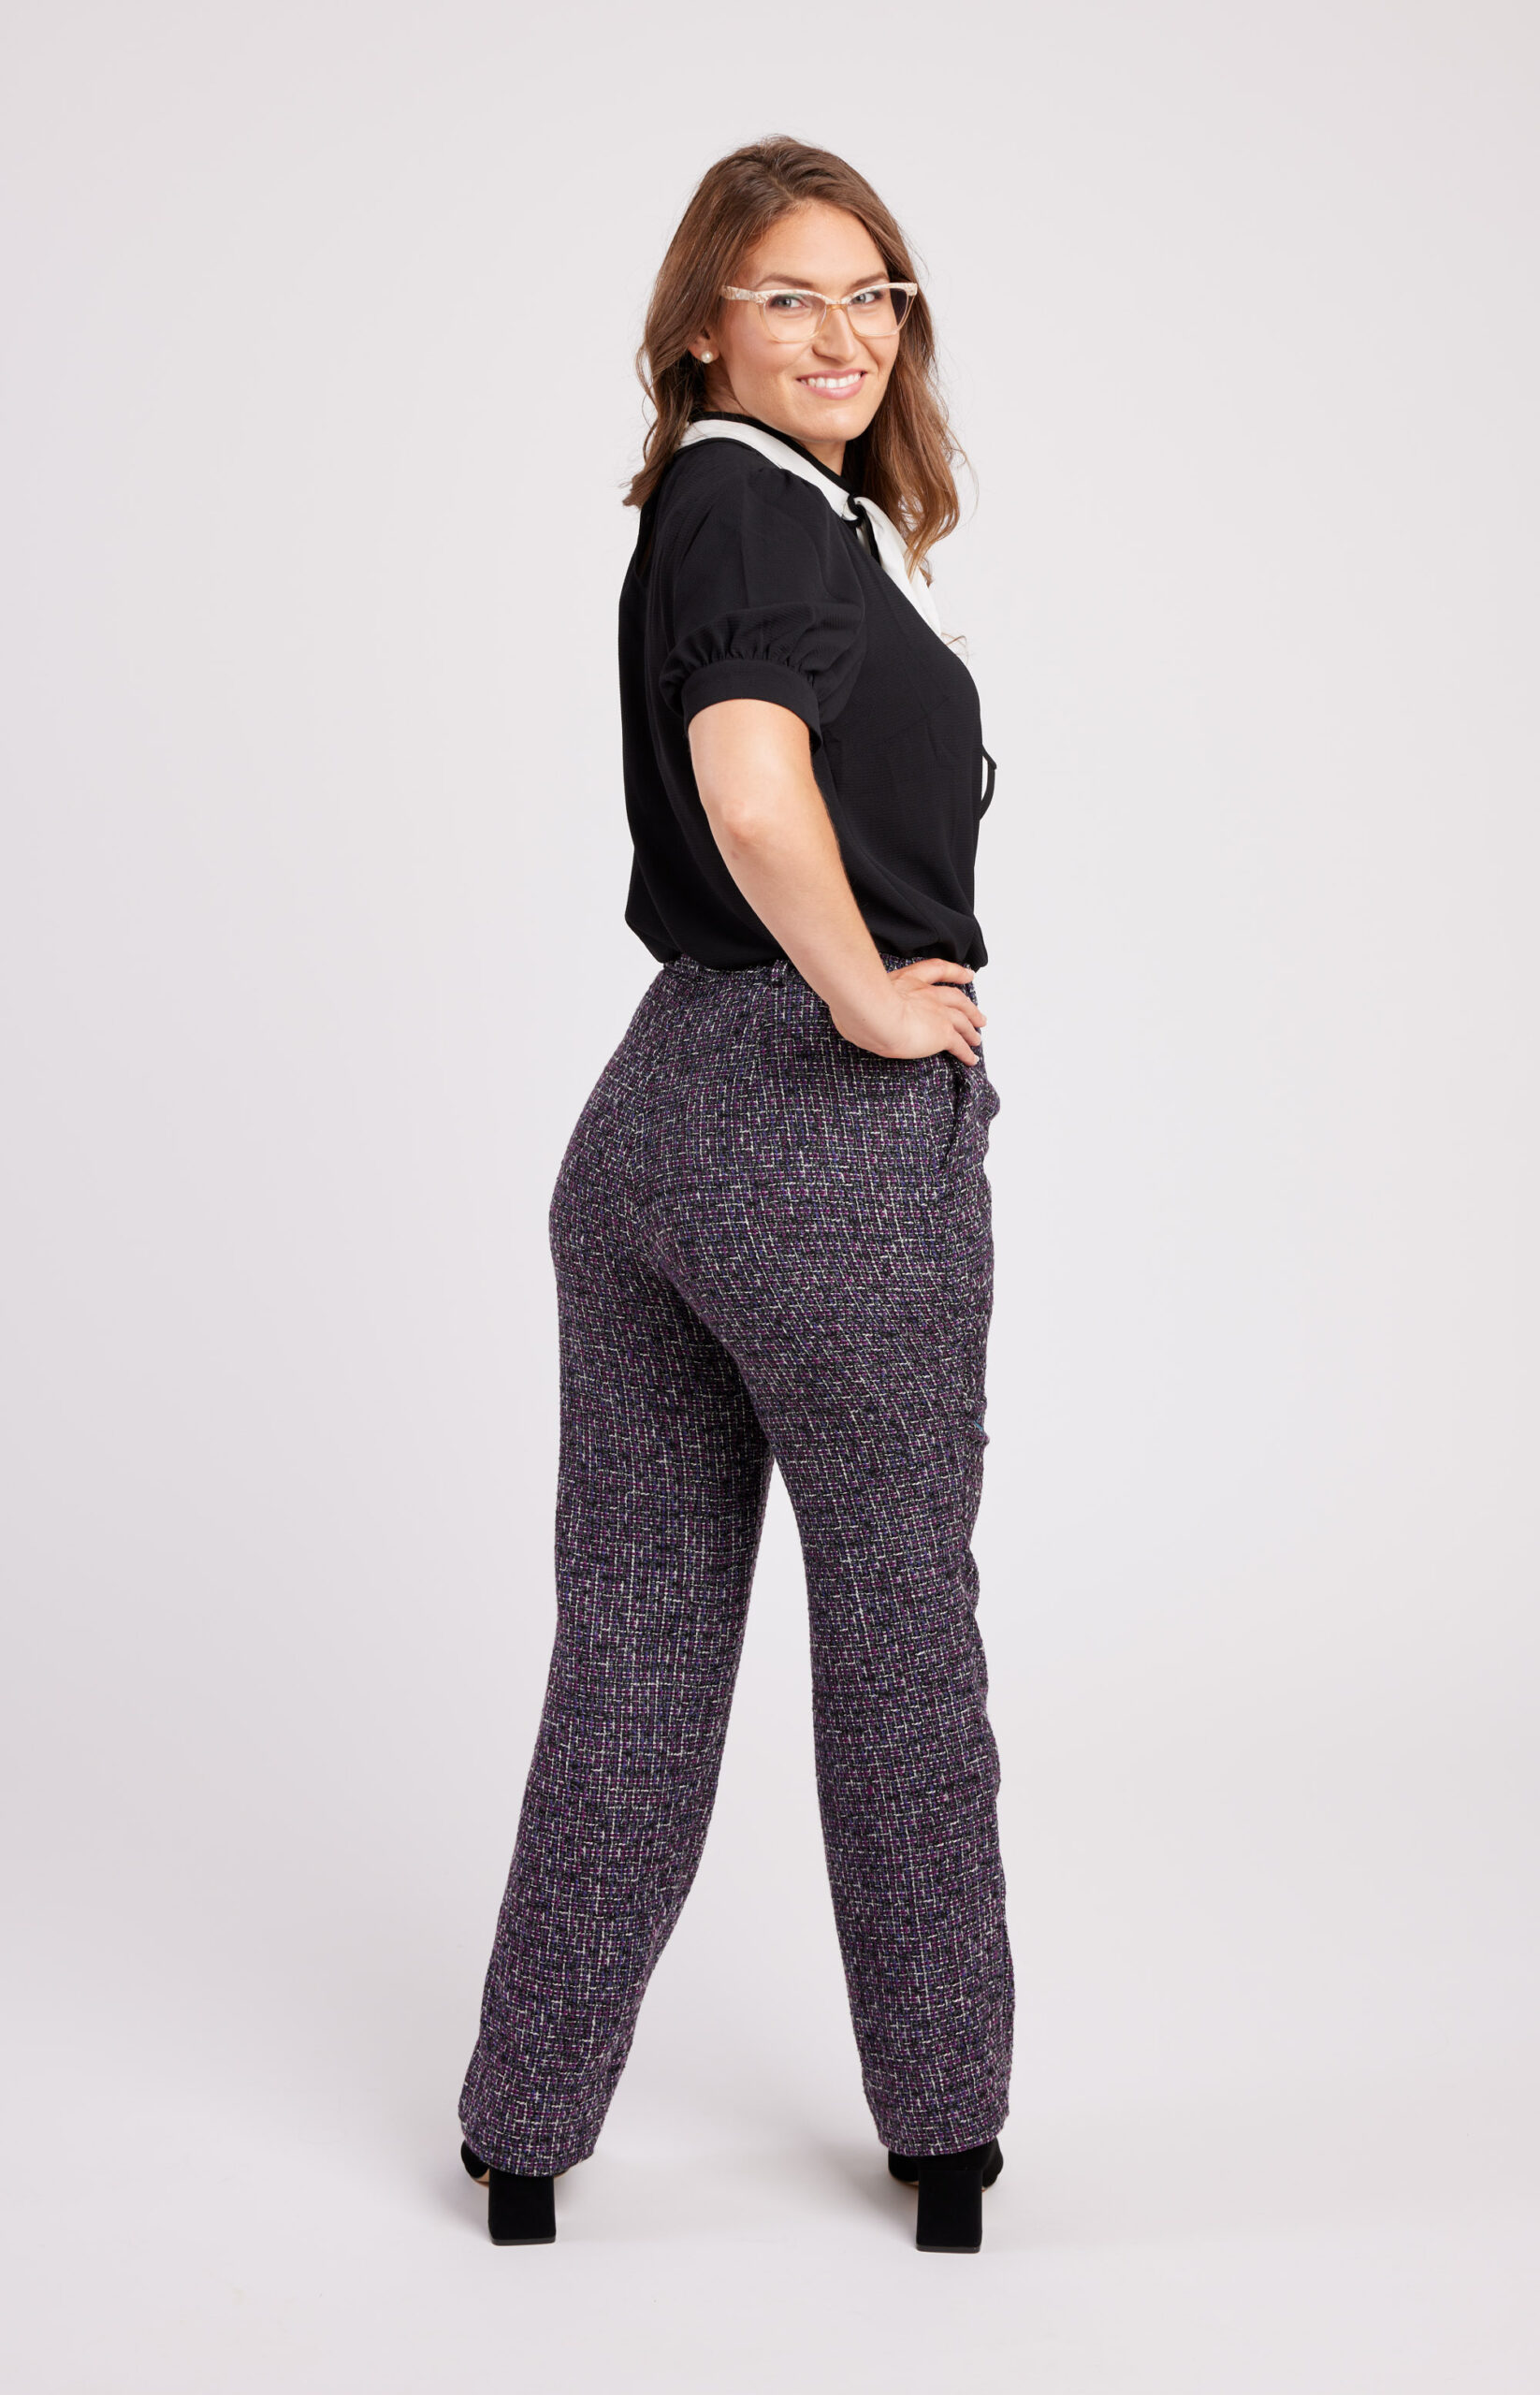
Note: In the example shown (grading between a 20 hips and 24 waist) the difference at the front is approximately ½” and the dart is also ½” wide so you would just remove the entire dart (this has been done on the purple pants Jenny’s wearing in these photos if you look carefully!). If you were trying to grade down to a size 18 waist, this would no longer work as the amount you need to remove is larger than the dart. In this case, use grading option 1 instead.
9. Now you can cut out your pattern piece. Leave all layers taped together and cut the legs out at the hip size (20). Continue cutting up the side seam along your new marked outer seam line. Cut across the top at the waist size (24) (remember if you modified the darts you will also need to modify the dart uptake) and the cut down the front along your marked lines. The cutting line is indicated by the purple line in the image below: 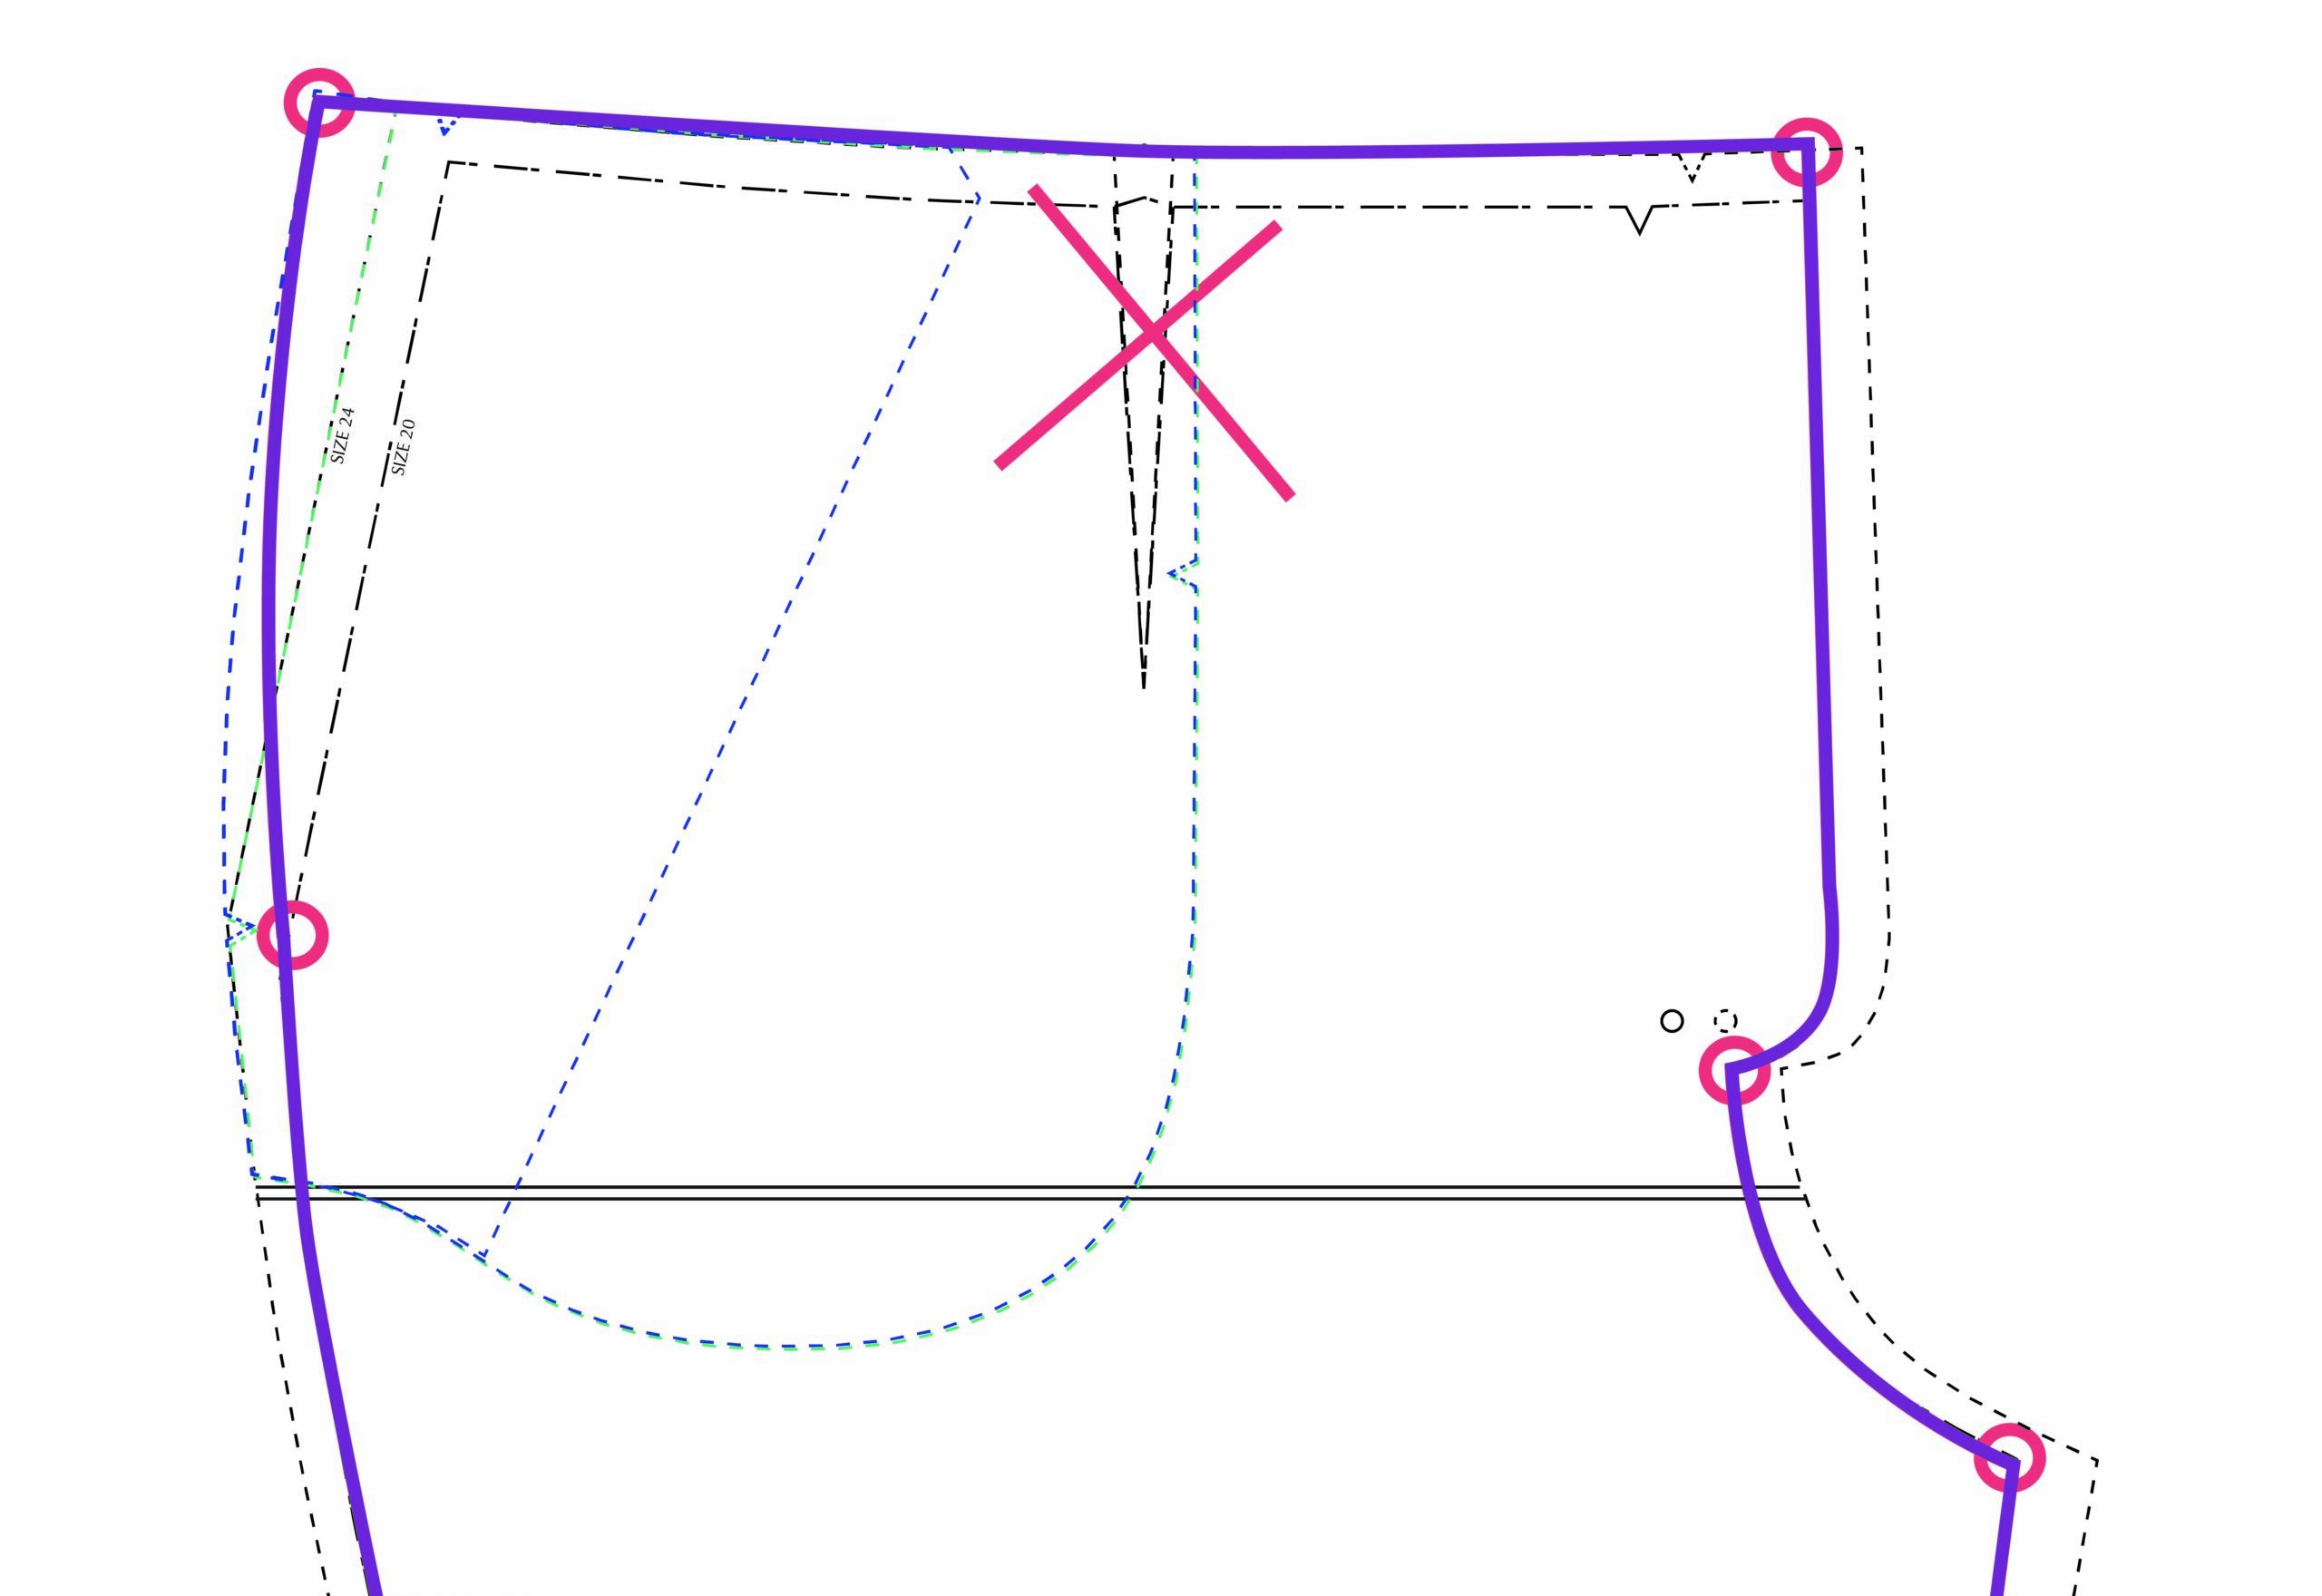
10. Carefully separate the lower pocket (5) and pocket facing (6) from the other pattern pieces and place to one side – they’re now ready for use. Make sure that the top pocket (7) is still attached to the front (1). Now trim the front (1) and top pocket (7) piece, through both layers, along the new pocket opening line.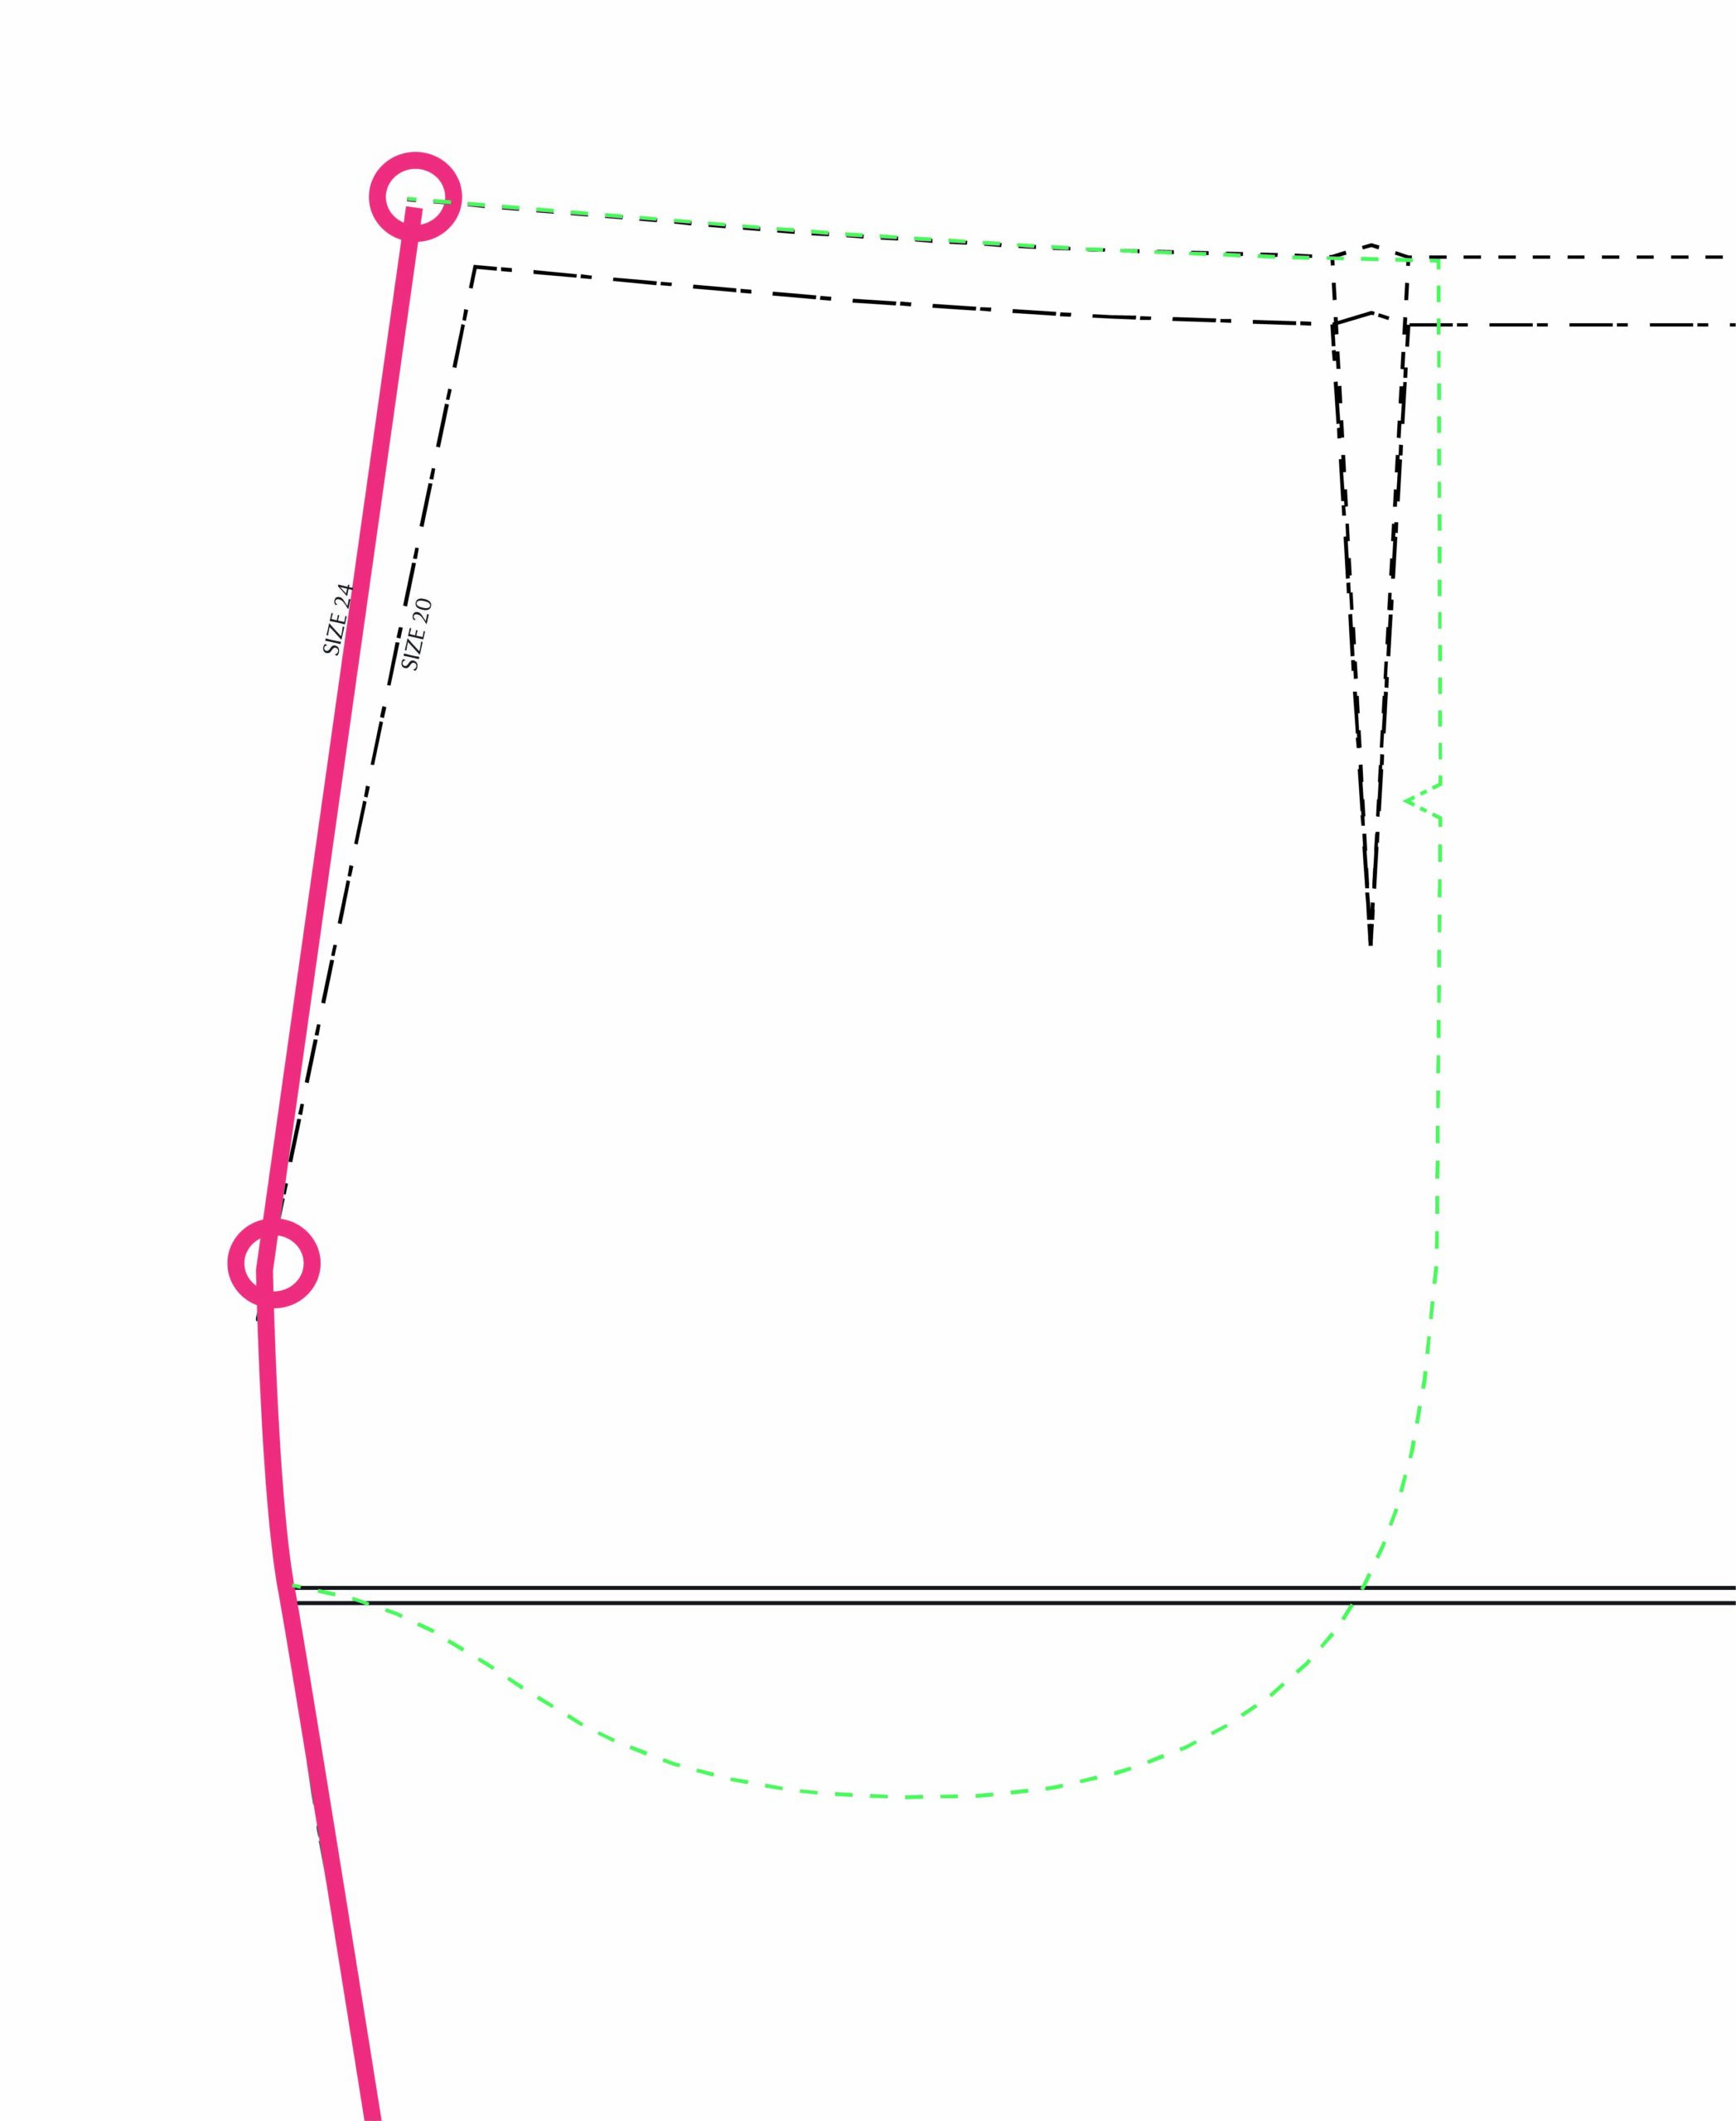
8. You can now separate all your pocket pieces and they are ready to go.
Grading the Back Leg
Grading the back (2 A/B) piece is done in a similar way, but is slightly easier as we don’t have to worry about the pockets.
1. Mark the top corners of back (2 A/B) based on your waist size (size 24). Mark the side seam notch and the back crotch curve at your hip size (size 20) at the height of the notch for the waistband size (size 24). Mark the lower crotch point at your hip size (size 20).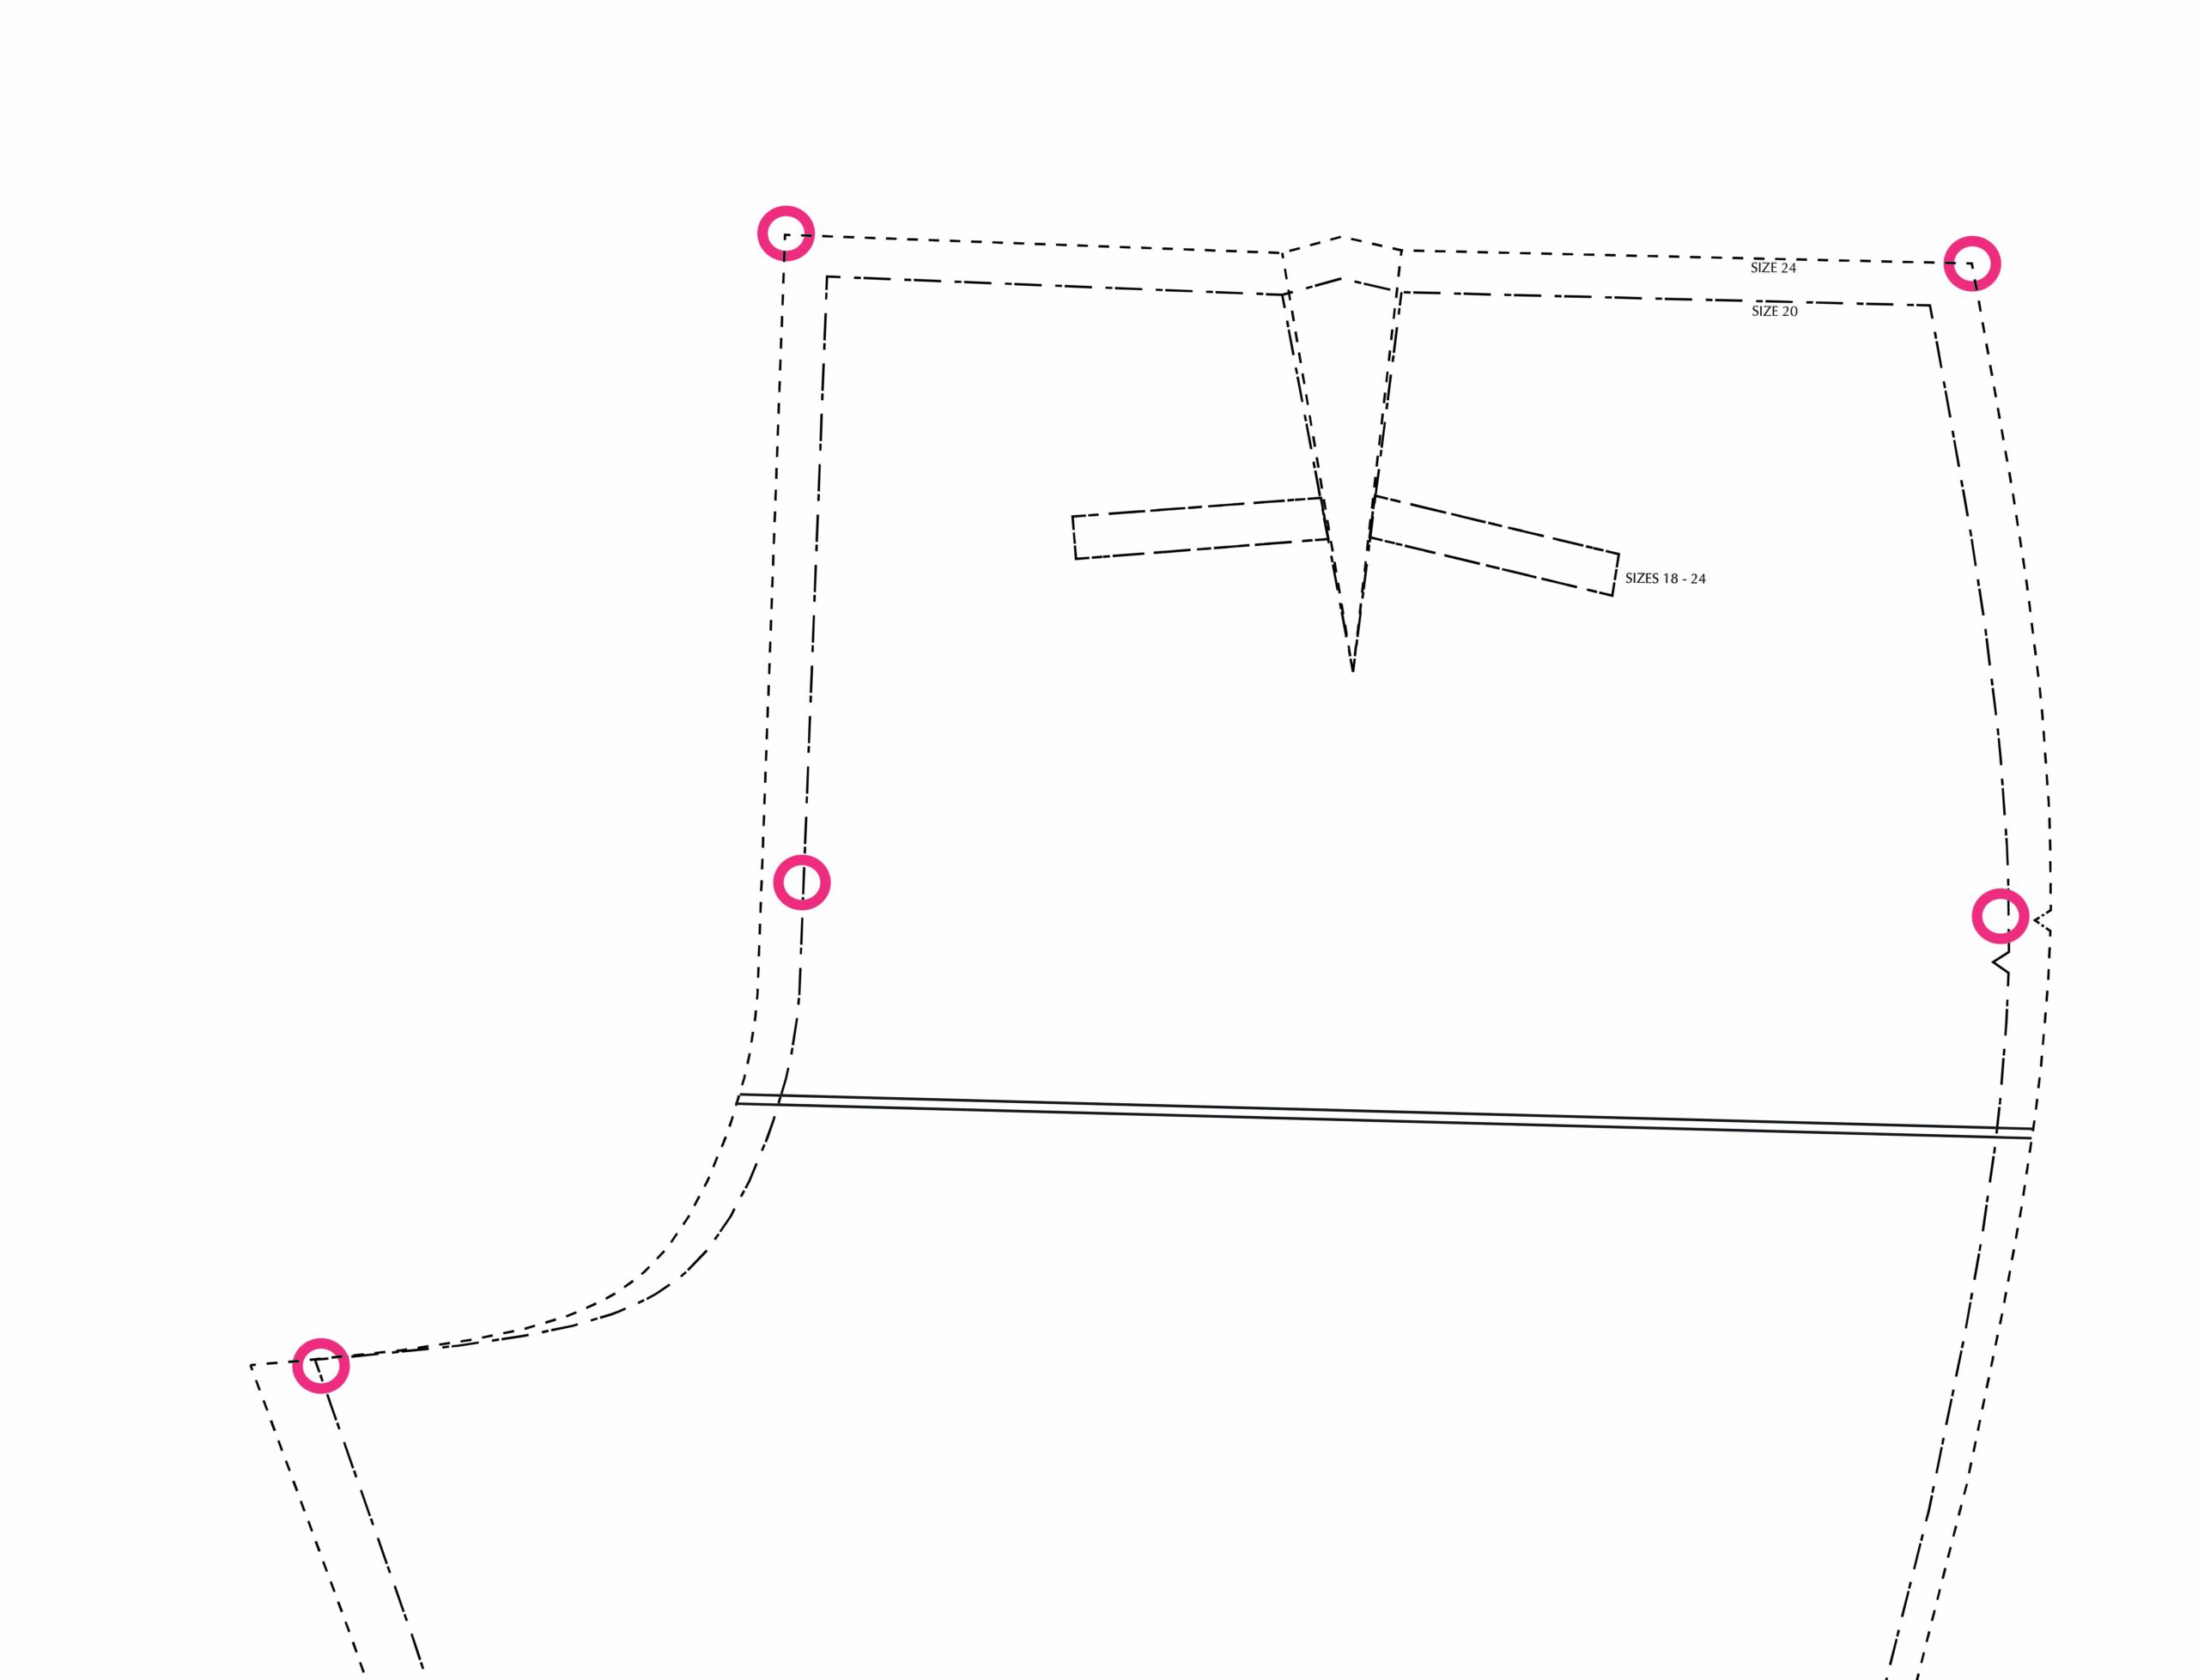
2. On the outer edge use a French curve to re-draw the side seam between the two marked points.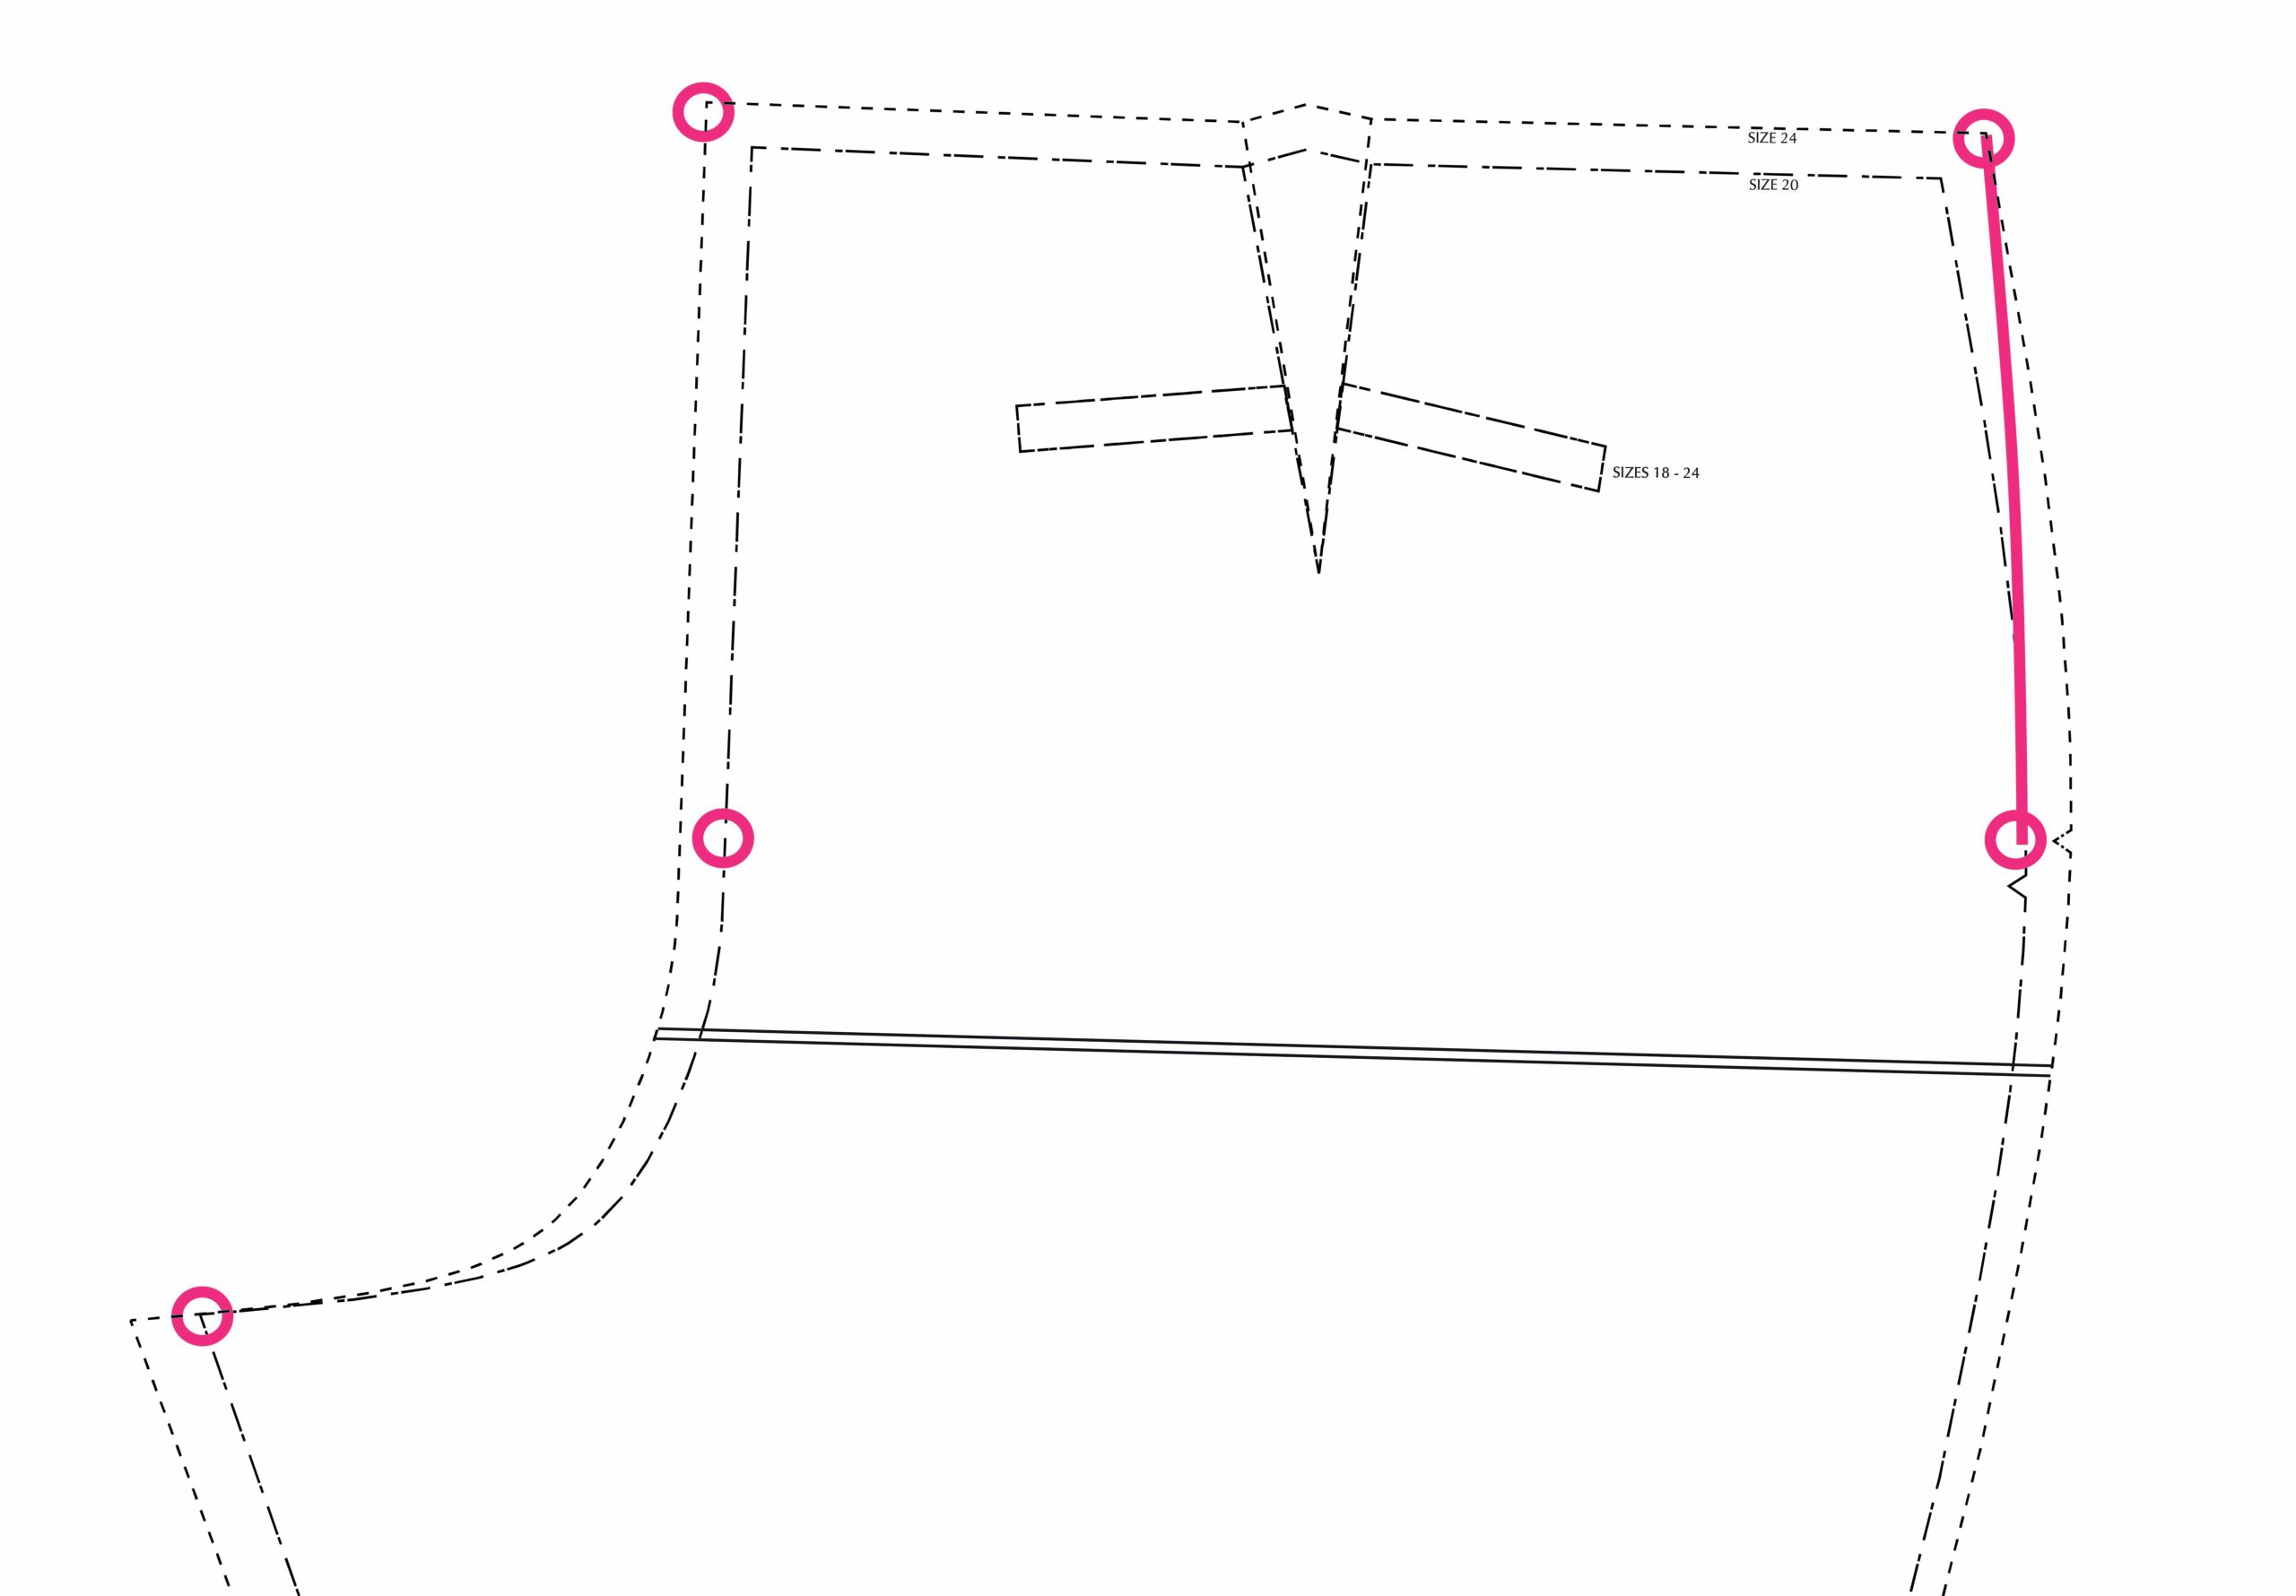
3. There are two different options for how to deal with the center back grading.
Option 1: Grade through the crotch curve. Join the two points from waist to hips and then continue following the crotch curve for the smaller hips size (size 20) through the bottom of the crotch curve. 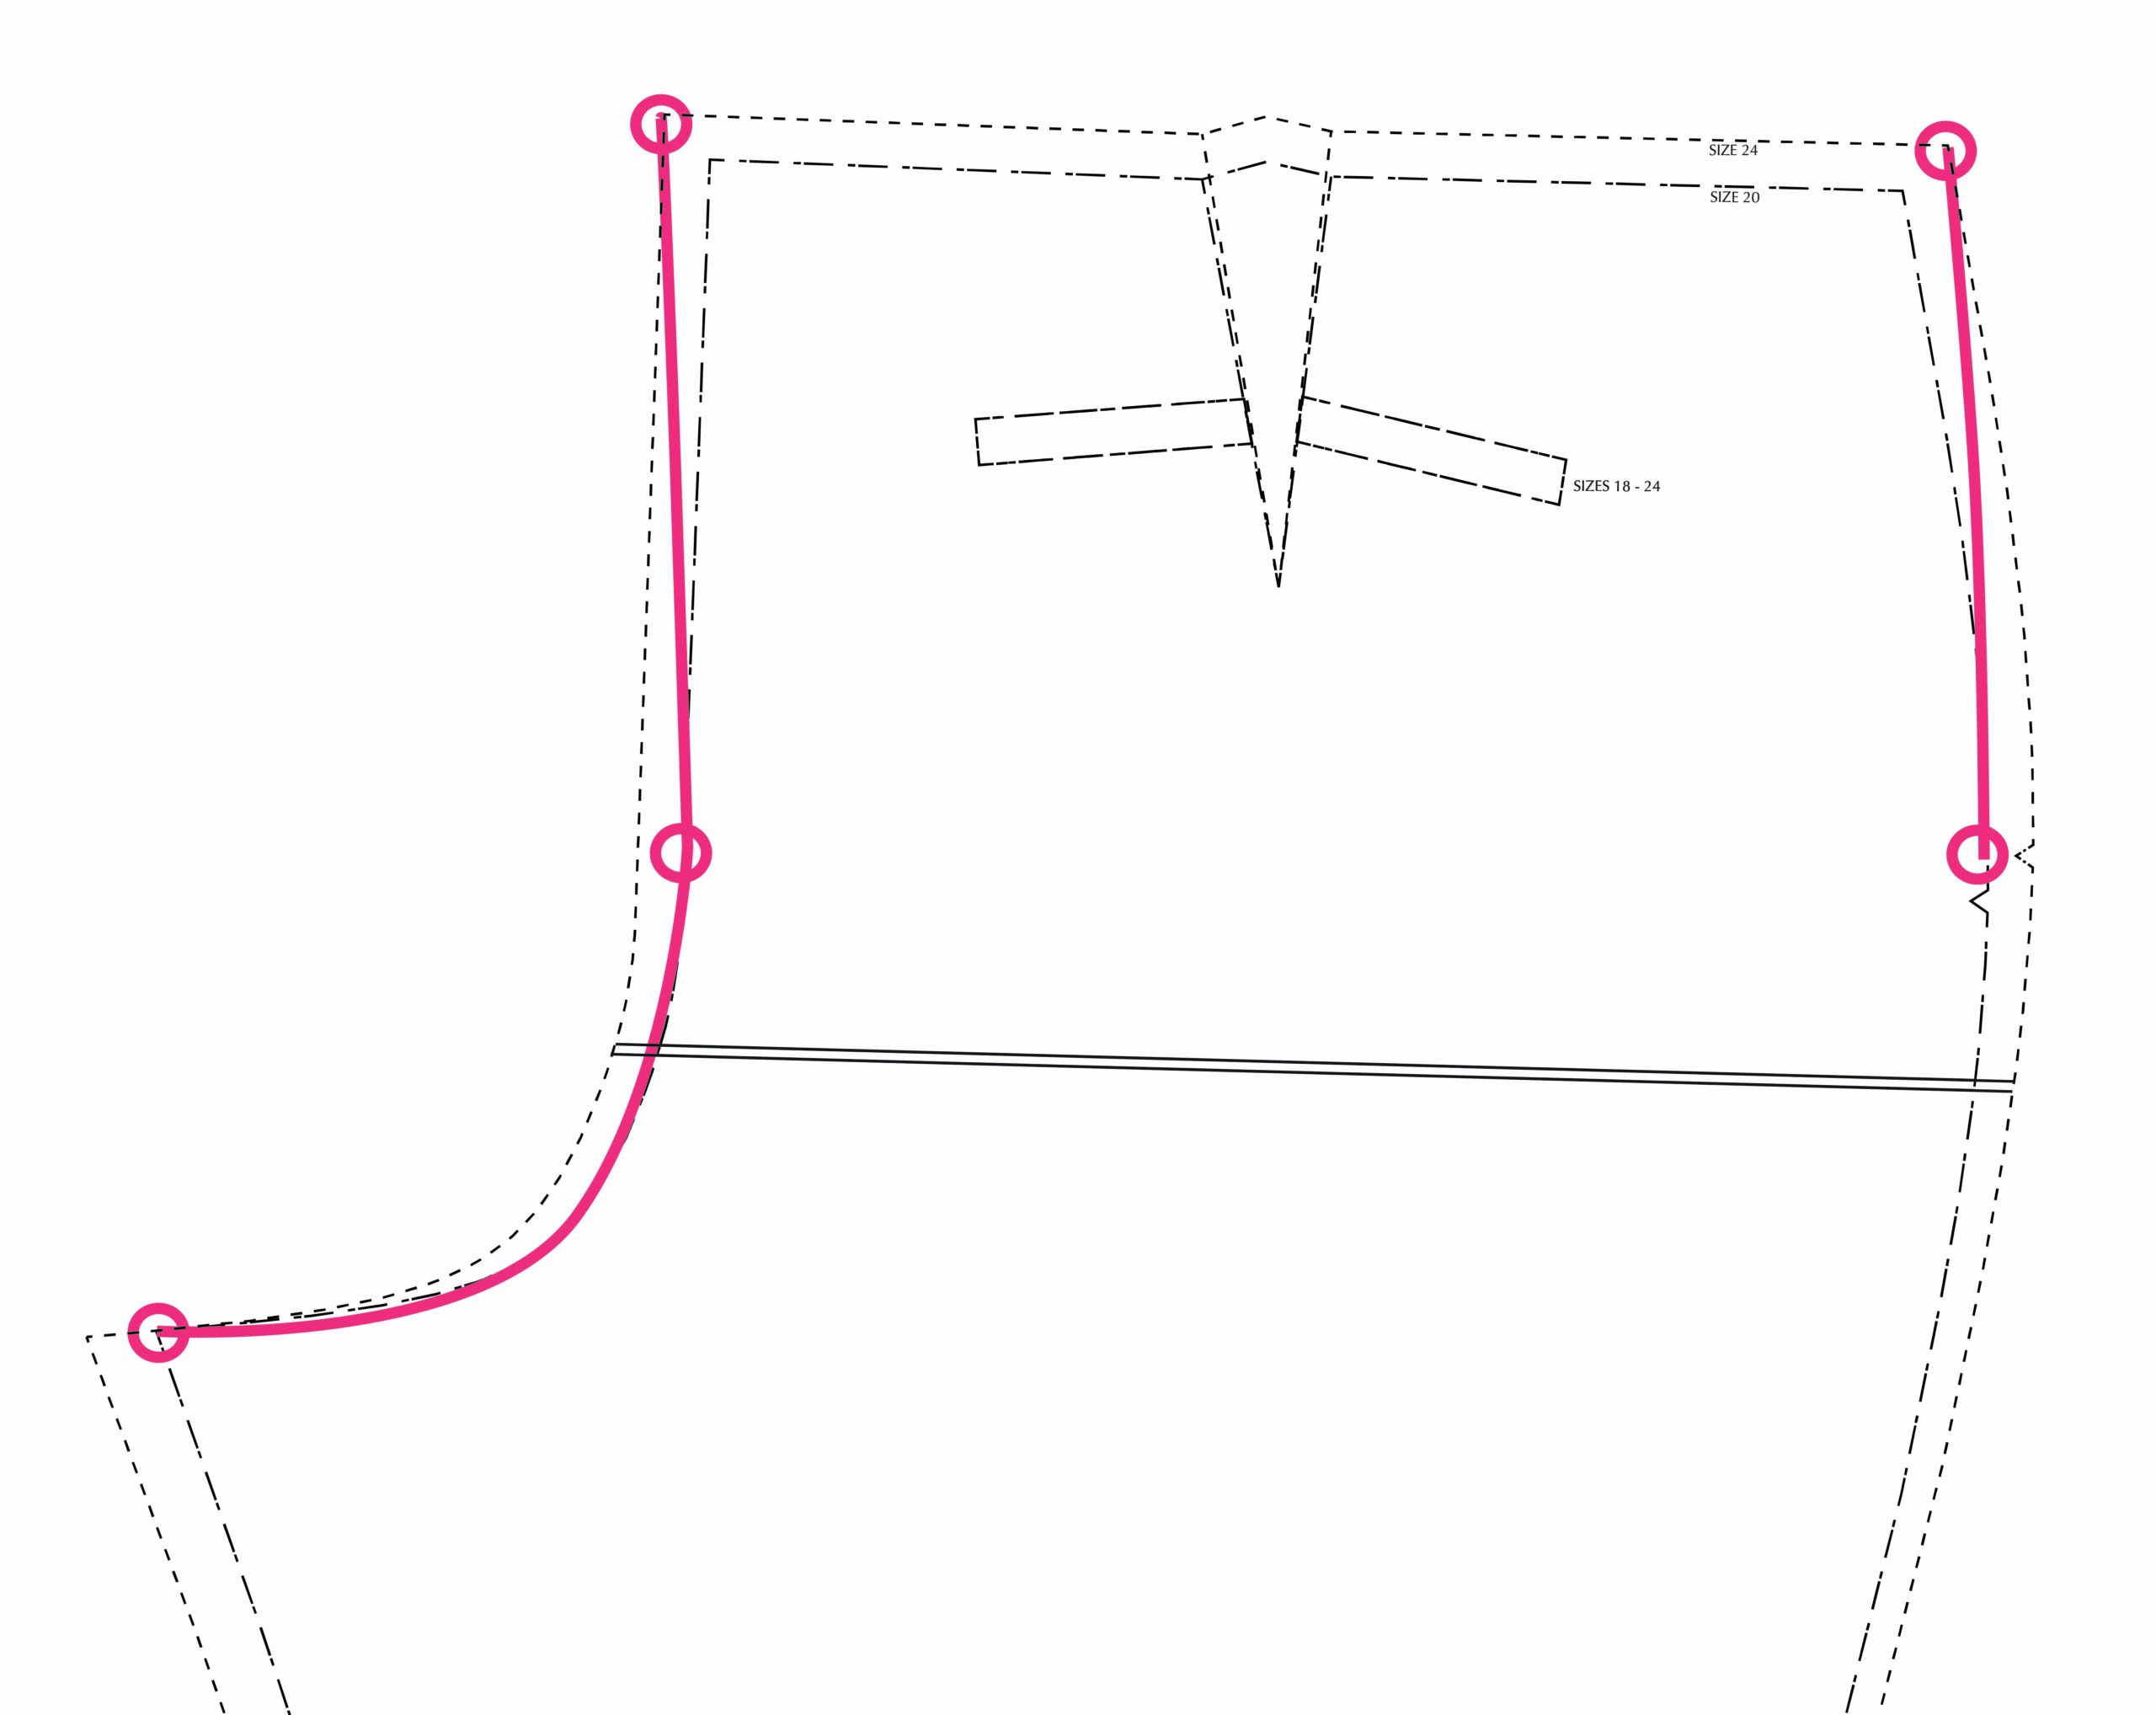
Option 2: Use the dart. Use the whole crotch curve based on your hip size (size 20) and increase the length of the seam at the waist by taking a smaller dart. To do this, measure the distance between the two sizes you are grading between at the center front and then remove that amount from the dart.
4. Now you can cut out your pattern piece. Cut the legs out at the hip size (20). Continue cutting up the side seam along your new marked outer seam line. Cut across the top at the waist size (remember if you modified the darts you will also need to modify the dart uptake) and the cut down the front along your marked lines.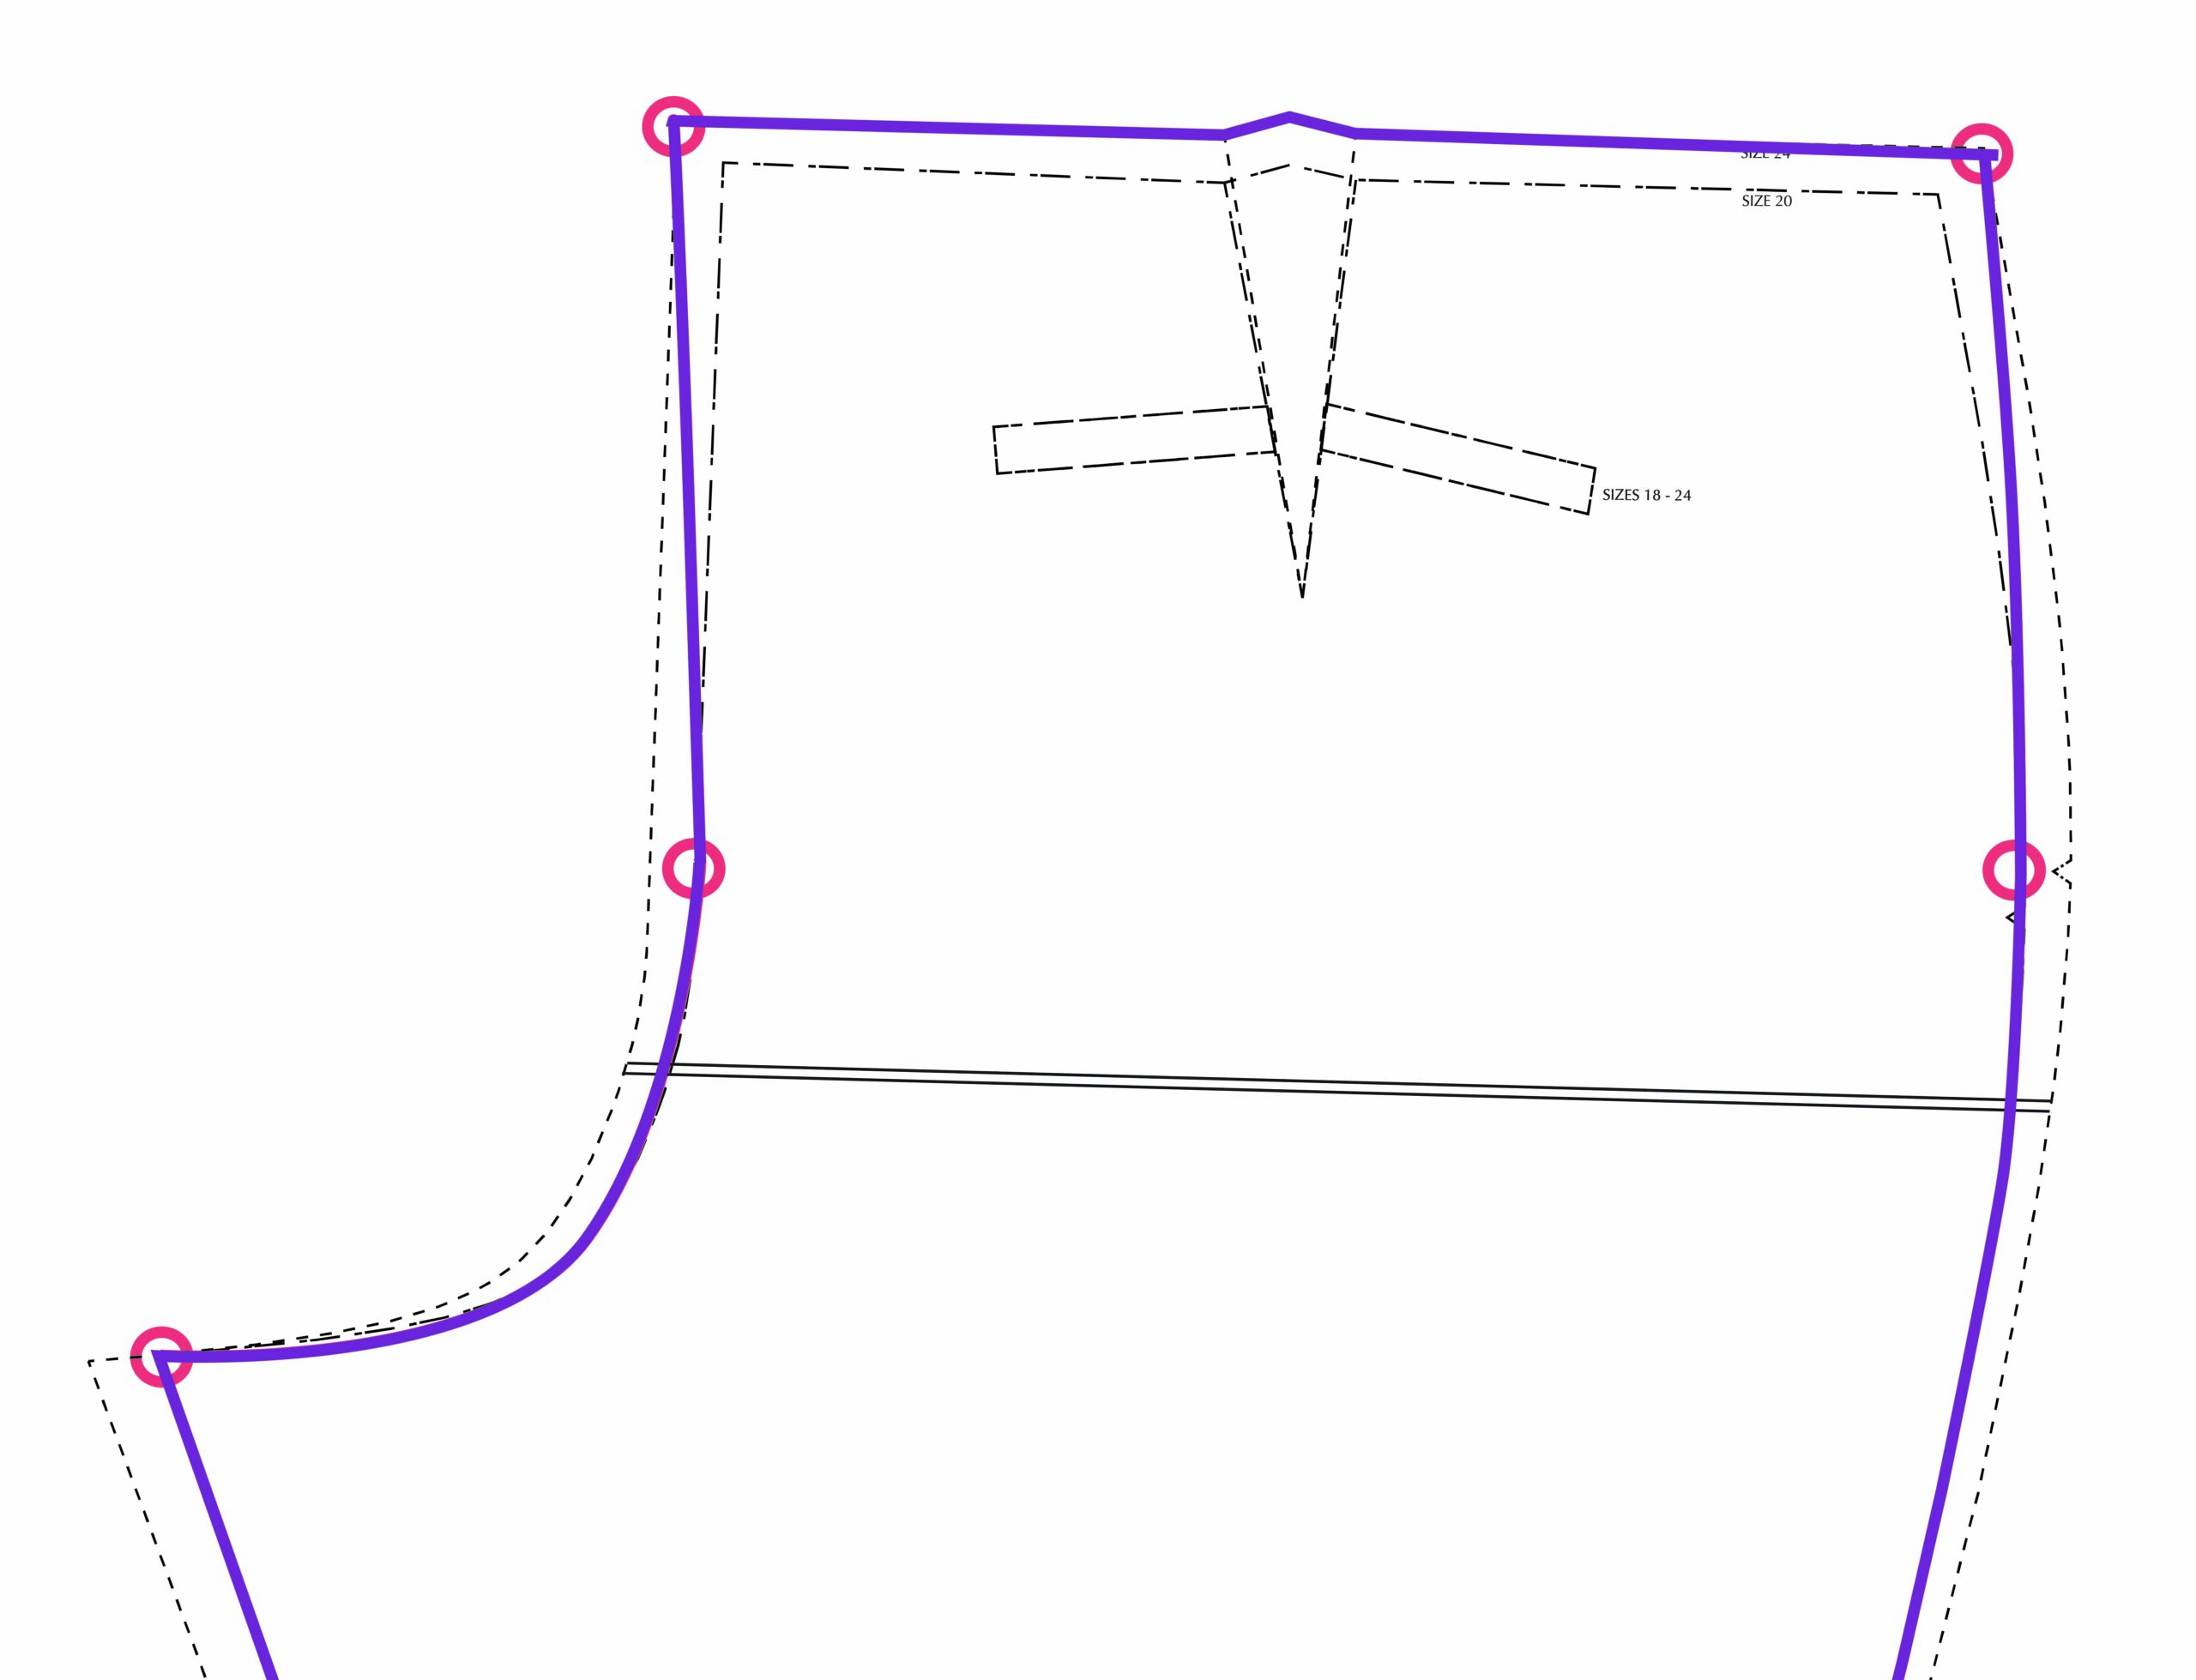
And you’re done!
Well done, you! Fabulous work grading between sizes on the Meriam Trousers. Now it’s time to cut your fabric and start sewing!
Want step-by-step video instruction with Jenny as your guide? Check out Pants Making for Curves, the latest online workshop from Cashmerette.