While it’s undoubtedly easiest to make a sewing pattern in your size, sometimes you may come across a pattern you REALLY want to make – but you’re just outside the size range. Fear not! In this tutorial, I’ll take you through how to make a pattern a couple of sizes bigger or smaller, to fit your body.
What is grading?
Grading is a method of proportionally increasing or decreasing the size of a pattern, while maintaining the same fit and shape of a garment.
As bodies get bigger, they don’t expand at the same rate all over. For instance, if your waist increases by 10%, it doesn’t mean that your neck, arms and hips automatically get 10% bigger too. This means that despite what you might first think, you can’t just take a pattern and draw on a slightly bigger line all the way around.
However, it is possible to grade up a pattern accurately, and this tutorial will take you through how to grade a pattern to account for the different rates of change in different places.
The method shown in this tutorial can be used to:
- Grade a pattern at only one point (e.g you need to go a size above the pattern range at the waist)
- Grade a pattern at a couple of different points (e.g. you need to go a size above the pattern range at the waist and hips, but not the bust)
- Grade an entire pattern (i.e. you need to go a size above the pattern range at all points)
Step 1: Assess if You Need to Grade a Pattern Up or Down
To determine whether you will need to grade a pattern you first need to take your body measurements and compare them to the patterns body measurements chart. If any of your measurements fall outside the body measurement chart assess the following:
1. Look at the Finished Garment Measurements (FGMs) for the pattern (or measure the actual pattern pieces if FGMs are not provided). Is there enough design ease in the garment such that grading is not required? Some examples where you may not need to grade a pattern due to design ease include:
- If your hip measurement is outside the body measurement, but the pattern is for a full skirt that has a lot of positive ease at the hip.
- If your waist measurement is outside the body measurement, but the pattern is for a swing dress with a lot of positive ease at the waist.
2. Is the reason you are outside the body measurements due to a separate fitting issue such as needing a full bum adjustment or full tummy adjustment? To determine if this is the case try taking half measurements of your body (from side seam to side seam) instead of full measurements. If the smaller size multiplied by 2 gets you into the size range, then you should use that as your “base size” and make the specific body part adjustment (such as an full bust adjustment or full tummy adjustment).
3. Are there features on the patterns that will allow you to size up without grading the pattern? For example if only your waist measurements are outside the size range, but the pattern has waist darts, you may be able to reduce or eliminate the waist darts to provide the room required.
If you do need to grade the pattern, the next step is to determine whether you need to grade the entire pattern, or only need to grade certain sections of the pattern.
Step 2: Calculate How Much You Need to Grade – And Where
1. Identify which parts of the pattern require grading
To determine which parts of a pattern require grading, look at the body measurements chart (below) and compare it with your own measurements.
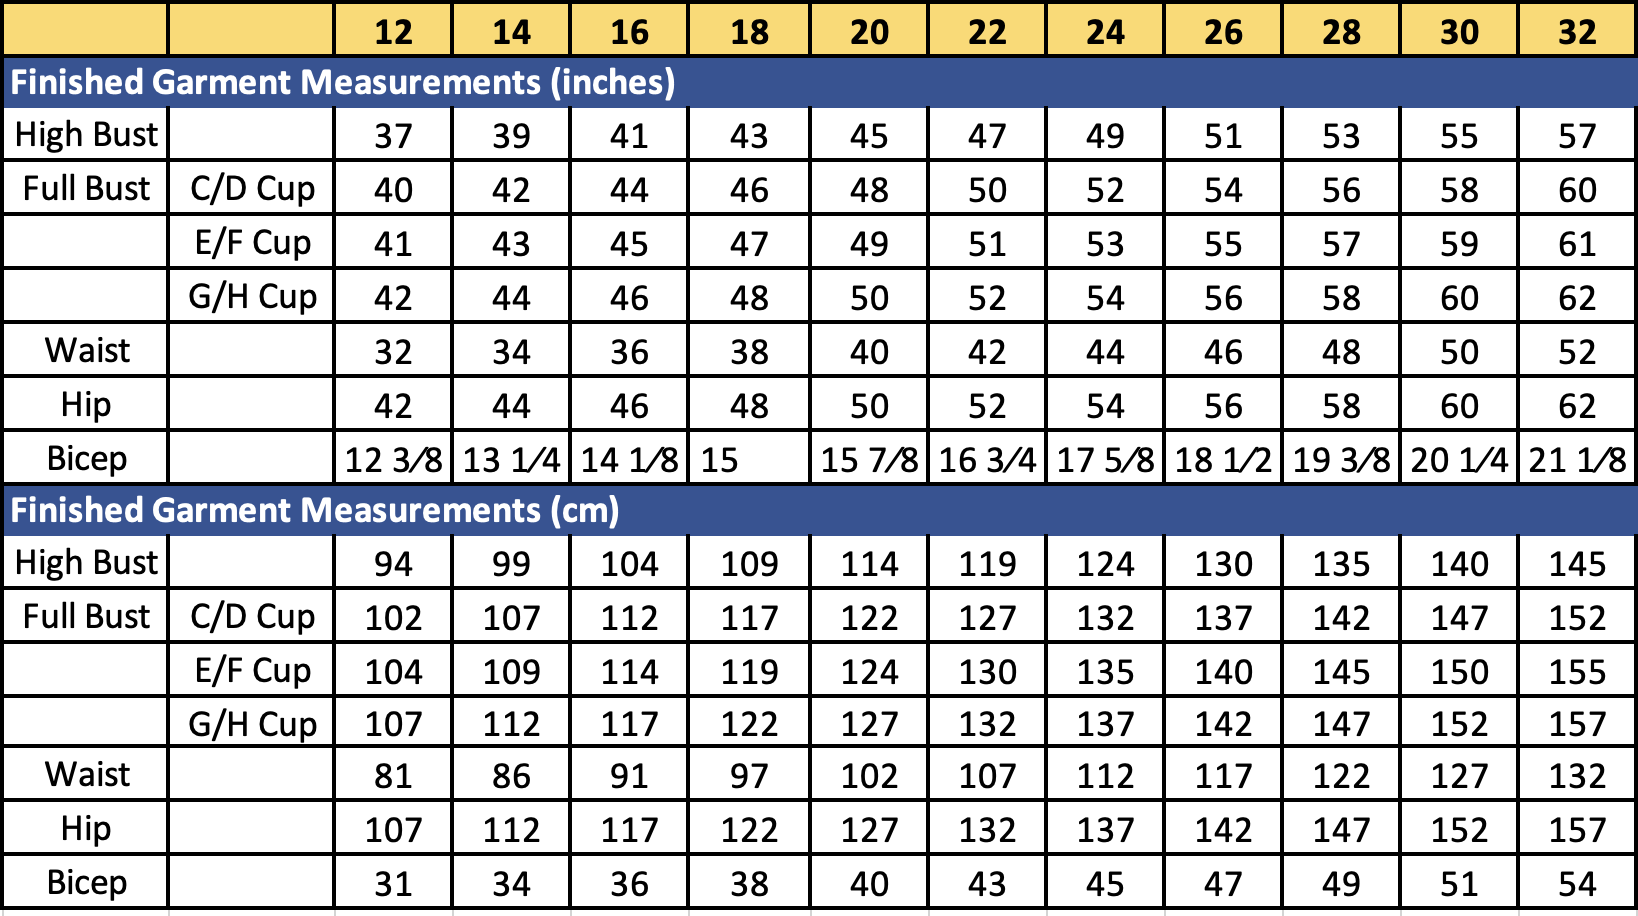
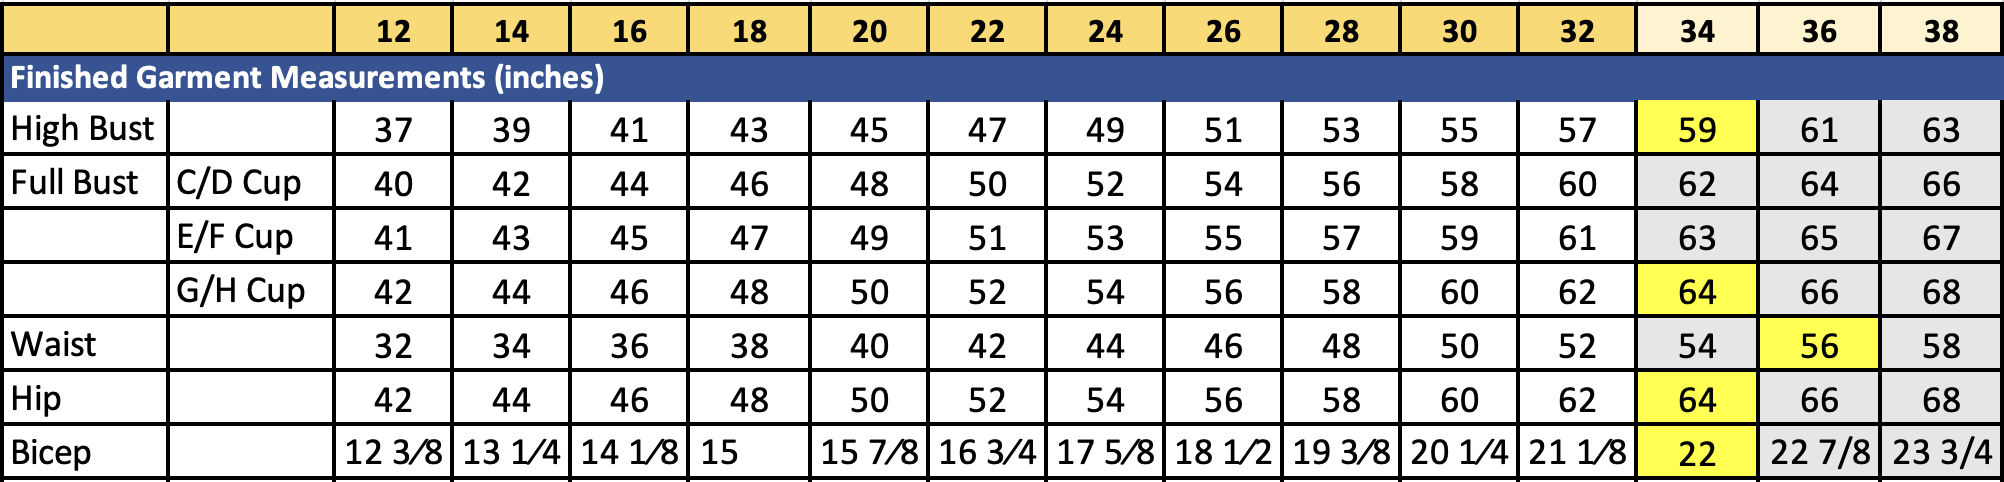
Example 1 – Your body measurements (as shown in yellow in the table below) are all outside the patterns size range.
If this is the case, you will need to grade up the entire pattern.
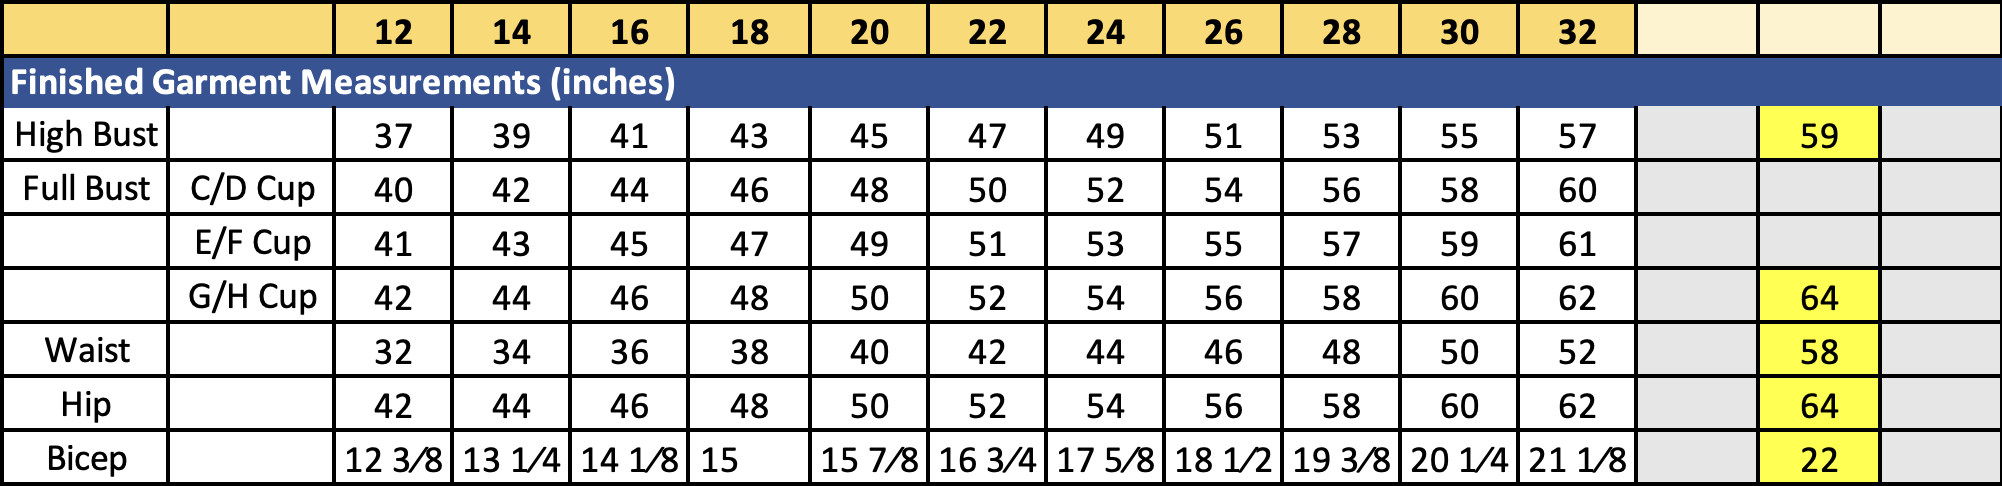
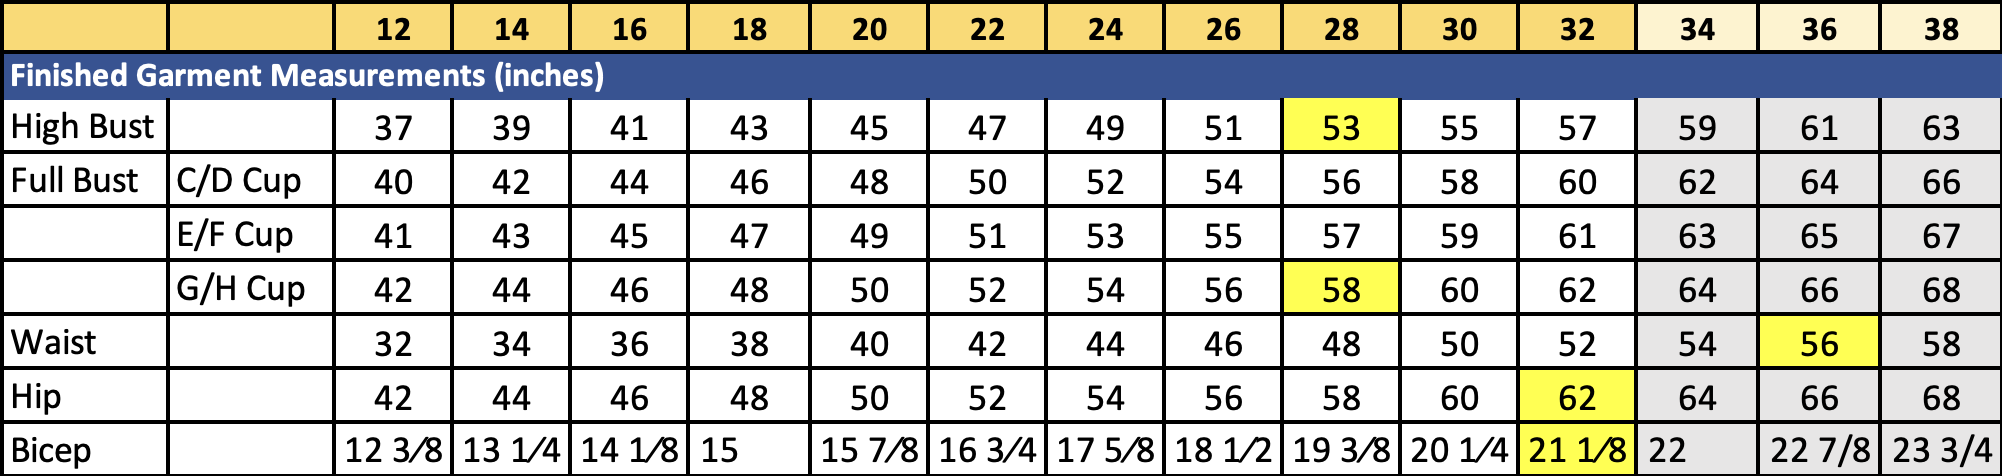
Example 2 – Your body measurements (as shown in yellow in the table below) are mainly within the patterns size range, but one or two measurements are outside the patterns size range.

In this case, the bust, waist, and bicep measurements all fall within the existing pattern sizing and you will only need to grade the pattern at the waist.
2. Calculate how much grading is required
To determine how many sizes you need to grade the pattern by, look at each line in the body measurements table and see how much the measurement goes up by at each size.
- For all bust, waist and hips measurements you can see that each size is 2” (5 cm) larger than the one before.
- For the bicep measurements each size increases by 7/8” (2 cm).
If we continue adding 2” (5 cm) to each of the bust, waist and hip measurements and 7/8” (2 cm) to each bicep measurement we get a table that looks like this:
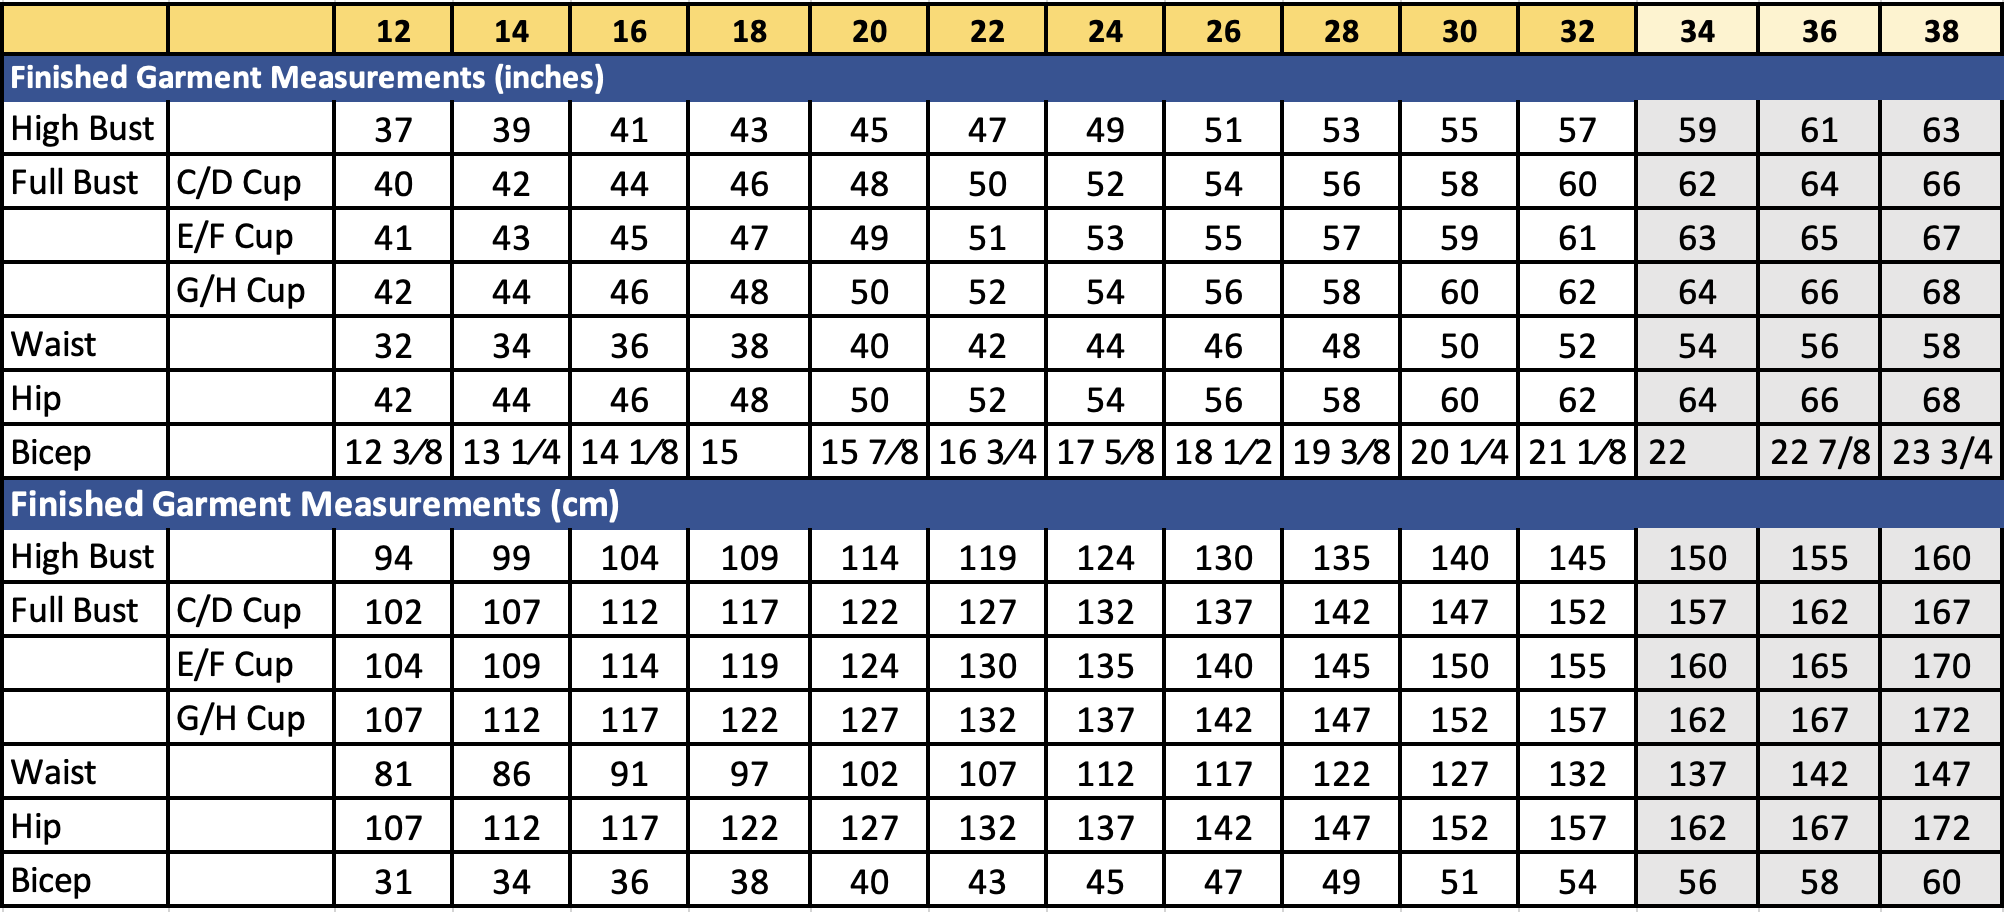
Example 1 – We can now put our measurements at size 34 for bust, hips and bicep and size 36 for waist, which means you will need to grade our pattern 1 size over the entire pattern, and 2 sizes at the waist.
Example 2 – Since you are within the current size range for bust, bicep and hep, you can use the following tutorial to grade the pattern up 2 sizes at the waist only, and then follow this tutorial to grade between sizes.
Step 3: Gather Supplies and Prepare Your Pattern
Supplies needed for grading
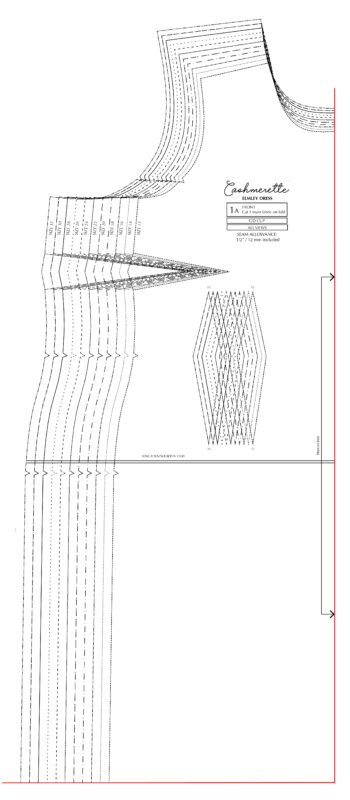
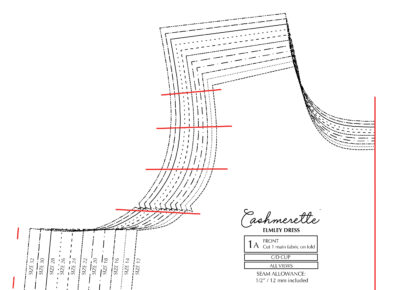
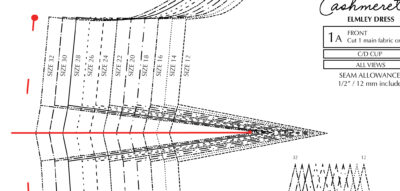
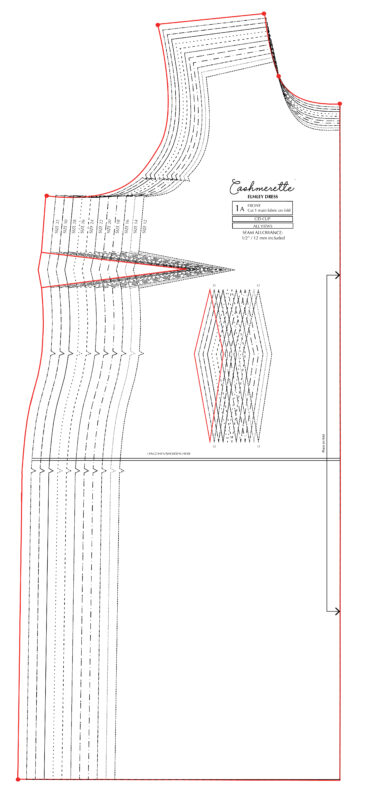
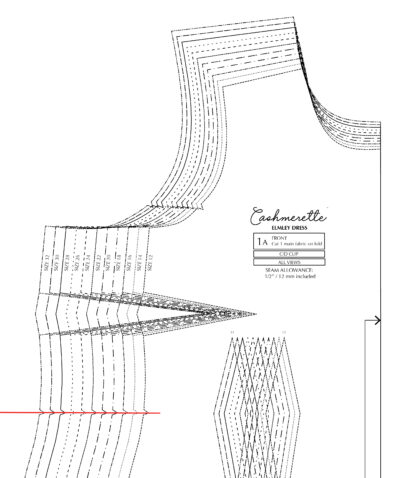
- A copy of the multi-size pattern you wish to grade. Note: Using the method shown in this tutorial you cannot use a single sized pattern – It needs to be multi-sized. For this example we will use the Elmley Dress from Sewing the Curve.
- Tracing paper – If your pattern does not have blank space around each piece to grade into you will need to lay tracing paper over the pattern piece and draw your new size pattern onto that. Make sure that the pattern and tracing paper cannot move during the grading process.
- Pencils or markers for marking your new pattern.
- Ruler. You will need a ruler with precise increments on it. I prefer a metal ruler but a good plastic one should also work. Note: I find it a lot easier to work in millimeters when grading as a lot of the measurements are quite small and I find these more accurate, so I use a ruler with both metric and imperial markings.
- French curve. If you have a good eye for drawing curves you can get away without a French curve, this will just make it easier to join your markings into a smooth curve.
Determine which pattern pieces you will need to grade:
- If you are grading the entire pattern that will be all pattern pieces.
- If you are only grading at one point you will only need the pattern pieces at that point – eg. If you are grading the waist, you will need the front and the back pattern pieces only (For the Elmley, if you are using the lining you will need to grade those pattern pieces as well).
Step 4: Grading Your Pattern
Different parts of the pattern will be graded in different ways. Go through each of the sections below to identify each type and assess how it should be graded. Once you have done that place tracing paper over your pattern piece and proceed to trace your lines as follows.
Jump to:
- Grading an entire pattern up by 1 size
- Partially grading up a pattern
- Grading an entire pattern up by more than 1 size
- Grading a pattern down
Grading an Entire Pattern Up By 1 Size
Non-graded Seam lines
Non-graded seam lines are those that do not change between sizes – for instance, lines which are “on the fold”. On the Elmley Dress both the lower edge and the center front edges are non-graded.
1. Trace the pattern along the non-graded lines, extending the lines out past the existing sizes at the ends.
Evenly graded seam lines
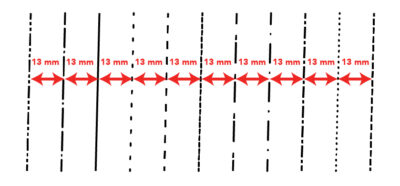
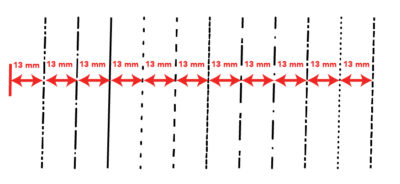
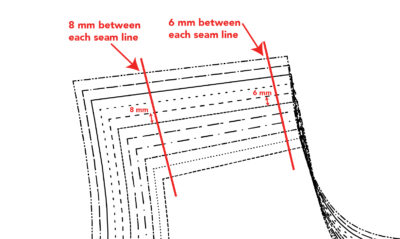
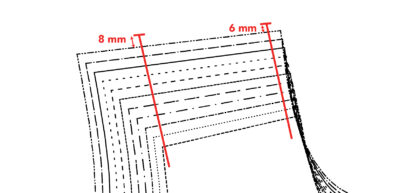
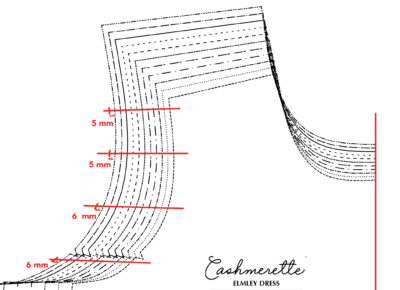
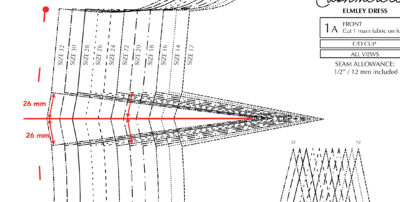
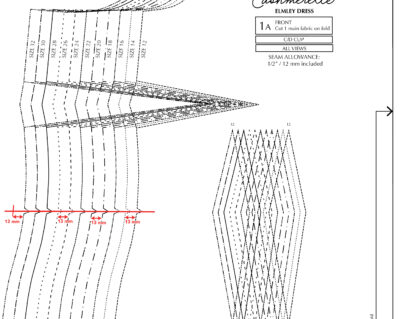
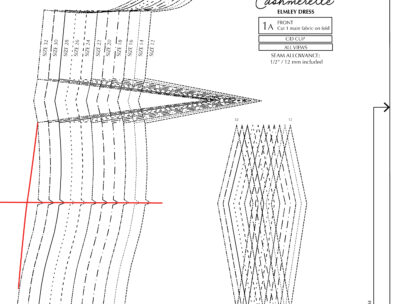
Evenly graded seam lines are those that have little to no variation in grading i.e the distance between each of the size lines is the same all the way along the seam line. On the Elmley dress, the side seams are evenly graded.
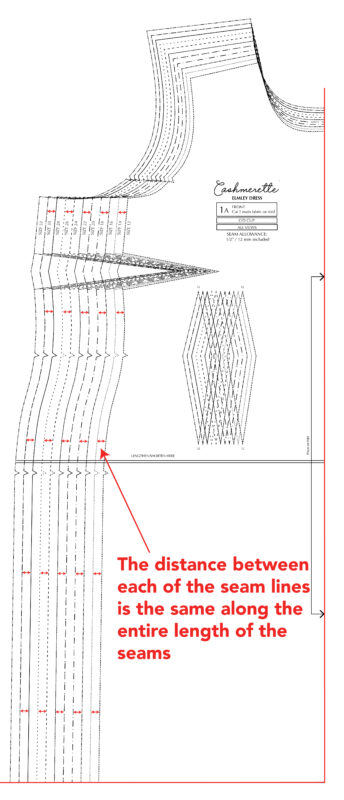
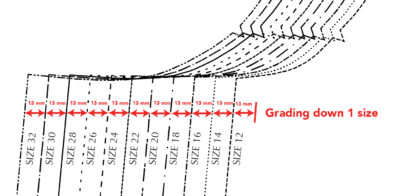
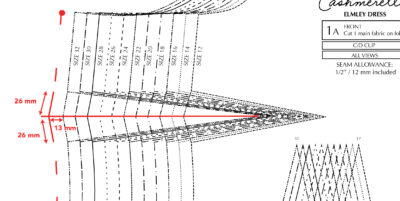
2. Measure the distance between each of the seam lines – In this case, each size is 13 mm away from the previous one.
Note: Throughout this tutorial all measurements will be in metric units for precision.
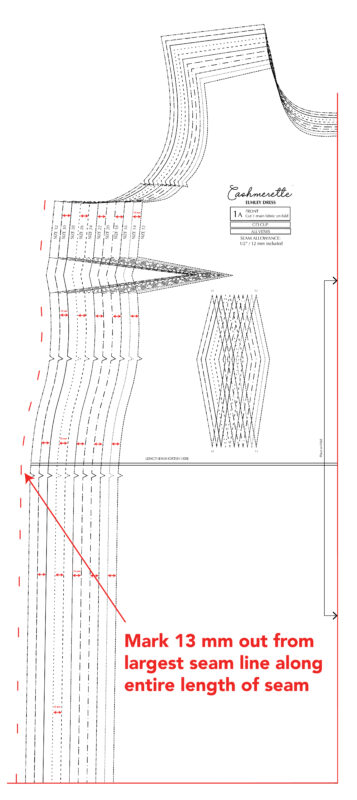
3. To grade up one size make a small mark the same distance away from the largest size.
4. Continue working up the length of the side seam (measuring the distance between the size lines to make sure it hasn’t changed) and making marks that distance away from the largest size.
Note: In the Elmley Dress pattern there is a bust dart on the side seam. We will learn how to grade that in GRADING THE BUST DART.
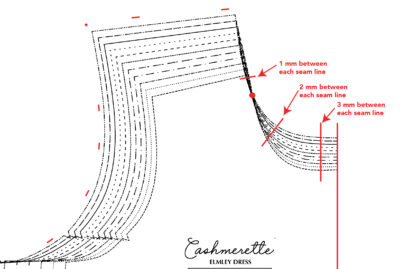
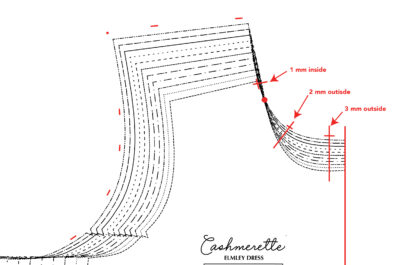
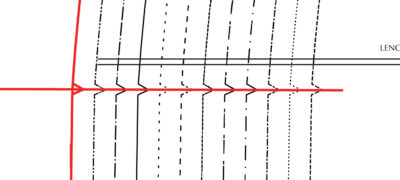
Variably graded seam lines
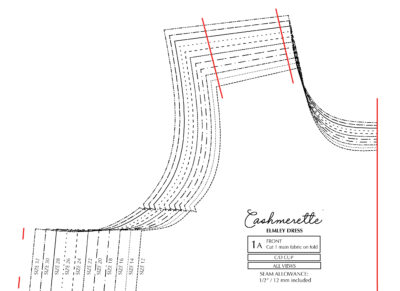
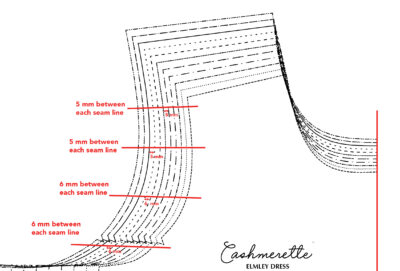
Variably graded seam lines are those where the distance between the size lines changes along the length of the seam line. The lines are closer together at one point and further away at another. On the Elmley Dress, the armscye and shoulder seams are both variably graded.
5. Choose a number of different places along the seam line to measure the differences (at least every 3 inches). At each of these locations draw a line through all the size lines as shown.
6. At each of the marked locations, measure the distance between the size lines and mark your new size the same distance out along the line.
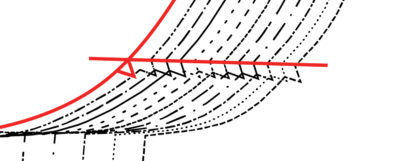
Grading the intersection of lines
At numerous points on your pattern, two seam lines will intersect creating a corner. Determine new intersection points for each of these corners in your new size.
7. Draw a line through the points where each of the lines intersect.
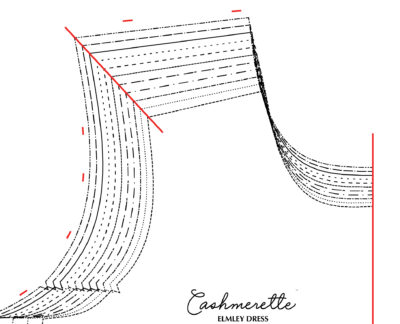
8. Measure how far each corner is from the one before along that line.
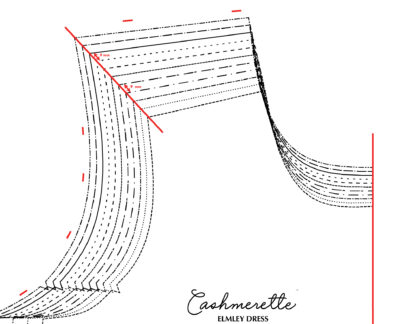
9. Make a mark for your new intersection point the same distance away, along the same line.

Grading seam lines with a cross over
There are times when the size lines will cross over each other so that the largest size that was on the outside of the pattern piece is now on the inside of the pattern piece. On the Elmley dress this occurs on the neckline.
10. Mark the cross over point. Your new size line will need to go through this point
11. Choose a number of different places along the seam line to measure the differences. At each of these locations draw a line through all the size lines as shown.
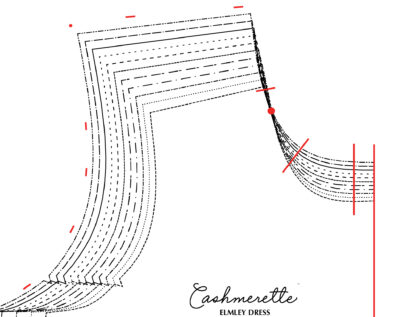
12. At each of the marked locations, measure the distance between the size lines.
13. Mark your new size line the same distance out along the line. Remember that on opposite sides of the cross over point you will be marking in the opposite direction.
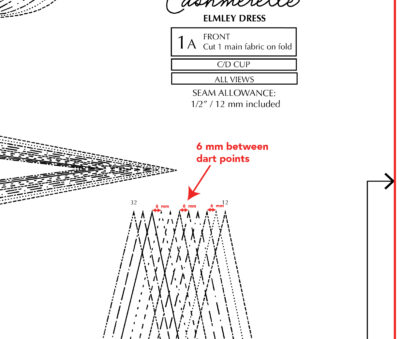
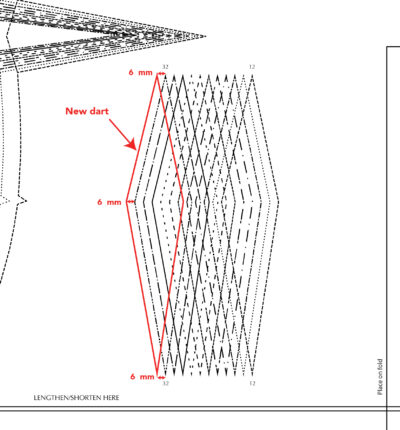
Grading Bust Darts
14. Look closely at the bust dart point. You will see that the dart points move slightly away from the centerline for each increased size.
15. Measure the distance between each dart point and mark a new point the same distance away from the largest size. In this example 6 mm to the left of the largest dart.
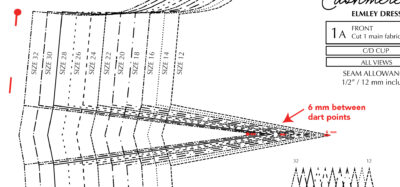
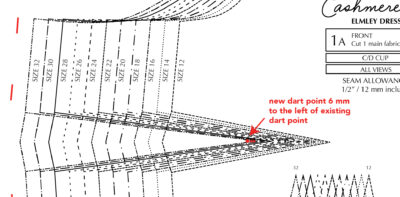
16. We can now draw a line from this new dart point out to the new side seam, through the center of all the existing darts.
17. Measure the width of the existing darts. In this example all the darts are all approximately the same size, 26 mm to the center line.
18. Draw in the new dart side seam the same width as the existing dart. The new dart will be the same distance out from the side seam as the side seam grading (13 mm).
19. Draw new dart legs between the new side seam and the new dart point.

20. Double check that the two darts legs are the same length, if not true the dart as required.
Grading A fisheye dart
21. The fisheye darts in the Elmley dress are the same dimensions for each size, they just move further towards the side seam for each increase in size.
22. Determine how far to move the dart over for our new size by measuring the distance between each dart end.
23. Draw a new dart that is 6 mm further towards the side seam.
Draw your new size line
24. Connect each of your markings either using a straight ruler or a French curve as necessary to create your new size pattern piece.
Mark notches
25. At each notch location on the original pattern, draw a line through each notch marcking and add a new notch in the same location on your new size.
Now that you have finished grading one pattern piece, you can repeat the entire grading section with each of the different pattern pieces.
Partially grading up a pattern
You can use the same methodology in the pervious section to grade only one section of the pattern (e.g. just the waist) rather than grading the entire pattern.
26. Find the location that needs to be graded. In this case at the waist notch, and draw a line through it.
27. Measure the distance between each of the sizes and make a mark that distance out along the line.
28. You can now grade between sizes in the standard way, grading from the lower leg of the bust dart, to the new size at the waist, then back to the original size.
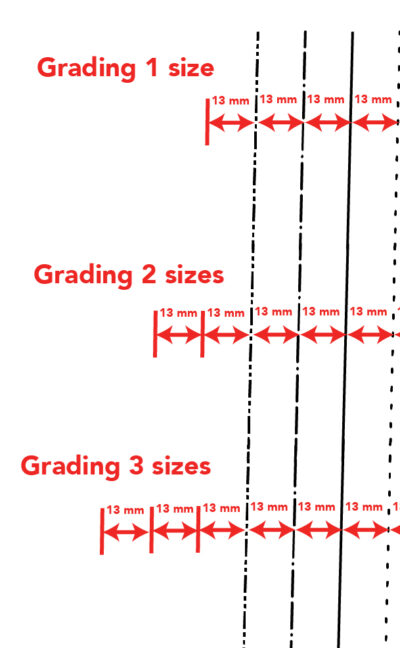
Grading a pattern more than 1 size
In the previous sections we graded the pattern out by one size only. If you need to grade a pattern by 2 or 3 sizes you can follow the same procedure, but at each measurement you would place your new mark either 2 or 3 times times the distance measured.
There is however a limitation to how far you can grade a pattern.
Grading a pattern down
Up until now we have only looked at grading a pattern UP a size, but you can use the exact same principals to grade a pattern DOWN in size.
Follow all the same steps for Grading a pattern, however when you are marking your new size lines you will mark them inside the smallest size line, rather than outside the largest size line.